• Hi Guest!
    You can help ensure that British Car Forum (BCF) continues to provide a great place to engage in the British car hobby! If you find BCF a beneficial community, please consider supporting our efforts with a subscription.

    There are some perks with a member upgrade!
    **Upgrade Now**
    (PS: Subscribers don't see this gawd-aweful banner
Tips
Tips

TR2/3/3A TR3A top frame straps

BJ8Healeys

Jedi Warrior
Country flag
Offline
Hello, Triumph fans -

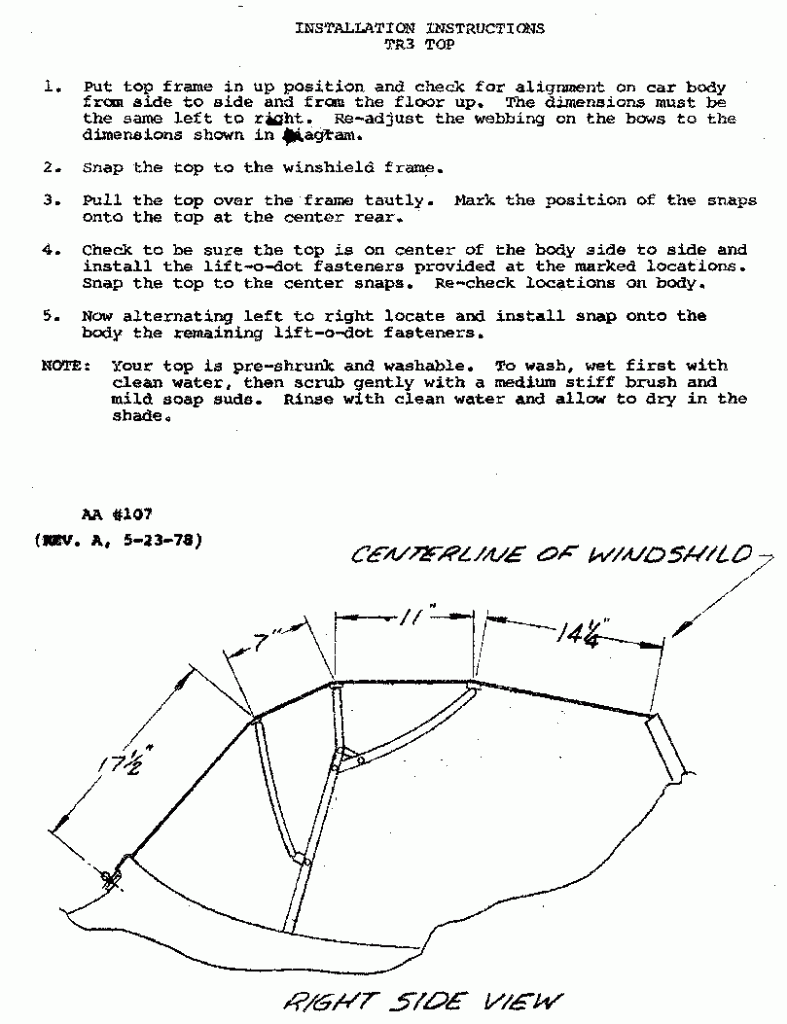
I have refinished and installed the top frame of a friend's TR3A. Now I need to install the two webbing straps. The new straps from Moss are finished on one end by being folded over and sewn, forming a loop. Is this the rear end of the strap?
How do I determine the proper distance from the rear attachment of the straps to the rear bow?

Thanks!
Steve Byers
Havelock, NC
 
I would put the finished end to the rear but (obviously) do not cut the length for awhile yet.

You can erect the top with the rear bow unattached to the straps -- I fact I have mine like that to make it easier to erect the top. I would suggest you leave attaching it for last so you can see where the bow wants to be.

When I did my top I started with a rope from the rear deck looped around the bow to hold them while I did a trial fit, then attached the straps. I left the excess in place awhile (couple of years as it turned out) in case I later needed to make a follow-up adjustment -- but I didn't need to.

This is what came with my Amco Top but I wouldn't take it as gospel -- just a possible starting point for fitment:

top-webbing_zps0a10807d.gif
 
EXACTLY what I was looking for. Thanks a bunch, Geo Hahn! It would be nice if the new tops available now came with similar installation instructions -- or instructions at all! For installing a top on a convertible Austin-Healey 3000, the starting point for the snaps is at the rear. I would have done the same for the TR3A top in the absence of your instructions.
 
Supposedly, the frame bars are supposed to line up with the seams in the top. I've found that the dimensions given above, and others I've seen have not corresponded to the seam location on my particular top. So, see where the bars line up before you commit to attaching the webbing. What I did was secure the webbing at the back leaving the full length of the webbing draped over the bars extended out, but not pushed up into the locked position. Put on the top, and then lock the frame into position. Now you just have to move the frame and rear bar to line up with the seams. I then marked the position of the webbing with some chalk and attached.

I discovered that if you mount and install the webbing at the designed lengths. Sometimes the bars don't line up with the top seams. They are supposed to follow the seams to be a correct fit. So I wait and see where they line up and then install the screws and plates at the aligned lengths
 
Shouldn't the frame be in the locked position and moved to line the bows up with the top seams before beginning to install the Tenax fasteners at the front and the Lift-the-Dot fasteners at the rear? Seems to me the frame is what gives tension to the top as it is installed, and should be in its final location before all the fasteners are installed in a new top.
If I understand the responses from Geo Hahn and Art, the straps should not be attached until the top is installed. What, then holds the frame where it should be for installing the top fabric?

Am I missing something? Also, the Amco instructions provided by Geo Hahn indicate that all the Tenax fasteners should be installed across the windshield before installing the Lift-the-Dot fasteners at the rear. Is there an advantage in doing it this way, rather than alternating from front to rear and side to side while making sure the top stays centered and properly tensioned?

Thanks!
Well I am sorta in the same boat,getting ready to install my top but have not made the first move yet .I think the advantage of installing front /top of windshield snaps first may be that the rear is more forgiving cosmetically to moving the snap fore or aft for tightness adjustment..

I wish some concours guys or original car/top owners could comment on the front flap installation.Previous posts indicate fastening both thicknesses with the snap(too thick?),tucking flap under bow,or just cut off flap.Tom
 
Tom, I have installed the first two (center) Tenax fasteners in the front of the new top. I also found that with the flap folded and placed on the stud first, the Tenax will not grip the stud securely enough not to come off. I thought the problem might be that I haven't made a large enough hole in the flap to clear the hex of the stud but I haven't verified that yet. The new Robbins top came with a diagram that shows the flap and top front edge are supposed to be attached with the same fastener. Obviously, the flap is there to give some protection against water entering the cockpit between the top fabric and windshield seal and I would be hesitant about cutting off the flap, especially since this isn't my car I'm working on.

For what it's worth, I began the installation by locating the centerline of the car and top frame with a line stretched between the front bumper and the boot handle, centering the Triumph badge at the front. I measured the width of the windshield top frame (118 cm, measured along the curve from the top end of one windshield side support to the other) and marked its center, and extended that line down the windshield. Then I marked the center of the top fabric on masking tape by folding it in half along the fore and aft axis, then reversing the fabric so the inside was out and marking the center similarly. After making sure the center marks of the fabric lined up with the car and frame, I installed the first two Tenax fasteners in the center at the front. That's where I am now.
 

Attachments

  • Robbins top.jpg
    Robbins top.jpg
    35 KB · Views: 158
I thought the problem might be that I haven't made a large enough hole in the flap to clear the hex of the stud but I haven't verified that yet.

Thanks Steve,after looking at the Robbins diagram and the post it looks like a min. 3/8 hole is needed in the flap.
Are any of you guys using,or used the special lift the dot punch that's about 60 bucks? Is it worth it? Tom
 
Are any of you guys using,or used the special lift the dot punch that's about 60 bucks? Is it worth it? Tom

I originally started to install my top without the LTD punch. It can be done, but is very fiddly and time consuming. I borrowed the punch from one of the guys in the TR club and it really works well. If I had to do it again without access to a punch, I would buy one. I also had a tonneau to do, so there's another 30 or so LTD holes.
 
My experience is with BJ8 Austin-Healeys, which have only two Lift-the-Dot fasteners for the tonneau cover. I installed those, but wasn't aware that there was a special tool. Does anyone have the tool available for loan to a non-club member?
 
Regarding the flap, I posted some pics a while back on the UK Triumph club forum showing what I needed to do to get the Tenax Fasteners to engage: https://www.tr-register.co.uk/forums/index.php?/topic/38453-tr3a-softop-supply/

Hopefully if the link works you can scroll down and see some closeup pics of the flap. I wound up cutting oval shaped holes in the flap to give enough room for each Tenax receiver to grab the post.

Many years ago the some of the tops came with a premade hole and heat welded surround in that lower flap. This made it very evident of how it was supposed to fit, namely over the stud and under the top with the Tenax fastener. Yes, the flap is there to prevent air/ water from coming in. These holes were about 1/2 inch in diameter. Make them big enough for the Tenax fastener to be able to seat down without hitting any of that flap.

I agree with the previous writer that one should NOT use the given inch demensions to install the straps.
The bows belong in the seam positons under the top. If every manufacturer made the top to exactly the same demensions and you were able to place the rear and front fasteners exactly where the original fitters put them then I am sure that those demensions would work fine. But there are way to many variables for that to work very often.

Charley Fitch
 
Regarding the flap, I posted some pics a while back on the UK Triumph club forum showing what I needed to do to get the Tenax Fasteners to engage: https://www.tr-register.co.uk/forums/index.php?/topic/38453-tr3a-softop-supply/

Hopefully if the link works you can scroll down and see some closeup pics of the flap. I wound up cutting oval shaped holes in the flap to give enough room for each Tenax receiver to grab the post.
Thanks for those great pics.Regarding the punch,i think they are available for about 60 bucks but I wanted to confirm that they actually worked.I think I will order one.Thanks again ,Tom
 
Back
Top