• Hi Guest!
    You can help ensure that British Car Forum (BCF) continues to provide a great place to engage in the British car hobby! If you find BCF a beneficial community, please consider supporting our efforts with a subscription.

    There are some perks with a member upgrade!
    **Upgrade Now**
    (PS: Subscribers don't see this gawd-aweful banner
Tips
Tips

TR2/3/3A TR3A Throttle Shaft Bushings

M_Pied_Lourd

Darth Vader
Country flag
Offline
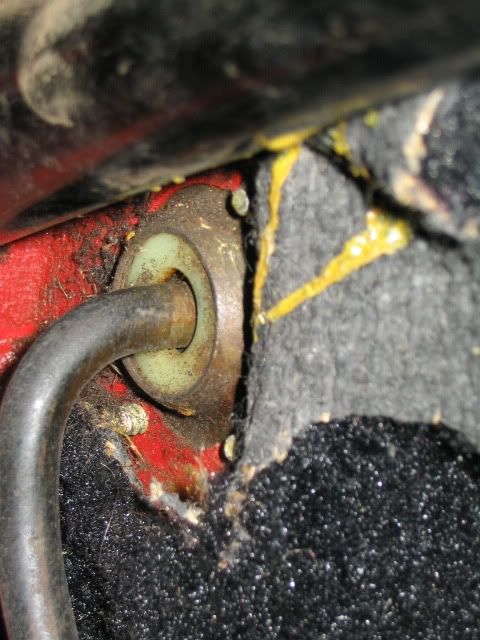
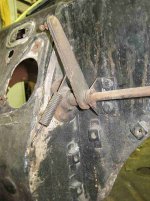
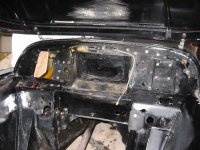
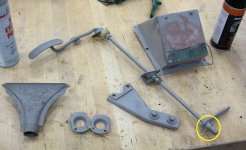
Hi Guys, removed my throttle shaft today (big pain) continuing on getting ready to paint the car.

Can you tell me if this looks right?

P1080936.jpg


P1060679.jpg


P1080939.jpg


Is there supposed to be a plate on the inside bulkhead of the car as well as in the engine bay? Both my plates that sandwich the nylon bearing were on the engine bay side of the car.

Cheers,
M. Pied Lourd
 
M. Pied, here's a pic of mine; nylon side appears to be in the car:

IMG_1445.jpg


Hope that helps.....
 
Nope, both plates go inside the engine compartment. As Kevin's photo shows, one plate protrudes through the panel, but it's mounted from the engine side.

Something else to keep in mind, there were several different designs used over the years. The shafts were different on earlier cars (though AFAIK the bushings & plates were the same).
 
Thanks guys.

Cheers,
M. Pied Lourd
 
Don Elliott said:
Long ago someone sent in this photo.

Ouch Don that hurts! It is really bad when at first I didn't recognize my own car!

Unfortunately I think that same part is in the same place now as it was when I took that picture! I really do need to get moving on this restoration!
 
Consider replacing the pins that hold the arm to the shaft, before reinstalling into the car. I didn't, and when I went adjust the linkage to the carbs after the engine was back in -- SNAP!!! -- the pin broke on the carburetor end of the shaft. Fortunately, I was able to get the arm off the shaft remove the busted pin and reinstall with a new one without having to pull the engine out.
 
Mkutz said:
Consider replacing the pins that hold the arm to the shaft, before reinstalling into the car... I didn't, and when I went adjust the linkage to the carbs after the engine was back in -- SNAP!!! -- the pin broke on the carburetor end of the shaft. Fortunately, I was able to get the arm off the shaft remove the busted pin and reinstall with a new one without having to pull the engine out.

Good advice above.

Heads up - the pins are tapered - try to hammer 'em out the wrong way and you only make 'em tighter. I bought the pins by the way, at my local Ace hardware store - perfect fit. The inner bearing collar can be a bear to slide down the shaft after paint - so avoid powder coating (if you put the bearing on first, the heat phase of the powder coating will melt the bearing.) Some additional pix for the thread.....

73495-l-0.jpg


100048-l-0.jpg


100047-l-0.jpg
 
Hi Luke,

Thanks for the pics. Yes, I can imagine that inner bearing would be a problem after paint. That was the hardest part for me to get off the shaft as the rod had been painted pretty heavily after it was installed it looks like. I ended up stripping the paint off the shaft and then had to coat the shaft with WD40 to help that bearing slide off (that and a BFH and vice grips).

I only had one "mills pin" to drive out. This was on the shaft closest to the pedal. The other two at the other end of the shaft had been replaced with a cotter pin and a fairly large hex head set screw (shaft had been drilled bigger).

So, I am wondering now, how to I paint the parts such as you did and then slide that inner bearing down on the shaft without stripping the paint? I was thinking that I might have to paint this on the car.....

A couple of pics

Mills pin being punched out...

P1080922.jpg


Set Screw instead of the mills pin on the other side

P1060677.jpg


Cheers,
David

Cheers,
David
 
M_Pied_Lourd said:
The other two at the other end of the shaft had been replaced with a cotter pin and a fairly large hex head set screw (shaft had been drilled bigger).

Cotter pin... Mine had been replaced with a nail.
 

Attachments

  • 24115.jpg
    24115.jpg
    65.9 KB · Views: 234
M_Pied_Lourd said:
.......So, I am wondering now, how to I paint the parts such as you did and then slide that inner bearing down on the shaft without stripping the paint? I was thinking that I might have to paint this on the car.....
The only way to do it is to slide the bushing on, slide the collar on, mask the bushing, and then paint. I was able to slide the collar after priming, and then put on the finish coats. I am pretty sure it would not be possible to slide the collar on after painting.


TexasKnucklehead said:
... Mine had been replaced with a nail.
I would definitely swap that out. The pin is hardeneed. Note earlier posting about the pin breaking.
 
At the risk of getting flamed... what is terrible about just cutting the nylon bush at the top? It's not exposed to full radial wear anyway and it's captured in a metal cover. Cut it, spread it a bit, and slide it to where ever. Just a thought, haven't tried it.

Oh, and what about clevis clips in stead of roll pins or grub screws or nails? Clearance problem? They are hard shear resistant steel and you can easily remove them if you need to...
 
AEW,

It is not the nylon bushing that I am concerned about. It is the metal collar on the throttle shaft that fits into the bushing on the drivers side bulkhead. This collar slides on the shaft from the opposite end after the shaft and pedal are and nylon bushing/keepers are in place.

Cheers,
David
 
AEW said:
At the risk of getting flamed... what is terrible about just cutting the nylon bush at the top?
I could be mistaken, but I don't believe that is the part they are having trouble sliding into place. On the later assemblies, the piece that rides inside the nylon bushing is a shaped collar (aka inner bearing) that gets slid the length of the shaft. I've zoomed in on luke44's photo above to illustrate.

<div class="ubbcode-block"><div class="ubbcode-header">Quote:]Oh, and what about clevis clips in stead of roll pins or grub screws or nails? [/QUOTE]

The joints need to be locked tightly IMO. Otherwise the pin working in the hole will quickly waddle it out, as well as causing irritating (to me anyway) slop in the throttle linkage. The ones on the 56 were already damaged from the DPO substituting bolts, so I reamed the holes back to round and installed split spring pins. Not sure if they will be strong enough in the long run, but so far they seem to be working well. Because the diameter is so small, there is actually a good deal of force on those joints when you stomp the throttle.
 

Attachments

  • 24117.jpg
    24117.jpg
    27.1 KB · Views: 206
AEW said:
At the risk of getting flamed... what is terrible about just cutting the nylon bush at the top? It's not exposed to full radial wear anyway and it's captured in a metal cover. Cut it, spread it a bit, and slide it to where ever... Just a thought, haven't tried it.

Oh, and what about clevis clips in stead of roll pins or grub screws or nails? Clearance problem? They are hard shear resistant steel and you can easily remove them if you need to...

Not a dumb question at all. But, the bushing is hard - it won't spread at all - so you would have to cut a chunk out the same width as the shaft itself - I'm sure during use the shaft would ride up in the groove and then start to stress things unevenly and it would only be a matter of time before the shaft would bend....

As for the pins, the originals aren't roll pins, although I suppose they would work if the size was right. A grub screw could also work I suppose, but the original holes aren't threaded - this would be a lot of machine work and I'm not sure about available sizes. The pins need to be a very tight fit and be hardened. A small bit of play here means huge slop in the operation of the throttle mechanism. As I noted earlier, off the shelf tapered pins that fit are available at Ace Hardware. Be sure to measure the old pins with a micrometer.
 
Back
Top