
-
 Hey Guest!
British Car Forum has been supporting enthusiasts for over 25 years by providing a great place to share our love for British cars. You can support our efforts by upgrading your membership for less than the dues of most car clubs. There are some perks with a member upgrade!**Upgrade Now**
(PS: Upgraded members don't see this banner, nor will you see the Google ads that appear on the site.)

Tips
- We have a special forum called "Member Articles" where you can submit actual articles for consideration for publication. Learn More
- Don't have an Avatar? If not, your avatar will default to the 1st character in your username. Go into "Account Details" to change your Avatar.
- Some basic forum navigation info: click
 Hey - did you know if you click on the title of a thread it will take you to the first unread post since you last visited that thread?
- Hey Guest - Is your British Car Club in our Clubs database? If not, send me a PM - Basil

- Looking for a local club? Click the "Clubs" tab above and browse hundreds of clubs world-wide.
- Add Android or iPhone APP: click
- Did you know - any picture or video you add in your posts in any marque-specific forum will also get added to the Media Gallery automatically.
- A few more tips about posting and replying: click
- Hey there Guest - be sure to keep your profile page up to date with interesting info about yourself: learn more
- More tips and tricks on Posting and Replying: click
 but were afraid to ask:
  STOP!! Never post your email address in open forums. Bots can "harvest" your email! If you must share your email use a Private Message or use the
  smilie in place of the real @
- Want to mention another member in a post & get their attention? WATCH THIS

- So, you created a "Group" here at BCF and would like to invite other members to join? Watch this!
- Hey Guest - A post a day keeps Basil from visiting you in the small hours and putting a bat up your nightdress!
- Hey Guest - do you know of an upcoming British car event?
 Pretty Please - add it to our Events forum(s) and add to the calendar! >> Here's How <<
- Hey Guest - you be stylin' Change the look and feel of the forum to fit your taste. Check it out
- If you run across an inappropriate post, for example a post that breaks our rules or looks like it might be spam, you can report the post to the moderators: Learn More
- If you would like to try some different "looks" or styles for the site, scroll to the very bottom, on the left and click the Style Selector.
You are using an out of date browser. It may not display this or other websites correctly.
You should upgrade or use an alternative browser.
You should upgrade or use an alternative browser.
TR2/3/3A TR3A Steering Worm - Can this be Restored?
- Thread starter angelfj1
- Start date

TR3driver
Great Pumpkin - R.I.P
Offline
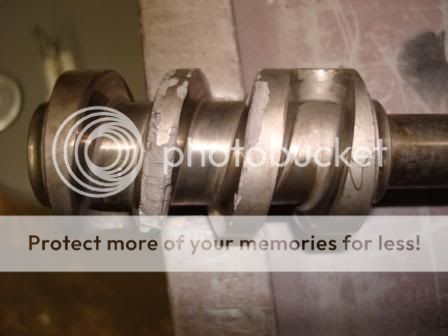
Frank, I can't quite see enough of the critical surfaces. The important parts are the tapered sides of the groove, which is where the peg rides; and the bearing races on the ends. The damage to the outside diameter, and the bottom of the grooves, is irrelevant.
But from what I can see, mine looks worse than yours does, where it counts. I've got some other used ones, but they have bad shafts, and I decided to try the one I had rather than experiment with how to move the worm from shaft to shaft. Seemed to work out very well, except I had some residual looseness on-center. The tight spot that you are supposed to look for when adjusting the top cover has turned into two tight spots on my worm, due to wear in the center.
I don't know of any effective way to repair an existing worm. Maybe, with enough tools and setup, you could manage to regrind the groove after building it up with weld, and then harden it again, but it sure wouldn't be easy to duplicate the shape of the original groove (which is kind of important).
AweMan
Jedi Knight
Offline
No doubt in my mind I could build up that worm gear with weld. I may even be able to hand grind it CLOSE to its original shape, the question is, is CLOSE good enough? I doubt it!
Machining would be the probelm. Tooling and setup time is what makes it expensive to have machine work done.
It may be time for rack and pinion for you. Unless you want Concourse look at the options.
Machining would be the probelm. Tooling and setup time is what makes it expensive to have machine work done.
It may be time for rack and pinion for you. Unless you want Concourse look at the options.
TR3driver
Great Pumpkin - R.I.P
Offline
I'm not sure what else to say, Frank.TR3driver said:The important parts are the tapered sides of the groove, which is where the peg rides; and the bearing races on the ends.
TexasKnucklehead
Jedi Knight
Offline
This has come up before. I have several boxes and have been able to remove the worms with a normal 3 jaw puller and the right sized shoulder bolt and pulling collar. It seems new worms can be 'pressed' back on if heated in an oven for a bit, then 'punched' to stay on. I did have to file the end of one of the shafts a little to get the worm to pull off. -I haven't tried replacing a worm yet.
https://www.british-cars.co.uk/cgi-bin/ge...040718222414282
Don't know if this helps, but it's where I'm headed...
https://www.british-cars.co.uk/cgi-bin/ge...040718222414282
Don't know if this helps, but it's where I'm headed...
TR3driver
Great Pumpkin - R.I.P
Offline
Thanks for the explanation and photo, Jerry. I'll save that for moral support when the topic comes up again for me. But so far I've not felt the need to dig that deep into TS13571L.
Went to the DMV to try to get some papers for it today, they were surprisingly agreeable. Apparently I'm even going to get to keep the black plates!
Went to the DMV to try to get some papers for it today, they were surprisingly agreeable. Apparently I'm even going to get to keep the black plates!
Hi Anglefi I fixed one like that once by putting it on a Crankshaft grinding lath and using different emery paper. It came out good but it always made me nerves. The material was so hard that some of it came off in chips and flakes, but mostly just grinding sparks. My mechanistic friend who owned the lath felt the same as Randle that the critical places are actually in V groove and told me not to worry. However, I had to really work on him to even try and do the repair. The idea was kinda abstract, but he was able to chuck it up, and he commented on how hard the metal was. My concern is that the adjusting screw rides on the top of the groove, but I can get over concerned sometime. I used it just the same for now because I figured a beat up old one was better than a cheap third world one. I have had too many experiences with inferior quality. Now that I have seen the picture form TexasN, I will have to try that and perhaps rebuild mine. How difficult was it to get lose TexN?
TR3driver
Great Pumpkin - R.I.P
Offline
Actually, the adjusting screw rides on the top of the rocker shaft, which in turn pushes the tapered peg into the tapered groove. There should be no contact at all to the top or bottom of the worm 'threads', which is how they get so cruddy looking. The wear marks visible in the bottom of Frank's groove are from a badly worn peg, or worm, or both. If it still touches bottom after rebuilding, you should probably grind a bit off the tip of the peg.sp53 said:My concern is that the adjusting screw rides on the top of the groove,
The groove is actually a rather complex shape, although not obvious to the naked eye, neither the width nor the pitch is constant. And as noted, it's very hard. I wouldn't be surprised if it's case-hardened, on top of being a high tensile alloy.
Only way I can see to machine the groove would be a toolpost grinder, combined with a second worm to use as a pattern. You'd need a shaft to mount both worms concentrically, and a dial indicator to ride on one worm while the grinder cuts the other one, a few degrees at a time. Even then, it's going to be tough to get the shape just right, and any mistake will show up as a hard spot when turning.
martx-5
Yoda
Offline
TR3driver said:... And as noted, it's very hard. I wouldn't be surprised if it's case-hardened, on top of being a high tensile alloy.
Case hardening is just a surface hardending. The way that worm has pieces broken from it, it looks to be a tool steel (carbon, alloy) that was hardened and then tempered to a Rockwell C of 55-60. I do some hardening of parts at work (non-critical stuff), and that is the result I see when an item breaks that has a Rockwell C of 55+. Incredible wear resistance, but brittle...sorta like glass.
We have some machines at work that have wearing parts in them that were made <span style="font-weight: bold">too hard</span> and they break too easily. They all had high Rockwells. I now have them made to a Rockwell C 45-47. It stops the breakage but wear resistance is less. However, I get better longevity at the lower hardness.
This is not to say that the worm should be of a lower hardness, as in this application, it should be very hard, but that is how very hard steel acts...it breaks and chips like glass.
OP
angelfj1
Yoda
Offline
I want to thank all of you because this has been an
education for me. Also, within only hours of my original
posting I got offers from three forum members for good
used worms for a very reasonable price.
The success I have made with my project would
not have been possible without this forum.
fja
education for me. Also, within only hours of my original
posting I got offers from three forum members for good
used worms for a very reasonable price.
The success I have made with my project would
not have been possible without this forum.
fja
TexasKnucklehead
Jedi Knight
Offline
I worked in a steel working plant in Pa for a while to put myself through school. We had several over 1,000 ton presses with die blades to cut and punch through 1/4" cold rolled steel. These blades, though small, were very heavy, and hard. But if you dropped one, it would shatter like glass. I thought there was some "grain" to the way they were hardned. The worm gears reminded me of that hardness and weight/size. If you notice, the damage is always at the bottom of the worm. My guess is that rust and debris ends up at the bottom of a dry box and the worm/peg is forced to cut it when the wheel is turned. The top of the worm takes the abuse and chips off.
I think I ruined mine when we pushed the car onto the trailer. Since the car had been under 20' of salt water a year earlier, the inside of the steering shaft filled with rust that ended up in the bottom of the box to be ground up.
Also if you look at the picture Frank posted, you can barely make out the begining of the date code stamped onto the worm. That should be the week and year it was made. It doesn't matter, but I think it's cool to see if it matches everything else on the car.
I'm going to echo here, but I learned most of what I know about these cars through this forum. I want to thank everyone as well. Someday my 58,59,?? TR3 will run again because of you all.
Jerry