• Hi Guest!
    You can help ensure that British Car Forum (BCF) continues to provide a great place to engage in the British car hobby! If you find BCF a beneficial community, please consider supporting our efforts with a subscription.

    There are some perks with a member upgrade!
    **Upgrade Now**
    (PS: Subscribers don't see this gawd-aweful banner
Tips
Tips

TR2/3/3A TR3A seat rails from Moss

NutmegCT

Great Pumpkin
Bronze
Offline
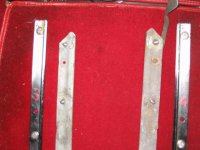
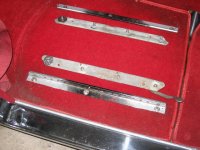
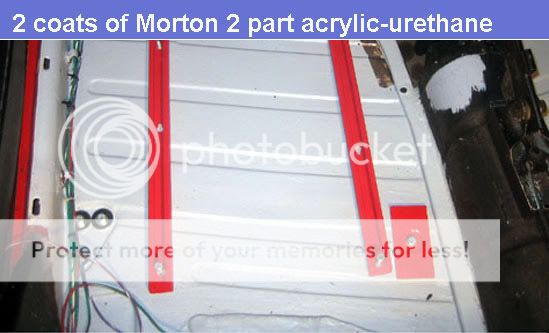
When I pulled the seats to work on my floorpans, I noticed the seat rails had "seen better days". Each seat base held on by two or three out of the eight studs (many studs broken off), slide release mechanism bent, jammed and corroded, rails held onto floor by various and sundry miscellaneous size nuts, bolts, and screws. Folding seat was on driver side, etc.

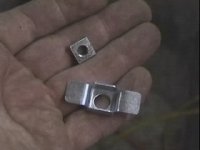
For the floor mounts on each of the two seat rails, only two fasteners were the same type/size - the two screws on the driver driveshaft side going into "permanent" bases on the underside. All other rail fasteners were a hodgepodge of different size nuts and bolts. I don't know how they are *supposed* to be fastened.

So I ordered the l/r seat rail sets from Moss. 801-400 and 801-405.

Do the new rails come with needed hardware? nuts for the seat studs? nuts/bolts for the floorpan mounts?

Thanks.
Tom
 
Tom - You could wait till the package arrives or give Moss a call to find out. I painted numbers 1 through 4 on my rails so that when I take them out for any reason, I know exactly where they should go back.
 

Attachments

  • 5850-SeatTracksTop.JPG
    5850-SeatTracksTop.JPG
    39 KB · Views: 485
  • 5851-SeatTracksApart.JPG
    5851-SeatTracksApart.JPG
    52.8 KB · Views: 675
Tom,

Better give them a call. When I replaced the seat rails
on my TR6 I had to order a special package that contained
all the correct mounting bolts, spacers, etc.

It was well worth the few $$ they cost.

I also fabricated a second set of rails to raise the height
of my seat about 1 inch and to give it almost 2 inches more
back/forth slide movement. I used 1 inch c-channel and the
existing frame holes. I can now see over the steering wheel
when I drive.

d

mortonseats2.jpg
 
Thanks guys. You can see the condition of my old rails in the picture below. Note that most of the mount studs are broken off.

How are your seat rails are fastened to the floor? Screws? Nuts with bolts? Bolts going into permanent nuts mounted under the floor?

Thanks.
Tom
 
Tom,

Mine are bolts going into threaded holes under the floor
panels. I think either welded nuts or threaded holes in the
frame members.

d
 
Tom,

Mine are bolted through the floor with bolts, washers, lockwashers and nuts. The seat pans have holes that the studs of the seat sliders go through and then I used nylocs on top of the pans. When I replaced my interior, I mounted the bottom rails directly to the floorpan instead of on top of the carpet. I made paper templates then slit the carpet to fit around the rails so I can take put the carpet if it gets wet. Caveat: Doing it this way makes it much harder to adjust the seat track. I might add nylon spacers between the bottom rails and the floor to raise it up 1/4" or so.


I think most mount the bottom rails directly through the carpet.

-PK
 
Tom,

I agree 100% with Peter-

Take the extra time to cut out slots in your carpet
for the seat rails. Don't fasten the rails thru the carpet.

I used velcrow strips to fasten the narrow pieces of
carpet to the floor pan. With my added height seat rails,
I have no binding problems and my seat moves smoothly.

d
 
Look at my photos above. I bolt the rails through the carpets as shown. If you cut the carpet away for the rails, the rails will sit lower and you won't have enough clearance to easily slide the seats back and forth on the tracks. They will be wedged by the carpet.

BTW, I have 3/8" thick felt underlay below the carpets.

There are captive boxes under the floor fans. When I did my restoration from 1987 to 1990, I put in new floor pans. But I removed the square nuts in ALL the captive boxes and replaced them with new 1/4 28 UNF square stainless nuts that I had made by a machine shop. In the photo, you can see the heads of the stainless bolts and washers holding the rails down.
 
Good news is that if the hardware is not included it is easy to find at Ace.

I also use slits in the carpet but with a spacer under the rails to raise them up.

Those old rails with broken studs can be repaired. I drilled out a couple of broken studs and replaced them with flat-head (counter-sunk style) bolts of correct thread. JBWeld was enough to secure the bolt though real welds would be better. I had to grind down the head of the bolts to clear the other half of the track when sliding the rails.

Use anti-seize on all threads when you install the new rails.
 
Thanks all. The rails should arrive Monday, so the coming week will be interesting.

I think I've read in a couple places that the original TRs came with rubber mats but no carpeting. Is this right? If so, was the interior just painted steel with rubber on the floor? Was carpet something added later?

Tom
 
The carpet was under the seats and all the way to the back. There was a 1/4" thick tan jute felt under the carpets and the rails were bolted in like mine above. The rubber mats were in the footwell from the front of the seats (front of the carpets) all the way to the front of the floor and then they sloped about 12" up the firewall. The earlier cars had round snaps centrally located to help hold them up there and the later TRs had two clips for each side to hold the tops of the rubber floor mats up there.

I still have remnants of all my original rubber floor mats etc. stored somewhere in boxes.

Don Elliott, Original Owner, 1958 TR3A
 

Attachments

  • 5869-RedInteriorNew.jpg
    5869-RedInteriorNew.jpg
    41.9 KB · Views: 458
TRF used to sell the original style rubber mat floor covering for the footwell area, perhaps they still do.

Really makes sense from a practical standpoint as that is the area most likely to get wet.
 
NutmegCT said:
Do the new rails come with needed hardware? nuts for the seat studs? nuts/bolts for the floorpan mounts?

Nope. Come with nothing but the welded-in studs. You'll need to add bolts for the floor pans (which are supposed to have captive nuts); and nuts for the studs.

If you're going to keep your TR3A, I'd suggest buying a box of each from a hardware store/outlet. They are MUCH cheaper in bulk, and you'll use them eventually. Even McMaster-Carr (which isn't the cheapest source) will sell you a box of 100 1/4-28 nylon insert locknuts (aka Nyloc nuts) for about $.04 each.
https://www.mcmaster.com/
 
Tom, beware that you may well encounter some striped nuts in your floorpan. If this is the case and your floorpans are ok for you for now (or forever), then don't be afraid to drill out the threads from the top just enough to go to the next size up bolt. I think you are dealing with 1/4" bolts or maybe even 3/8". Just go to the next size, staying with SAE fine thread, and tap new threads and use larger bolts. There is just enough meat in the welded nuts to pull this trick off. If one needs it, then do them all. The four welded-to-the-frame-bracket nuts that hold my center console support were all stripped. Changing these nuts was a potential nightmare. Just tapped them with larger and have a perfect end result.
 
Don: "The carpet was under the seats and all the way to the back. There was a 1/4" thick tan jute felt under the carpets and the rails were bolted in like mine above. The rubber mats were in the footwell from the front of the seats (front of the carpets) all the way to the front of the floor and then they sloped about 12" up the firewall. The earlier cars had round snaps centrally located to help hold them up there and the later TRs had two clips for each side to hold the tops of the rubber floor mats up there."

That's exactly what I've got in mine. The rubber mats (obviously only a few years old) are held up by the metal clips. Same jute padding under the carpets (altho' mine is closer to 1/2 inch thick), and the carpets lie just as you describe. By the way, the interior of your car is beautiful. Absolutely excellent. My shifter seems to be a completely replacement, as the boot, threaded stick, and knob are very different.

Randall - is there a "list" of the sizes of nuts and bolts and washers, etc., I should buy in bulk? What you say certainly makes sense, but buying 100 of a bolt that I'll only need two or three of (for example) could get a bit pricey.

Bill - I never even thought of tapping new threads. I had just figured that most of the attached nuts were missing, as the seat rails were all attached using separate bolts with nuts and washers. Those bolts slide easily through the hole, so maybe the attached nuts are actually still there.

Tom
 
Tom,

The nuts under the floor pans are inside a steel cage that is spot welded to the underside of the floor pan. The nut floats (sits) inside the square cage. The nuts are only held in place by the square cage so that the nut doesn't spin while tightening or loosening the nut. Unfortunately the 1/4"- 28 bolt and nut would rust as one and the nut turns in the cage. We are talking about nuts that are square with a 1/4" - 28 thread. After spraying a half can of PB Blaster and applying map gas to the cage and nut the bolt may start to come out. Most broke off inside the square nut or spun indide the cage. Sometimes you can hold the nuts in place by grabbing hold of the outside of the cage with an adjustable cresent wrench or vice grips to keep the nut inside the cage from turning and breaking off. If the bolt breaks off in the nut sometimes you can lift one side of the cage that isn't spot welded with a screw driver and remove the nut. Sometimes the cage snaps right off and you have these nice little sharp tabs left in place to cut your hands everytime you reach under there. You may see the remnant tabs of your cages welded to the underside of the floor pans if they weren't ground down and off. The outer fenders also use this fastening method as well as any other place you can think of where a wrench can't fit! If it didn't rust you could change these parts out very quickly. Until you change out the floor pans just use some 3/4 or 1 inch - 1/4"-28 flat headed machine screws single slot to hold the rails in place. You need a low profile machine screw or bolt here. If you use a regular 1/4"-28 bolt the head of the bolt may interfere with the slider. I have some of these screws if you cannot find any. Make sure you use large enough flat washers and then lockwashers so the nut does not pull through the floor pan. 3/4 and 1 inch long 1/4" - 28 bolts, 1/4"-28 square nuts, 1/4" flatwashers and lockwashers are good to have on hand if you're taking body panels off
 
Here is what they look like before you weld on all 110 captive boxes used on a sidescreen TR.
 

Attachments

  • 5876-CaptiveBox.jpg
    5876-CaptiveBox.jpg
    10.1 KB · Views: 408
NutmegCT said:
Randall - is there a "list" of the sizes of nuts and bolts and washers, etc., I should buy in bulk?
I don't know of a published list anywhere. Probably the 3/4" long 1/4" NF hex-head bolts are the only ones worth buying a box of for just one TR3. (Although I've bought boxes of many other sizes.) I'd also suggest a box each of 1/4", 5/16" and 3/8" NF Nylocs. Nylocs lose holding power every time they are installed, so I recommend replacing them every time for critical places like the front suspension. Seat bolts are less critical, so you can reuse them here 4 or 5 times.
 
NutmegCT said:
is there a "list" of the sizes of nuts and bolts and washers, etc., I should buy in bulk? What you say certainly makes sense, but buying 100 of a bolt that I'll only need two or three of (for example) could get a bit pricey.

Tom,
You could order one of the hardware kits from Macy's Garage and then have the parts for future jobs as well. I have not used them, but recently learned of their site.

I am awaiting UPS bringing the new aircleaners and a couple of other bits to me today as well. Probably won't arrive until I am gone golfing this afternoon. Guess tomorrow I start tinkering again.
 
Back
Top