• Hey Guest!
    British Car Forum has been supporting enthusiasts for over 25 years by providing a great place to share our love for British cars. You can support our efforts by upgrading your membership for less than the dues of most car clubs. There are some perks with a member upgrade!

    **Upgrade Now**
    (PS: Upgraded members don't see this banner, nor will you see the Google ads that appear on the site.)
Tips
Tips

TR2/3/3A TR3A Rear Seat Questions

CraigLandrum

Jedi Hopeful
Offline
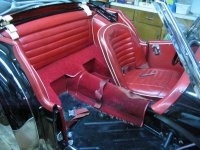
I'm just about done with recovering all of my interior panels and seats, dash, etc, but have reached a roadblock on the rear seat. My car's rear seat (1959, TS 43071) was missing when I got it and I don't have access to a good example of one of my vintage. I have the "back" (gas tank cover) panel of the seat, but could find absolutely zero pics online of the rear cushion portion of the seat of a TR3A. I guess since you can't really sit in it, nobody cares to take a picture of it :smile:

What I'm looking for is for a kind soul that has a pre-60000 TR3A with a back seat to post a few pics of it. Any info on how that sucker is mounted would be great. A measurement of the seat bottom from front to the back taken from the middle of the seat would be very helpful, along with a pic of where the sides but up against the wheelwells. From that, I should be able to guesstimate the rest of the measurements. From the single picture I've seen in the restoration book, the seat has a slightly curved front and is (perhaps) held up by two posts attached to the floor, but have no clue how or if it is attached in the back. A pic of the supports would be nice. From the pics and measurements, I'll cut out some plywood and foam and sew the cover and piping for it using the same vinyl I used on the seats and other panels. I'll then fab up some supports.

Any help or guidance appreciated.

My son and I are finished with the body work and will be painting in a week!
 
The rear set was an option. Most cars did not have it. Here is a picture of them from The Roadster Factory mini catalogue. The one with the brackets fit from 22013-60000.

Sorry I can't provide anymore info. You guys are moving along at a pretty good clip. Post some pics after the paint job.
 
Craig - When I was 20 years old, I had saved up enough money to buy my first car. I bought my 1958 TR3A (TS 27489 LO) brand new here in Montreal from one of the four S-T dealers. I paid cash. I had worked at Pratt & Whitney in the shop and then in Tool Design for 3 years after graduating from high school. I told the dealer what I wanted and what I didn't want. I wanted an overdrive but to keep the total price down,I told him I didn't want a rear seat, wire wheels or white wall tires. So with tax and the plate, it came to a total of $2616.00.

On the carpet in the rear floor area, there were two holes and two rectangular areas the size of postage stamps where the carpet had been flattened where the feet of the supports had been attached to the two captive nuts located under the rear floor pans. The TR had been assembled with the rear seat and the dealer had removed it. I never found out how it had been attached along the back panel but I assume there were tabs on the rear of the seat which were screwed with sheet-metal screws up under the bottom edge of the rear seat panel.

I never missed the rear seat. I always carried two cushions (more like pillows) in the rear. If I had a third person, that person would sit on the cushions on one side and his/her feet would go into the other side.

I have never lost a point at any TRA or VTR concours for this in the last 17 years because the seat was available as an option and I don't suggest you need it. In fact you don't want it, especially if your son is younger than 20 years old and he might be the occasional third person.
 

Attachments

  • 12421.jpg
    12421.jpg
    64.1 KB · Views: 327
My '58 came with one when we purchased it. I took it out and sold it on ebay since it's worthless and takes up space. Sometimes I wish I had a flat horizontal space to hold things but if and when I get the urge, I'll make up a carpeted shelf.

BTW, the seat mounted with a pair Z-shaped bent metal brackets the bolted through the rear shelf.
 
If memory serves, there are captive nuts in the vertical sections to the left and right of the propshaft tunnel. The brackets are one piece, that fasten to those nuts, then rise straight up to support the seat bottom several inches in front of it's rear edge, then run forward to about 1 inch from the front edge. Then straight down, and turn for the 'foot' shown in the TRF reference, which bolts through the floor pan to another captive nut. At least on my car, there was no fastening between the bottom and the back at the rear edge, the bottom was located only by the brackets.

For TS39781LO, which came to me with no bottom, I made one from 3/4" plywood and bent flat iron for the brackets. Never did get around to upholstering it, as the painted plywood seemed to work out better for us. Mostly for carrying a small cooler with cold drinks on longer trips; but also the dog enjoyed riding there and her claws would have been hard on upholstery. The space under the seat also works to hide small items like sunblock, "wet wipes", etc.

A friend of mine has taken that concept farther, and made a lockable "foot locker" out of that space that looks really handy. His seat bottom is hinged at the rear and lifts up (once the hasps are undone).
 
Craig, I have an occasional seat that you can use for a pattern. I'm sorry I can't give it to you, but I am open to offers for it.

Rob can pick it up or I can make a road trip to Virginia. I also have that millboard (I think you call it a gas tank cover) you can have fer nuttin.
 
TR3driver said:
If memory serves, there are captive nuts in the vertical sections to the left and right of the propshaft tunnel. The brackets are one piece, that fasten to those nuts, then rise straight up to support the seat bottom...

That's my recollection too... I would add that on mine there were what I think are called 'T-Nuts' in the plywood that were used to secure the top of those brackets.

I made a new plywood bottom but instead of using the old one as a pattern I used the upholstery as my guide as they seemed to differ slightly. Oops, I just recalled you are making your own upholstery so, unless you have an old rear seat cover, that approach won't work.
 
George: Yes, there are T-nuts pressed into the plywood. Here are some photos that were taken with an early 1-mega pixel Sony Mavica. Crude by todays standards.

Craig:I Have a few more photos that I will email to you.

Good Luck

FJA

MVC-655S.jpg

MVC-444S.jpg

MVC-670S.jpg

MVC-678S.jpg

PictureFromNikon995060.jpg
 
Angelfj - thanks so much for the pics - so THATs what those bolts in the vertical sections back there are for! The mounting looks fairly straightforward, the plywood looks easy enough, and the pleats and general pattern of the upholstery closely match that of the front seats, which I've already sewn, so this should be doable. I'll talk my son into doing the brackets :smile:

Twosheds - My son and I will try and arrange a quick trip up to see you at your convenience.

Thanks to all for your help and suggestions!
 
Geo Hahn said:
I made a new plywood bottom but instead of using the old one as a pattern I used the upholstery as my guide as they seemed to differ slightly.

PeterK said:
A pre TS60000 TR such as yours would have the rounded front as shown. Later...the seat shape is more rectangular.

Now I see why my upholstery & plywood didn't match. As Poirot would say, "The mystery, she is sol-ved".
 
Craig,

If you are in Chantilly come by and see the seat and brackets on my 58. You are free to take it out and take measurements.

Phil
 
Back
Top