• Hi Guest!
    If you appreciate British Car Forum and our 25 years of supporting British car enthusiasts with technical and anicdotal information, collected from our thousands of great members, please support us with a low-cost subscription. You can become a supporting member for less than the dues of most car clubs.

    There are some perks with a member upgrade!
    **Upgrade Now**
    (PS: Subscribers don't see this gawd-aweful banner
Tips
Tips

TR2/3/3A TR3a rear Diff seal

tinman58

Jedi Knight
Country flag
Offline
I thought that the gasket was leaking on my diff. Cleaned it up and saw no leakage from the seam . Pulled the plug to drain the diff. and not much oil came out. I refilled it and put sealant on the threads. After a short while there was gear oil dripping from the front seal, (not alot) but enough. Is it a easy job to replace or going to be a pain in the Butt?
 
Aloha,

It is not that difficult and can be done under the car. The drive shaft can be disconnect at the rear flange and held out of the way with some wire or cord. A impact wrench is helpful in removing the input flange nut(don't forget to remove the cotter pin first). You might want to make some marks on the flange, differential and drive shaft so you can reassemble everthing the way it was oriented before. A seal puller or large screw driver can be used to pry out yhe old seal. Examine the input flange for any wear where the seal makes contact with it. If a groove has been worn into it a speedi-sleeve will provide a smooth new surface for the replacement seal. As the seal is formed on the flange and the input shaft has not been removed, no need to worry about shims, etc. Reassmbly is straight forward. A lift makes the job easier, but jacks stands will do.

Good luck.
 
I did mine a few months ago, it wasn't bad at all.

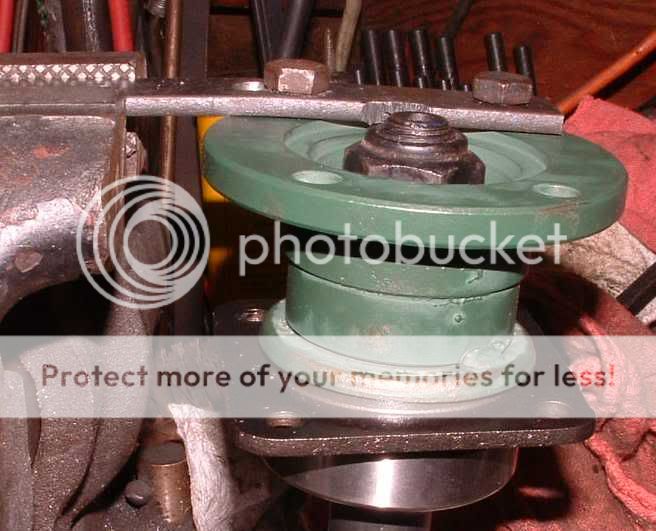
Put the car on stands fairly high (need room to swing a breaker bar and torque wrench), disconnect the driveshaft from the diff and find something to prop it up out of the way. I used my custom-made tool (in reality just a chunk of flat iron from Home Depot with some holes & a little grinding) to hold the flange while undoing the nut (shown here holding a Stag side flange)

DSCF0002_crop.jpg


Tap the flange off with a brass hammer, pry out the old seal with a big screwdriver (being careful not to gouge the bore), then tap the new seal into place.

You'll want to clean and inspect the sealing surface of the flange. If you can feel the notch with a fingernail, then it definitely needs a Speedi-sleeve. After having a similar joint leak anyway, my current standard is that if I can't polish the mark away with some crocus cloth, sleeve it anyway. Fortunately mine did polish up, so I didn't bother with a sleeve.

Smear the surface with grease, tap the flange back into place, torque the nut to 85-100 ftlb (so the slot lines up with the hole), and insert a new pin.

If you still use Nylocs on the flange bolts, I'd suggest replacing them. I use metal-to-metal equivalents since the Nylocs on my TR3A seemed to back off on their own even when new (probably because the shaft was out of balance).
 
MGTF1250Dave said:
A impact wrench is helpful in removing the input flange nut
Just my opinion of course, but I have had bearing failures that were pretty clearly linked to using an impact wrench on their shaft. I don't do that any more.
 
Dan,

You can also have a helper apply the brakes to assist in removing the castle nut, as well as when you torque it during reassembly

NAPA carries speedi-sleeves. I purchased one from Moss as the NAPA warehouse here did not have the correct size

Ron
 
I remember having a hard time prying the seal out. I had to buy a seal puller, but even then it was difficult. Still, overall only a 3 out of 10 on the difficulty scale.
 
I've done 2 TRs and a Healey with the Harbor Freight seal puller - easy peasy - though some have had better luck with the screw & slide hammer or big screwdriver.

Much easier if you can get the car on a lift. Our local club has 'lift days' twice a year for tasks like this. Big turnout, social occasion, some work gets done, mistakes get pushed to the curb (hasn't happened yet though).
 
Geo Hahn said:
I've done 2 TRs and a Healey with the Harbor Freight seal puller - easy peasy - though some have had better luck with the screw & slide hammer or big screwdriver.
And some have had worse luck with the HF puller. I went out and bought one just for this project; it broke on the very first pull without budging the seal.
 
Thanks for all the input. It should be a simple task. I added the seal to my Supercharger order at "The Little British Car Co." Along with a couple other non essiential things. If the S/C takes to much longer I will have a pretty good size order.
 
Back
Top