• Hey Guest!
    British Car Forum has been supporting enthusiasts for over 25 years by providing a great place to share our love for British cars. You can support our efforts by upgrading your membership for less than the dues of most car clubs. There are some perks with a member upgrade!

    **Upgrade Now**
    (PS: Upgraded members don't see this banner, nor will you see the Google ads that appear on the site.)
Tips
Tips

TR2/3/3A TR3A fuel pump questions

Bremer

Jedi Hopeful
Country flag
Offline
Hi, I am rebuilding the fuel system of my 59. Aside from A LOT of grime and dirt inside the pump and glass bowl, I am having the following problems/questions:
First: After reassembly of the diaphragm to the lower body half, the tip of the rocker arm now needs to be moved about 3/8'' before the diaphragm is pulled down. When activating the priming lever, however, the diaphragm moves immediately. Can someone confirm if I have assembled the diamphragm rod correctly (or incorrectly)? I have had a hard time getting it to engage at all. I have the factory manual and have followed the procedure described there.
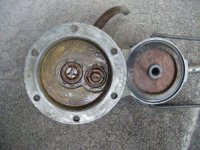
Second: Wanting to remove and clean out the valves, I found that my valves are different from what's shown in the manual's figures. I don't have a valve retainer plate or screws to keep it in place, see photo. How do I remove these valves?
Third: Where can I buy a rebuild kit that actually contains the essential items?

Thanks very much!
 

Attachments

  • 22022.jpg
    22022.jpg
    75.4 KB · Views: 433
TRF has a good rebuild kit, and it includes new valves. Those six indentations around each valve are what are keeping them in place. Grind those away, and the valves can be driven/pried out. The new valves won't just fall into place, but rather need to be tapped into place using a socket that matches their outside diameter. My GT6 workshop manual had the step by step description of the valve replacement while my TR4/4A showed the retaining plate that wasn't on mine either.
 
Bremer said:
...the tip of the rocker arm now needs to be moved about 3/8'' before the diaphragm is pulled down. When activating the priming lever, however, the diaphragm moves immediately...

Sounds normal.

<div class="ubbcode-block"><div class="ubbcode-header">Quote:]...Can someone confirm if I have assembled the diamphragm rod correctly (or incorrectly)?[/QUOTE]

Hard to say w/o a picture.

<div class="ubbcode-block"><div class="ubbcode-header">Quote:]...Wanting to remove and clean out the valves, I found that my valves are different from what's shown in the manual's figures. I don't have a valve retainer plate or screws to keep it in place, see photo. How do I remove these valves?[/QUOTE]

As noted above, they are swaged or pinned. Your call but I would be tempted to clean them in situ with carb cleaner then test them with a suck and blow on the inlet and outlet. If they check out okay you might leave well enough alone rather than drive out the old and press in the new and wonder if they are going to stay put.
 
Jay, Geo, thanks for your responses.
I cleaned the valves and the other components in situ (how nice everything looks when it's clean!) and the valves seemed to function adequately. Assembling the pump and doing a bench test with gasoline, I noticed that the pump allows the gas to just flow through to the outlet, if the fluid level is higher on the inlet and the rocker arm is not activated (i.e. engine off). Is this normal? I guess the float valves in the carb bowls are going to prevent overflow with the engine off, right?
I also noticed that the gas moves in both directions, i.e. back and forth when activating the rocker arm. More gas moves in the right direction, though, towards the carbs. This makes me think I need new valves, but I concur that installation might be tricky.
Thoughts?
 
I have always tested the valves by sucking & blowing on the inlet (should be able to blow but not suck) then on the outlet (should be able to suck but not blow). Really fun if you've just had gas in there.

I never had much luck trying to simulate the pumping action on the bench, I go more by the (sorta) quacking sound it makes when I work the lever.

If all that seems good then I put it on and see what happens.

Repros are now available with the priming lever though I prefer a rebuilt original just because it is a pretty easy original part to keep in service. No experience with the current crop of repros but in times past they were not always good.

PS: Several secret formulas for the easiest way to get that rear nut tightened, I like a 1/4" wobble extension on a socket. There's even a web page on the subject:

https://www.jmwagnersales.com/fpit.html
 
Geo Hahn said:
I never had much luck trying to simulate the pumping action on the bench, I go more by the (sorta) quacking sound it makes when I work the lever.

I like the description and pretty accurate too! :smile:

Scott
 
Geo Hahn said:
Repros are now available with the priming lever though I prefer a rebuilt original just because it is a pretty easy original part to keep in service.

I agree w/ Geo... whenever possible, I prefer to rebuild the original part. Personally, I prefer the FP rebuild kit from TRF; I've had better luck w/ the diaphrams...... Have fun!
 
Seeing how many people here carry a spare fuel pump, I think I will do both: Rebuild my original and buy a new one as a spare.
Thanks again for the advice.
 
Bremer said:
Seeing how many people here carry a spare fuel pump, I think I will do both: Rebuild my original and buy a new one as a spare...

FWIW, this is what I carry as a spare, can be attached in seconds by bypassing the mechanical pump altogether:

Electric%20Pump%201.JPG


Came from Autozone but most FLAPS will have some similar low pressure electric pump.

A mechanical spare is also good -- I carry one on long trips when I might have the 'luxury' of doing the replacement in a motel parking lot rather than in the left turn lane on Sabino Canyon Road.
 
Carrying two replacement pumps... That's truly a belts and braces approach!
Any particular brand/model of electric pump that has been proven suitable for our cars?
 
For a 'just-get-me-home' pump the one shown works fine. It is installed right in the engine compartment and just dangles there for no longer than it is needed. I think it was about 30 bucks at the local auot parts place.

For a longer term solution or an installed electric pump for back-up there are doubtless better choices.

FWIW -- that spare I carry has seen a lot of action thru the years, usually on someone else's LBC. Once they see how quickly it gets them back on the road (aren't even late for breakfast) they run out and buy one to carry in the boot.
 
Geo,

Thanks for posting the photo - I've been meaning to do this for a while.

I assume the red lead goes to the + terminal on the coil (for negative ground cars) and the black to ground and the pump just dangles there (after connecting up the fuel lines, of course, until you get home, right?

Cheers
 
Yes, coil (white wire side) & battery ground are what I use. A small bungee may be useful if it ends up in an awkward spot when fitted up. The hoses of course have to accomodate a 5/16" input and a 1/4" output.
 
Be sure to get the low pressure version! LBC carbs only want about 4 psi max; while American carbs typically take 7 psi. Some pumps come in both flavors, and the only difference is the sticker on the side.

Personally I prefer the little rectangular Facet pumps, but they are more expensive. For short term use only, the one Geo shows probably makes more sense (but my "temporary" solutions have a way of becoming permanent
grin.gif
)
 
Back
Top