• Hey Guest!
    British Car Forum has been supporting enthusiasts for over 25 years by providing a great place to share our love for British cars. You can support our efforts by upgrading your membership for less than the dues of most car clubs. There are some perks with a member upgrade!

    **Upgrade Now**
    (PS: Upgraded members don't see this banner, nor will you see the Google ads that appear on the site.)
  • When posting a classified ad, you MUST select a prefix from the drop-down next to the subject line. If you don't you will get an error and your ad will not be posted!
Tips
Tips

TR2/3/3A tr3a elbow capping

ekamm

Jedi Warrior
Offline
Has any one got pictures of the recovering of their elbow cappings. In particular the buttons on the ends of the cappings. I've read some posts describing how but still don't really get it. One problem is that my dad recovered them years ago and it's not right so I don't have the guidance of disassembling the old one and learning from this.
 
The chrome buttons fit on the door cappings not the elbows. They have an arrow shaped spring metal clip that insert into holes at each end of the metal ends of the door capping. Mine never clipped in very well and I had to use contact cement to get them tight. But that was probably because the leather I used was a bit too thick.

As far as the elbows, someone (chime in please with the link) made a jig out of 2x6 that he put in a vise and used to pull the new vinyl down over the concave/convex stretches of the elbows.
 
Sorry everyone calls the piece aft of the door the dogleg and my elbow rests on the door. I meant the door. I have the jig post. My real question is how do you fold the leather/vinyl over the end to get the recess that will accept the button. My dad folded over the material in a way that left a gap at the bottom and then cut a small piece to fill in the gap.
 
That should do. It's a bit hard for anyone (VTR or TRA judges) to spot this small piece added, providing it's not bulging or over-lapping. I did mine in 1990 and folded the excess back in onto the ends where the domed cap mentioned above is inserted. I trimmed off all the excess. I bought new end caps from the usual suppliers.
 
Eric, maybe these photos will help.

The first was taken at least 10 years ago and shows the door-top capping, in place with a rusted end button.
door_capping_end_button_original.jpg


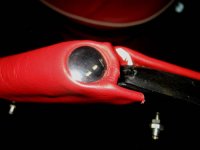
The next photo shows a capping that has been stripped except for the basic capping piece and an end button. The end button is complete with barbed clip.
doorcapping_close-up_before.jpg


The next photo shows a capping that has been glass bead blasted and powder coated and ready to be covered with new leather.
doorcapping_close-up_after.jpg


Finally, I have added a sketch from a Roadster Factory Catalog, showing the component parts that they can supply. You can find it here:
TRF mini TR2-TR3
doortopcappingTRF.jpg

The re-covering process is very simple. For each door-top capping you need, new leather for covering, 2-new chrome plated end buttons, a length of foam rubber core, and adhesive. Cut the foam rubber core to fit between the ends, and cement in place. After this has dried, spay adhesice, cover with leather, be sure to tuck in neatly at the ends and glue and push the end buttons in place. I used adhesive tape to hold everything together while it dried.

Good luck!
 
From Franks pics of the cap before it was recovered, dad did about the same covering. Using a small piece of material at the bottom of the button to cover what didn't get covered by the material folding over the top. I was really just afraid that he had changed some thing.
 
ISTR originally, the rubber core and capping are covered with a thin upholstery fabric before the vinyl (I used leather) was stretched over it. At least, that's how I did mine.

The extra layer visually smooths out the seams between the rubber and the steel capping so it doesn't show through - i.e. a "seamless" appearance.

(No way could I get my end caps to look as perfect as in Frank's top photo.)
 
Another question, on the steel cappings prime,paint or leave unfinished as original. Will there be an issue with the adhesive sticking? The original ahesive was pretty well attached for the most part.
 
Mine had what looked like some sort of reddish primer on them that was in good shape, so I just left that on.

Also, it's possible to cover the end cap <span style="font-weight: bold">without</span> adding another piece on. I did it with mine. You will have one seam, but that seems unavoidable. I just left a generous section of leather to work the end caps and carefully shaped it around, cutting and lining up where the seam would be. It's a bit tedious, but it can be done. I don;t know if it's possible to do without any seam, but if someone has a way, please share.

Here's the end result <span style="font-weight: bold">without</span> a section added in.
 

Attachments

  • 19900.jpg
    19900.jpg
    16.8 KB · Views: 180
Back
Top