• Hi Guest!
    You can help ensure that British Car Forum (BCF) continues to provide a great place to engage in the British car hobby! If you find BCF a beneficial community, please consider supporting our efforts with a subscription.

    There are some perks with a member upgrade!
    **Upgrade Now**
    (PS: Subscribers don't see this gawd-aweful banner
Tips
Tips

TR2/3/3A TR3A "B" post

Gordo

Jedi Hopeful
Offline
TR3A "B" post

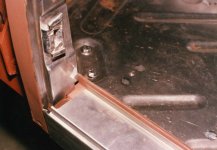
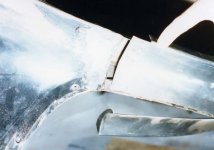
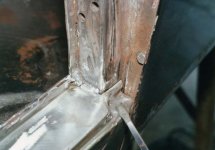
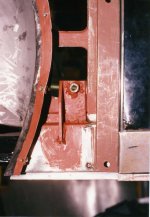
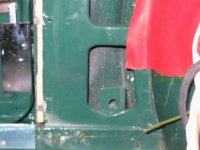
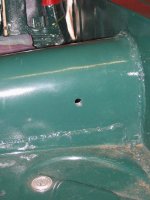
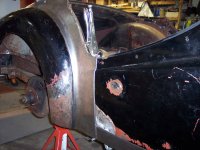
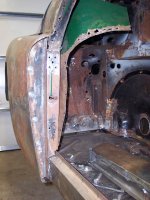
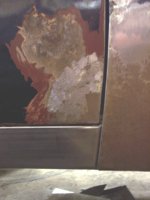
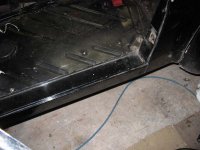
I'm in need of some close up pictures of a "B" post without the rocker installed. It is so nice out I'm cutting out the outer rockers. There is so much built up weld at the bottom of the post that I'm having difficulty knowning where to cut to salvage as much of the post as possible. There is no rust so I'm trying to save metal.

Gordo
 
Re: TR3A "B" post

Here is one from a late TR3A I finished in 2006.
 

Attachments

  • 9332.jpg
    9332.jpg
    209.5 KB · Views: 184
Re: TR3A "B" post

Don - do you have other large format pictures like this from your rebuild?

I found this very helpful.
 
Re: TR3A "B" post

Here are some from my own TR3A restoration in 1988. It took me a while to find them and re-size them. The new outer sill was too short at the "B" post so I had to MIG weld in a small piece. The front curve (see screwdriver) to clear the door when fully open was too small so I had to modify this where it's welded to the "A" post. I also had to take a large rubber mallett to the insides of the outer sills to give them the curve they should have to follow the curve along the door. The outer quarter panels are different in that one side is for the early TRs while the other side is for the later TR3As and TR3Bs where we can see the joint.
 

Attachments

  • 9337.jpg
    9337.jpg
    42.6 KB · Views: 114
  • 9338.jpg
    9338.jpg
    33.3 KB · Views: 115
  • 9339.jpg
    9339.jpg
    36.3 KB · Views: 115
  • 9340.jpg
    9340.jpg
    45.6 KB · Views: 107
  • 9341.jpg
    9341.jpg
    47 KB · Views: 115
Re: TR3A "B" post

Don, thank you for the pictures. They are really going to help. I like the bracket for the seatbelt and may copy that. I have a couple questions:

It appears that the quarter panel must come off to replace the inner sill from what I can tell from the pictures. Am I correct in that or not?

Did you use lead to finish the joints at the A and B posts?

As an aside, The B post end of my outer rockers have a 90 degree bend up about 1/2 inch tall as a tab to weld to the post. I did not see that on yours and wonder if I got some odd ball piece.

Thanks again, Gordo
 
Re: TR3A "B" post

My quarter panels were so rotten, I had to change them. I suppose you can change the outer sill without removing the quarter panels. If yours are rust-free, give it a try.

I also have 2 nuts welded to a plate inside the driveshaft tunnel for the inner ends of the seatbelts. All these photos are from the late TR3A I finished in 2006.

There is no lead. The finihishing and painting was done by the body shop and for both TR3As, they used a tiny bit of body putty at the rear end, next to the "B" post. There is none at the front end as it gets covered by the front fender. y joints are still good after 97,000 miles.

My sills did not turn up. In fact I had to MIG weld in about 5/8" extra along the top flat portion. I did them all like they were originally. They are flat to the "B" post and I MIG welded the sill top to the side of the "B" post with a nice fillet of weld. Then I used my die grinder to really smooth out this radius. Looks terrific.
 

Attachments

  • 9345.jpg
    9345.jpg
    27.9 KB · Views: 103
  • 9346.jpg
    9346.jpg
    50.7 KB · Views: 116
  • 9347.jpg
    9347.jpg
    162.8 KB · Views: 117
  • 9348.jpg
    9348.jpg
    169 KB · Views: 110
  • 9349.jpg
    9349.jpg
    91.9 KB · Views: 141
Re: TR3A "B" post

Don, that new set of pictures is just awesome. I'd like to compliment on your work.

I spent the morning killing a pot of coffee and just looking at the B post on my car. I've come to the conclusion that I may be able to cut the quarter panel off about 7 inches up from the bottom to access the inner sill. My quarters are rust free and I really hate to cut them but I see no other option except for splicing the new and old inner sills just in front of the rear body mount.

I'll try another pot of coffee in the morning and hope to come to a decision soon.

Could you explain what a Y joint is?

Gordo
 
Re: TR3A "B" post

Both these restorations were total body-off. This makes the inner sills easy. You can see some of the steps from 1987 to 1990 for my TR3A on the Montreal TR site. The attachment was May, 2007 with 94,000 miles since 1990 - just before I had the car re-sprayed.

Turn up the volume when you go back to the home menu and re-open the home page, also on some of the left side menus.

https://www.rucompatible.com/triumphmtl/member_cars.htm#TR3
 

Attachments

  • 9353.jpg
    9353.jpg
    51.2 KB · Views: 104
Re: TR3A "B" post

Don, Are those the joints on the human body or the car? HAHA. I'm turning into a Gumby taking this car apart.

I looked at your original restore and guess you removed all trashed panels before you had both clips blasted?

How long did you wait to primer the blasted clips?

I'm doing a two piece resto and plan on removing all damaged pieces first then blast what's left and hopefully there will still be something to build off.

I'd put some pictures up of what I'm doing but my USB ports are broken. Grandson thought they'd be a neat place to put pencils.

Gordo
 
Re: TR3A "B" post

I replaced all the metal on the front clip and MIG welded it, then I did the rear clip. Then I assembled them loosely on the frame with the inner sills and the new floor pans. Then I put on the doors and front fenders. Next I inserted the rubber body pads and tighened down the body bolts to the frame. I had to add and/or remove some pads several times till all the gaps were parallel with all the bolts tight. I made sure that the door would close and the that the door latch would click. The outer sills were clamped into place to check the gap along the bottom of the doors. With all this right, I welded the front clip to the floor pans, then the rear clip. This got the tub back into one piece. Then I welded in the outer sills. The pictures on the site show the rest.

As for sandblasting, everything was done in January, 1988 at 25 below zero in the snow by a sand-blast outfit. It was two year later that the car was ready for finishing and painting. The paint shop did it all again. Don't let them use ordinary sharp sand. I used glass peening on my external body panels and resin that won't distort the panels on the second TR3A.
 
Re: TR3A "B" post

Wow. Those pictures are impressive. They make me feel like I'm not doing a restoration at all. That is truely amazing work and results. Although bead blasting will reveal much that is hidden, I don't see myself doing that type of body reconstruction -and I'm hoping I don't have to. My car had been previously restored, but I do not think to the degree you guys have gone / are going.

The pictures are great.
Jerry
 
Re: TR3A "B" post

Jerry - I restored my black TR3A again this past spring. I took it all apart again. But this time I left the body on the frame. Everything was out or off it. I took out the engine and gearbox and rebuilt the engine after 16 years and 94,000 miles. I found one spot about the size of your thumbnail where the paint had chipped off and there was a tiny bit of surface rust right there. There was no welding or blasting this time. I had the paintshop paint inside the empty engine compartment and also he painted each panel etc. off the car.

I got it back from the painter June 5th and took till July 13rd to re-assemble it all. During the winter, I had sent my wire harness to have it re-covered and that went in like new. After about 85 miles to tune up the carbs etc. on the new engine during a 2-day period, I left on July 15th for VTR near Philadelphia. That trip was over 1700 miles and it ran like a charm.. Oh yes, the VTR judges gave me 2nd in my concours class with 384 points out of 400. The car that beat me was trailered from South Carolina.

Mine is the black one.
 

Attachments

  • 9380.jpg
    9380.jpg
    74 KB · Views: 133
Re: TR3A "B" post

Don,
I ran across your web site when I first got my TR3 and was impressed by that amount of work and attention to detail. Knowing you purchased the car new and still had to deal with that sort of restoration is impressive. You are more dedicated to your car than most are their wife. -not to imply that every wife is worth that sort of dedication.
(the same for cars)

So, I can assume that by now you've stopped keeping track of how much money/time you've spent on the car. I'm barely into mine, and I've exceeded my budget. What I worry about, (and I'd like some input here) is why there are so many TR3s on ebay that have begun restoration, but never finished. How can someone do so much work and then walk away and give it to someone else? What is the key to seeing the project through?

-oops, sorry,I think I hijacked the thread.
 
Back
Top