
-
 Hey Guest!
British Car Forum has been supporting enthusiasts for over 25 years by providing a great place to share our love for British cars. You can support our efforts by upgrading your membership for less than the dues of most car clubs. There are some perks with a member upgrade!**Upgrade Now**
(PS: Upgraded members don't see this banner, nor will you see the Google ads that appear on the site.)

Tips
- We have a special forum called "Member Articles" where you can submit actual articles for consideration for publication. Learn More
- Don't have an Avatar? If not, your avatar will default to the 1st character in your username. Go into "Account Details" to change your Avatar.
- Some basic forum navigation info: click
 Hey - did you know if you click on the title of a thread it will take you to the first unread post since you last visited that thread?
- Hey Guest - Is your British Car Club in our Clubs database? If not, send me a PM - Basil

- Looking for a local club? Click the "Clubs" tab above and browse hundreds of clubs world-wide.
- Add Android or iPhone APP: click
- Did you know - any picture or video you add in your posts in any marque-specific forum will also get added to the Media Gallery automatically.
- A few more tips about posting and replying: click
- Hey there Guest - be sure to keep your profile page up to date with interesting info about yourself: learn more
- More tips and tricks on Posting and Replying: click
 but were afraid to ask:
  STOP!! Never post your email address in open forums. Bots can "harvest" your email! If you must share your email use a Private Message or use the
  smilie in place of the real @
- Want to mention another member in a post & get their attention? WATCH THIS

- So, you created a "Group" here at BCF and would like to invite other members to join? Watch this!
- Hey Guest - A post a day keeps Basil from visiting you in the small hours and putting a bat up your nightdress!
- Hey Guest - do you know of an upcoming British car event?
 Pretty Please - add it to our Events forum(s) and add to the calendar! >> Here's How <<
- Hey Guest - you be stylin' Change the look and feel of the forum to fit your taste. Check it out
- If you run across an inappropriate post, for example a post that breaks our rules or looks like it might be spam, you can report the post to the moderators: Learn More
- If you would like to try some different "looks" or styles for the site, scroll to the very bottom, on the left and click the Style Selector.
You are using an out of date browser. It may not display this or other websites correctly.
You should upgrade or use an alternative browser.
You should upgrade or use an alternative browser.
TR2/3/3A TR3A Alternator conversion
- Thread starter TuffTR250
- Start date
martx-5
Yoda
Offline
Here's a link from the VTR website that's has a wire by wire description.
https://www.vtr.org/maintain/alternator/gm-tr2-3.shtml
They don't talk about the physical mounting, but if you're going to use a Delco (GM) 10SI, there's are several ways to go about it.
I went with a narrow belt conversion when I did mine, which also eliminated the engine driven fan. So, it depends on how you want to proceed with that part of it.
You also have to deal with the ammeter, as the alternator can put out much more current then it's capable of handling. Dan Masters mentions one way to handle that problem, but it makes the ammeter just about useless. What I did was follow what Randall has suggested and put a shunt across the ammeter terminals to divert some of the current past the meter. With the right piece of wire, you can have the meter read approximately 1/2 the current. In other words, and indicated 15 amps is actually 30 amps.
If Randall doesn't chime in soon about the shunt, I'll dig out the info he gave out (it's at home) that worked well for me.
Edit: Also, you'll have to convert to negative ground if you haven't already. See link below...
https://www.vtr.org/maintain/negative-ground.shtml
M_Pied_Lourd
Darth Vader
Offline
Can you install a volt meter in place of the ammeter? I have an alternator conversion that I have yet to install. I believe the directions indicated that a TR6 voltmeter could be used in place. If this is the case, I would want to try and swap the flat glass for the curved glass of the ammeter....
TR3driver
Great Pumpkin - R.I.P
Offline
Sure, you can use a voltmeter in place of the ammeter. Get along OK with nothing at all if you want, put a clock or vacuum gauge in the hole.
The shunt I used was 3.5" of 16 AWG wire, just mounted on the back of the ammeter. Here's a shot of it (taken as I was parting out the car, so other wires are already disconnected). As Art noted, it converted the ammeter to be approximately 60-0-60 instead of the marked 30-0-30.

Having tried both (the Stags have their original voltmeters, essentially the same as the TR6 unit); I much prefer the ammeter. It is a little harder to interpret, but gives much more information and also gives you the situation right now. For example, a quick glance when parking the car tells me if I've left the headlights on. Tap the brakes, tells me if all 3 brake lights are working. Etc, etc. I even use it to see when the radiator fan is running.
At least with the Stags, the voltmeter is also inaccurate, since it is affected by the voltage drop through the wiring and ignition switch. With everything on, that can be a volt or more, which is more than the difference between battery being charged (a bit) and discharged.
But obviously it's a matter of taste.
PatGalvin
Jedi Warrior
Offline
Hey Art
I installed the Delco 10SI with narrow belt conversion when I was building the engine on the bare frame. When I reinstalled tub, I found I had virtually no room to swing the alternator outward without fouling the tub. Using the stock pivot, I had about half inch clearance and no room to tighten the belt by swinging the alternator out. Have others fitted this alternator in the TR3 and if so, how much space do you have between the alternator body and the tub? I really couldn't see how it would work, in my case. Thanks. I don't think I'm hijacking the thread, as it's pertinent to Bob's planned install. And Bob, I might have a used (run 30 minutes) alternator to spare, if you're interested.
Pat
TR3driver
Great Pumpkin - R.I.P
Offline
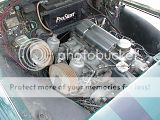
I didn't do the 10Si, but the Motorcraft alternator I used was about the same size and I definitely saw the clearance problem you are talking about. I notched the alternator housing and engine front plate to allow the alternator to move closer to the motor; and then found a belt short enough to pull up tight before the alternator hit the body. (Actually, as I recall, it was the suspension tower that was a problem. If it was just the inner fender, I would have revised it to clear.) In order to change the belt, I had to take the alternator completely loose, which would allow the alt body to twist and get enough clearance to R&R the belt.
Kind of a hassle, but since the lower mount wound up being just one long bolt, it was actually fairly easy to remove the nut and slide the bolt forward until the alternator could pivot. I did it once on the side of the freeway, in about 20 minutes with a hot engine. But if I do it again, I will definitely use a smaller diameter alternator.
This photo doesn't really show the clearance, but maybe gives some idea. With the belt tight, there wasn't room for my fingers between the alternator & tower.

martx-5
Yoda
Offline
Hey Art
I installed the Delco 10SI with narrow belt conversion when I was building the engine on the bare frame. When I reinstalled tub, I found I had virtually no room to swing the alternator outward without fouling the tub. Using the stock pivot, I had about half inch clearance and no room to tighten the belt by swinging the alternator out. Have others fitted this alternator in the TR3 and if so, how much space do you have between the alternator body and the tub? I really couldn't see how it would work, in my case...
Pat
As Randall mentioned, belt length is critical. I had to go to a shorter belt then the one supplied with the narrow belt conversion kit. It was a little tight trying to get it on the pulley, but once on, I could tighten it without it hitting anything. It has about an inch of clearance.
Thanks for the information. I plan to go with the wide belt and keep the engine fan. I saw a previous thread where Randall suggested a shunt on the ammeter, so I'm planning to do that. A question: With the wide belt pulley on a GM alternator, will the belt I'm currently using on the generator be the right length with the GM alternator? Regards,Bob
I have a question about the wiring on the GM alternator conversion. I wired my alternator up like the VTR article from Dan Masters said to do using his "method one", but my ignition warning light is not coming on when I switch on the ignition. It did previously with the generator. With this "method one" is the ignition light supposed to come on when the ignition switch is turned on? I don't see what powers it under "method one". Here is the link to the Dan Masters article: https://www.vtr.org/maintain/alternator/gm-tr2-3.shtmlNote that on my car it does not have the 2 large black wires to the control box, only 1 small one and I left that connected to tthe control box. I did all other wiring exactly to Dan Masters "method one".Thanks! Regards,Bob
TR3driver
Great Pumpkin - R.I.P
Offline
Yup, yellow light should still work.
Which GM alternator did you use? Some of the newer ones have different wiring requirements, Dan's article is for the "classic" 10-Si alternator.
The dash lamp gets power through the wiring behind the dash and the ignition switch. All the alternator does to light the lamp is ground the small yellow wire, which you joined to the yellow/green wire at the old control box location. The yellow/green should run to the dash lamp, thus the alternator grounds the lamp to make it light.
Although I doubt it is related to your yellow lamp problem, I would want to account for that other small black wire. This is the ground path for the instrument panel, as it may not be securely grounded through the dash. The fuel gauge needs the ground, as do the turn signal and dash lights. One of the small black wires on the E terminal of the old control box should come from the ground tie point on the back of the instrument panel, the other connects to the body near the control box. If, as I suspect, the ground wire is missing, then you should ground the other small black wire rather than leaving it connected to the control box.
When I bought the reman alternator I asked for a 63 amp one for a 1975 Camaro V8. I was told that is a good one to use. It is a 7127-3. I don't know how that number relates to the 10-SI. Any idea how the wiring for installing a 7127-3 compares to what Dan Masters wrote for the 10-SI? I will have to check to see if there is a ground wire to the body near the control box. The dash lights and the fuel gauge are not working, so that I'll look for that gound. Thanks!Regards,Bob
TR3driver
Great Pumpkin - R.I.P
Offline
That's it, should work. Sounds like you might have some wiring issues near the warning lamp. One thing you can try is to disconnect the small plug from the alternator, and temporarily run a jumper from the yellow wire to ground. Turn the key on, the dash lamp should light. If not, the problem is in the wiring or the lamp itself.
If it does come on, you may have a bad alternator. There is a reason that most shops refuse to install "rebuilt" alternators.
Note that the alternator may not work (even if it is good), if the dash lamp doesn't light. The current through the lamp initially provides excitation (field current) to the alternator.
vivdownunder
Jedi Warrior
Offline
To overcome the lack of space for a full size alternator, scaled down units from a small Kubota tractor work well.
Viv
Viv
You are correct Randall, wiring problem. I had a bad solder joint on the jumper I made to connect the small yellow wire to the yellow/green wire. I should have done a continuity test on the jumper before I installed it, but I didn't. So today my son and I were testing the wiring and found the jumper to be the problem. The ignition light now comes on. So the alternator seems to be working fine now. We went for a long drive after we fixed the wiring. It was a beautiful day for a ride in a TR3. Regards,Bob
As Randall noted, I had the odd experience last Sept when the light behaved normally i.e. on with ignition turned on, then off when running. However when I returned home from a jaunt, the battery was flat. Went through the hoops of checking battery condition etc to eventually conclude that it was the alternator.
The rebuilder said that the recitfier had burned out, which disabled the light from coming on to show "no charge". All the while I thought that it was charging normally as there was no light. Soooo, per Randall's suggestion, it's time to possibly start a new thread (another day perhaps) on updating the alternator conversion to the smaller denso unit. this should overcome the space issues and facilitate a change to the narrow belt???
I seem to recall that a few member s have succesfully worked out the mounting arrangements