• Hey Guest!
    British Car Forum has been supporting enthusiasts for over 25 years by providing a great place to share our love for British cars. You can support our efforts by upgrading your membership for less than the dues of most car clubs. There are some perks with a member upgrade!

    **Upgrade Now**
    (PS: Upgraded members don't see this banner, nor will you see the Google ads that appear on the site.)
Tips
Tips

TR2/3/3A TR3 temp gauge

TRclassic3

Jedi Trainee
Country flag
Offline
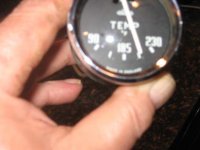
The temp gauge just suddenly quite registering at all. Is the only possible cause a failure of the gauge and thus a need for a rebuild?

If that is the case, any suggestion on plugging the connection at the thermostat housing so I can continue to drive while it is out?

TIA
Ed
 
Ed,
Those mechanical gauges are finicky. I had mine rebuilt 4 years ago and now it registers about half the norm (90 degree on the gauge equals 172 deg actual).
Could be you've lost the gas in the tube from the line being 'moved' or vibration at the connection. Why this would happen I haven't a clue but I suspect something within the gauge itself as I can't see the tube losing a portion of the gas and not the whole deal.
Take it out and get a brass fitting from Ace hardware to plug the hole, that's what I did. I'd periodically check the engine temp with a laser temp.
Or, you could get a cheap replacement gauge from autozone (same bulb type) for the interim, just match the threads. There was one on sale on ebay for a TR3 (non stock).
 
If the ether has leaked out of the bulb and tube you're looking at a repair/rebuild. Reading low can happen if the gauge is in the process of loosing its fluid. The "usual sources" can repair the temperature gauges but it's not cheap. When I last checked it was around $140.

IF you are inclined to try the repair yourself (assuming no mechanical faults with the gauge head), look at this site:
https://www.ply33.com/Repair/tempgauge

I have repaired two gauges using them method shown there. On the first gauge I tried, there were other mechanical issues to deal with apart from a cut capillary tube. The mechanical problems complicated the repair and calibration but suffice it to say that the method does work.
 
The rebuild should replace the bulb anyway, so IMO you can just cut it off and use it to plug up the hole in the housing. Or the sender from a TR4 gauge should work.

Since I lacked the capital to pay for a gauge rebuild, I just bought a cheap 2" mechanical gauge at my FLAPS. That was maybe 15 years ago, and I just transferred it to the 'project' TR3 ... even though it doesn't match the other gauges all that well, I kind of like the 270 sweep and the softer lighting.
 
dklawson said:
(assuming no mechanical faults with the gauge head
Tho I've not tried it (yet), it should be possible to check out the head with air pressure. The gauge itself is a simple pressure gauge, it doesn't 'care' whether the pressure is air or ether vapor. Look up the vapor pressure of (presumably diethyl) ether at various temperatures of interest; apply that much air pressure and see what the gauge reads.
 
dklawson said:
IF you are inclined to try the repair yourself (assuming no mechanical faults with the gauge head), look at this site:
https://www.ply33.com/Repair/tempgauge

This was the site that I used to repair my cappillary temp gauge. I used the gauge that was in the car as a donor. It was a Stewart-Warner 270 deg gauge. I see these gauges at Pep Boys for less then twenty dollars. The procedure is is pretty straight forward. When I got done and tested the gauge in boiling water, it measured exactly 212 deg F. It's really incredible how low the temperature goes in that ice, salt slurry. IIRC measured it at about 10-20 deg BELOW zero. Cold enough to keep the ether in the bulb.

Sorry for the out of focus pic. When I shot that, I forgot to put it on macro.
 

Attachments

  • 13545.jpg
    13545.jpg
    21.9 KB · Views: 245
TR3driver said:
Tho I've not tried it (yet), it should be possible to check out the head with air pressure.

That is indeed true and I played with this a bit prior to rebuilding the first gauge I worked on. However, that was not really the problem... the pressure gauge portion performed "normally" but something appeared to have "messed up" the gauge calibration prior to the capillary tube failure.

On the first gauge I worked on, the temp needle was NOT sitting on zero when the capillary tube was cut off. I didn't think a thing about this when I started the repair but I found that I had to spend a LOT of time calibrating the gauge to get it to read correctly. I'm not sure what happens to the gauges to cause this, but I've seen this on several dual (water/oil) gauges.

On the next dual gauge I worked on, the temp needle was on the left stop when I started the repairs and it worked very well and calibrated easily.

Again I don't know what causes the gauge to fail with the needle off the low end of the scale. However, from now on I won't bother working on a temperature gauge unless the needle is at the zero peg when the tube is cut off. I'll leave those repairs to the pros.
 
I ran across this vapor pressure chart which looks like it has info on what kind of pressures to expect at various temps for diethyl ether.

At 80 deg C (176 deg F), the pressure is just shy of 4 atm, or about 56 psi. At least that's what I get out of this. If I'm wrong, please correct me.
 
That's the way I read it, so assuming I'm right about it being diethyl ether in the bulb, you should be able to apply 58 psi and see the gauge indicate 176 degrees F.
 
dklawson said:
I'm not sure what happens to the gauges to cause this, but I've seen this on several dual (water/oil) gauges.
A good bout of overheating will do it. At least that appeared to be what made my original gauge start reading about 40F too high. Same thing happened on my Dad's car, too.

The active element in the gauge is a flattened brass tube formed into a semi-circle. Pressure inside the tube makes it become more nearly round, which forces it to straighten out slightly, which in turn moves the needle through a linkage. Anything that distorts the tube (like too much pressure/temperature) will affect the calibration.
 
I guess I just couldn't see the excessive pressure from overheating having enough "umph" to straighten out the bourdon tube. However, since reshaping the tube was the only way I was able to calibrate the first gauge... it makes perfect sense with your observation.

Art, thanks for the link. I'll print out a copy of the chart and keep it with my data file for gauge literature.
 
Question.
It was stated that a gauge indicating a lower than proper temp would be from a loss of gas.
My gauge has been holding steady at the lower setting (the 90 deg mark is actually 172 deg measured).
I've recalibrated my eyeball and can read what the actual temp is and it has been at the same 'level' for 6 months now.
How could it patially leak?
Is there another experienced explanation...internals in the gauge perhaps?
Don't mean to steal the thread but am wondering.
 
I also repaired my original TR3A temp guage bulb with a donor bulb and line from a new cheapo capillary guage and it worked fine. The tough part is soldering the brass patch connection between the old and new lines - be sure you have sanded both to bright metal and have a good soldering iron. You should tin both cut ends of the cap lines (without sealing the hole on the end!), slip the brass patch over both ends and solder in place. Must be a nice clean and really good solder joint to be 100% airtight. While you will smell some of the ether when you are soldering, what you don't want is to smell itw hen you are testing the guage out later in boiling water :smile:

One very, very, very important step that I almost forgot - be sure you put the nut on the line BEFORE you solder the ends together! That's the nut that will hold the bulb in place - and be sure it faces the right way. Its a real bummer to do a nice soldering job only to realize you have to desolder and do it all again.
 
Prb51, is this a dual gauge or a 270 degree sweep (temperature only) gauge?

A dual gauge calibrated in oF has 90 degrees just above the left-hand stop peg.
https://www.spriteparts.com.au/user/cimage/dual-gauge.jpg

Likewise, the 90 oF mark on a 270 degree sweep temperature gauge is also very near the left-hand stop.
https://i20.ebayimg.com/06/i/001/15/93/7c94_1_sbl.JPG

If your gauge only makes it up to that point when the car is at temperature I'd say the gauge has lost all but a tiny amount of ether and it's just barely putting out enough pressure to barely move the needle.
 
Doug,
It's the TR3 temp sweep gauge and you are correct about the 90 degree and I misreported. I went and looked and the line half way between 90/185 is the 172 degree mark and about an 1/8th in beyond that is 185. So the sweep hand moves 3/4 of an inch to 180 but will rise higher if hotter.
Still, it's not 'on' but has remained in that condition for months.
Still, funny it would lose a bit of gas and then hold steady, any other explanation?
Sorry for the confusion.
 
Back
Top