• Hey Guest!
    British Car Forum has been supporting enthusiasts for over 25 years by providing a great place to share our love for British cars. You can support our efforts by upgrading your membership for less than the dues of most car clubs. There are some perks with a member upgrade!

    **Upgrade Now**
    (PS: Upgraded members don't see this banner, nor will you see the Google ads that appear on the site.)
Tips
Tips

TR2/3/3A TR3 Static timing; point of confusion.

mrv8q

Luke Skywalker
Country flag
Offline
So I've installed my newly rebuilt carbs, and newly rebuilt distributor, and I'm confused by reading 2 differing guides about the static timing on the 3; TerriAnn's site, and a printout by Ken GIllanders.

The 3 is at the timing mark on the pulley, and I've already set the points timing. I've made up my 12V bulb, and it works. Using the pic below,
IMG_1359.jpg

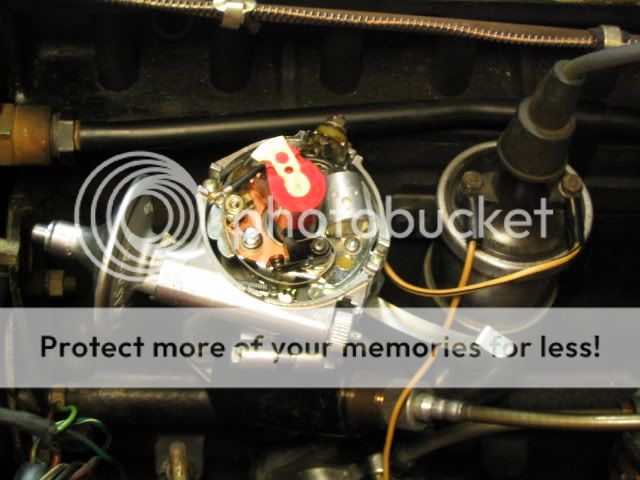
where do I attach my light leads? Ken talks about removing the coil to distributor low-tension lead, Terry doesn't. Terry mentions turning the ignition switch on, Ken doesn't... So far, I can, without the ign switch on, turn the distributor so the light goes from dim to bright. So, kind BCFers, where do I attach my leads? It's a + ground car, BTW... Jeez, I've forgotten how to do this in 5 years!
 
Actually, either way will work. Ken's method (apparently, I haven't read it recently) requires that you have a self-powered test light (aka continuity checker) while TeriAnn's method (again apparently) will work with a non-powered light.

My preference is to use a non-powered light (since that's what I have), and connect one side to the distributor terminal (or the coil terminal that is wired to the distributor); and the other side to ground. Turn the key on, and now the light will light when the points are open.

With the engine at TDC, turn the dizzy CCW until the light goes out (points close) and then back CW until the light just comes on. Lock down the clamp (but be gentle, it's kind of fragile), then advance the vernier by 4 degrees (two marks). That will get you close enough to take it for a drive, and you can "fine tune" it from there.
 
Kevin,Not much recent TR3 experience but you can set your points on any vehicle with an ammeter by haveing someone tell you when,with the ignition on , the ammeter ticks from discharge(ponts closed-coil energized) to 0,points just opened,coil just fired.
Easy method if you dont have a test light.
Tom
 
Hi Kevin - I use Randall's method above. Easiest way to do it I've found and she'll run using that method if everything else is sorted. Should workack just fine with your homemade test light.

Ping back after you've given it a go!
 
TR3driver said:
...connect one side to the distributor terminal (or the coil terminal that is wired to the distributor); and the other side to ground. Turn the key on, and now the light will light when the points are open...

And yet another method (what I do) is connect one lead to the distributor lead (white/black) and the other to the hot side of the battery -- now the light goes out when the points open (sorta the opposite of above).

Actually I usually use a buzzer rather than a light. The buzzer is nice when you're just doing a quick verification of the timing as you can be looking at the engine pulley as you edge the car forward (in 4th) by pushing on the top of the LF tire.

The thing is, once you have it clear in your head the dynamics of the moment you are looking for all these methods will get you there.
 
I have a PDF on that:
https://home.mindspring.com/~purlawson/files/StaticTiming.pdf

My preferred method is to connect the test lamp (non powered) between the low side of the coil (distributor side) and ground. Turn on the ignition. If the test light is on, turn the dizzy housing counterclockwise slowly until it turns off. From there, turn the dizzy housing clockwise slowly until the test lamp comes on. The lamp turns on when the points open and is off when the points are closed.

The moment when the test lamp just comes on is when the points open. It's when the coil will fire. When you reach that point you tighten the distributor down.
 
Another non-approved method not found in the owner's manual involves non tradional tools. We used to do this all the time when thrashing on sprint cars back when they ran magnetos and time was of the essence. This method assumes that the crank pulley mark is in the correct place. make sure the motor is at/near TDC (not 180 out) and put the crank pulley mark where you want the timing to be. Rotate the distro until the points open. Insert foil from a cigarette pack or a rolling paper (cigarette of course) between the points. Move the distributor until you can just slide your paper/foil out of the points and lock the distributor down. Check it again after it's locked down to make sure it has not moved and loosen/adjust as necessary. Pat the driver on the butt and send him back out there. When you can later check it with a timing light you probably will be pleasantly surprised to find the timing is spot on.
 
cheseroo said:
...Insert foil from a cigarette pack or a rolling paper (cigarette of course) between the points. Move the distributor until you can just slide your paper/foil out of the points...

Neat, and a nice complement to the old trick of using a paper match to set the points gap.
 
Rich,
how about this backyard method
Position crank,turn on ignition,take an old spark plug wire ,put in coil,held close to ground ,and watch for spark as dist. is rotated and points open.
Personally by eye,until able to run and use timing light is my preffered method.
Have Fun
Tom
 
Will any of these static timing approaches work with dizzys that have been modified for Pertronix electronic ignition or are these all specific for points? Thanks -

pat
 
PatGalvin said:
Will any of these static timing approaches work with dizzys that have been modified for Pertronix electronic ignition or are these all specific for points? Thanks -

pat

I don't know for sure but I suspect that Pertronix requires electricity in order for the sensor that acts as breaker points to be active. You would need the key on to try the test light method and I'm not sure how happy the Pertronix would be about you introducing additional resistance. TFB's approach should work but if you are using a high output coil this approach can become a bit hairy unless you are comfortable around defibrillators. I run Pertronix so for static timing I'd use the eyeball method to get it run then I'd stick to more conventional methods like a timing light or vacuum gauge.
 
Thanks, BCfers, for all the great responses... I'll have to wait until the weekend to button this up....
 
Regarding Pertronix, there are two designs, "Ignitor" and "Ignitor-2". The original Ignitor is a Hall-Effect switch and it can be static timed with the test lamp connected as I described above (and the ignition on). HOWEVER, Ignitor modules cannot tolerate being left turned on without the engine running. Therefore, you have to complete your Ignitor module static timing in under 3 minutes. This isn't really a problem though as all you need to do is pull the Pertronix power supply wire off the coil once you have the static timing set. Just remember to reconnect it before you try and start the engine.

Ignitor-2 modules use a different switching technology that does not support "zero speed firing". Basically, the module won't switch on and off unless the dizzy shaft is rotating at a decent speed. Therefore, you cannot static time an Ignitor-2 module.
 
Thanks to all for the responses, especially Doug and Randall. I again have a running, braking TR3. I think I made a bigger deal out of the timing situation than it actually was; very simple after being pointed in the right direction. I'll dial in the carbs later on today.

Looking at the distributor bracket, I'm wondering why there's the front pinch nut and bolt, as well as the two nuts, although I'm suer there's a reason...

IMG_1367.jpg
 
Well, the bracket with the pinch bolt was made by Lucas I believe; it is found on most British cars of the period. The pinch bolt is needed to attach the steel bracket to the pot metal distributor body, and of course the two nuts attach the bracket to the engine.

But I don't see any need for the slots under the two nuts, unless it was so the engine maker didn't have to be too particular about stud placement.

Even Lucas eventually came up with a simpler (less expensive) design, though I doubt it saved more than pennies per car.
 
Back
Top