• Hey Guest!
    British Car Forum has been supporting enthusiasts for over 25 years by providing a great place to share our love for British cars. You can support our efforts by upgrading your membership for less than the dues of most car clubs. There are some perks with a member upgrade!

    **Upgrade Now**
    (PS: Upgraded members don't see this banner, nor will you see the Google ads that appear on the site.)
Tips
Tips

TR2/3/3A TR3 replacement body panels

TexasKnucklehead

Jedi Knight
Country flag
Offline
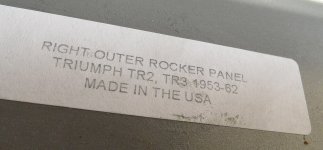
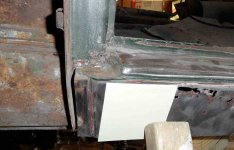
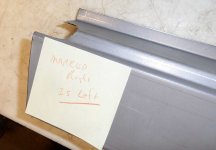
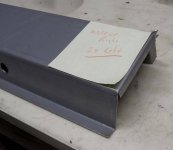
We all know the outer rocker panels are different on pre and post 60k cars, but I got a set marked "TR2 TR3 1953-1962". The one marked "right" is for the left and the one marked "left" is for the right. -I think. The rear of the rocker has a 90 degree bend over, about 1/4" and is perpendicular to the top and bottom edge. The front is at an angle where it meets the front fender. The front has a hole cut where Don has recently shown a small recess needs to be for door opening clearance. However, the replacements do not have additional material that goes under the front fender. Obviously some attention is required of the cut out hole, but is the additional fold under the front fender required?

I have a 1959, pre 60k...

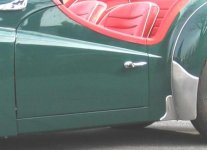
My new rocker panels are flat, the ones on the car are curved to match the doors. Has anyone simply straightened the doors, instead of matching the curve along the length of the rocker? Or, could post 60k doors be used, instead of messing with the curve?
 

Attachments

  • 24721.jpg
    24721.jpg
    64.3 KB · Views: 557
  • 24722.jpg
    24722.jpg
    65.6 KB · Views: 566
  • 24723.jpg
    24723.jpg
    63.8 KB · Views: 543
  • 24724.jpg
    24724.jpg
    65.1 KB · Views: 544
You need the fold under the fender so the fender will not stick out further than the door. You want to be able to lay a straight edge on the fender and door and it will lay flat. Ive never seen that style outer rocker before. If you have not removed the old rocker you may be able to save the old metal where the cut out is. I also don't like the angle that the upper part of the sill has. It looks very rounded, it should have a much sharper angle. As for the curve I installed a flat sill on mine and I thought it looked terrible. It took at least 30 hours to get curve in it by using an unused flat sill from the right side, and making it double walled. I bit more side impact protection never hurts.
 
I've been entertaining the idea of making a form (or buck?) by gluing up some cut plywood to match that gentle curve on the door. Maybe make it sort of like a wood press and sandwich the sill to try to put that curve in it. Anyone think that has a chance of success?
 
Randy It may work but I think you would need to have to curve in the the buck to be larger than the curve in the door. After pressing the metal will relaxe, and want to return to it's original shape. Some vertical cuts in the sill may help it bend, but they would have to welded later. Sounds like a good way to make some extra money if you could get it right.
 
Randy , these don't look right , I agree . Toss them and find the correct ones , you'll spend hours trying to get these to work and they'll not ever look right. This is left over stuff from 30 yrs ago when the cars weren't worth anything but a quick smutz and spray.
 
TR4nut said:
I've been entertaining the idea of making a form (or buck?) by gluing up some cut plywood to match that gentle curve on the door. Maybe make it sort of like a wood press and sandwich the sill to try to put that curve in it. Anyone think that has a chance of success?

In my opinion a good chance. A buck might not even be necessary. It would entail stretching he vertical surface (as on the car) and or shrinking the horizontal surfaces. Not difficult but will require some skill in shrinking and stretching and also planishing he result.
That curve, as my often unreliable understanding goes, was not put into replacement rockers since the sixties. (hardly noticeable is the same curve on the lower part of the original fenders). The easiest solution, of course, is bondo. Don't alter the doors.
The replacement panels I got from LBC (Moss) needed the folds at the b post re-done but otherwise fit pretty well. Pretty cheap too.
Tom
 
Hey Randy,

I got sills from Moss that had the "near correct" front bends. They still took mild beating to clear the door corner when it opened. Your's are missing the most complicated bends at the front. I would use the front of your old sill if they are decent enough to weld in to these...or send these back if yours are unusable to splice in. And yes, the lip should be there to help line up the fender. The Moss sills do have the lips.

The curve is not available in any replacement doors. The buck will take above average skill to make it work. As you bend the curve into the vertical outer skin, the horizontal surfaces will buckle. These will then need to be shrunk...a lot. shrinking takes heat, which will warp the surfaces...requiring more beating to straighten them out. Then, the curve will also be added to the edges that have to be straight to weld to the inner sills. You will then have to straighten and re-bend the edges straight. In the end, if you have the skill and tools to fix the curve in these, you would be able to beat new sills from scratch just about as easy.

My sills will take about 1/16" of filler to match the door curve. I looked it over and decided I was not willing to put the effort into it to save a smear of glazing compound. Just a thought, if you really don't want to use any filler, you could cut the flat vertical surface off and weld it back on with a curve. Still a lot of work, but far less skill required...

Keep us posted!

John
 
Actually Jerry has this issue right now, I kind of stole the thread unfortunately with my comment about adding a curve to the sills. Jerry is ahead of me on his 3A restoration, I'll be tackling sills sometime later this year hopefully. Or since he'll be real good at it by then I'll beg him to help me! I bought ones from TRF but haven't really looked at them too closely yet.
 
TR4nut said:
Actually Jerry has this issue right now
Oh, it's only *my* issue now? I know your turn is coming, and others have been there ahead of us... we all have issues, this is only one of mine right now. :smile:

TR4nut said:
I bought ones from TRF but haven't really looked at them too closely yet.
Randy, please look at them for me. Especially the front edge that should go under the fender. How about dog-legs? Supposedly they haven't changed. Can I assume reproductions will fit?

I suppose I need to get a better set of sills, and would like to get dog-legs at the same time, but would like it if everything would fit somewhat 'like new'. I knew I was taking a chance on the sills I got, but was hoping for the best. The passenger side is rotted well into the area that goes under the fender, so cutting in old is not an option there. The curve is a lesser issue, but this discussion is proving worth while.

TR4nut said:
later this year hopefully.
So, what's new with your TR3? I haven't heard any updates lately.
 
Jerry- I placed them up against what I have on the car and they look very close. If you are coming out this weekend, I can throw them in the car and you can look - in fact you can use them now as I know I won't be in need for several months.

Got the gearbox back together thanks to our mutual guru friend Mike. Overdrive puts out about 320 psi with a drill setup, I'm calling it good for now. Wanted to mate everything up and get it on the frame but I think that will wait for a couple weeks as I have some business trips getting in the way.
 
When I did my early 1958 TR3A in 1987 to 1990, I used the rounded rubber end of a mallet hitting inside the outer sill till I had the curve to match the curve of the door.

On the late TR3A I finished in 2006, the new outer sills I purchased were identical (flat) but since a sheet-matal shop was making all sorts of pieces for me, I had him use his rolling wheel inside the outer sills to put in the correct curve. We can see the results here.
 

Attachments

  • 24733.jpg
    24733.jpg
    18.6 KB · Views: 386
TR4nut said:
If you are coming out this weekend, I can throw them in the car and you can look - in fact you can use them now as I know I won't be in need for several months.

That is a very generous offer that I can't accept for a couple reasons. 1) I doubt I'll make the run this weekend 2) It would be my luck the replacements I get would be sub-standard, and I'd have to take yours back off the car 3) I still need dog legs anyway. 4) I have other issues.

But I'm happy to know that TRFs 'should' fit better than what I have.

Anyone have issues with any replacement doglegs?
 
CJD said:
These will then need to be shrunk...a lot. shrinking takes heat, which will warp the surfaces...requiring more beating to straighten them out. Then, the curve will also be added to the edges that have to be straight to weld to the inner sills. You will then have to straighten and re-bend the edges straight. In the end, if you have the skill and tools to fix the curve in these, you would be able to beat new sills from scratch just about as easy.
Shrinking, if necessary, can be one cold. This curve is a very long radius, only about 1/8 or less in the sill chord. It will not effect the flanges. Although this is probably not a fist time metal forming project, it is not out of the question for most amateurs, at least in my opinion. See Don's post above.

Tom
 
Back
Top