• Hey Guest!
    British Car Forum has been supporting enthusiasts for over 25 years by providing a great place to share our love for British cars. You can support our efforts by upgrading your membership for less than the dues of most car clubs. There are some perks with a member upgrade!

    **Upgrade Now**
    (PS: Upgraded members don't see this banner, nor will you see the Google ads that appear on the site.)
Tips
Tips

TR2/3/3A TR3 PCV

TexasKnucklehead

Jedi Knight
Country flag
Offline
Positive crankcase ventalation. I'm assuming that wasn't very successful with the TR3's use of the downdraft tube/breather pipe on the rear on the block. Has anyone installed a PCV system on a TR3 and is happy with the results? No oil leaking when parked? Any suggestions or should I leave it alone?

Perhaps I'm considering "proper crankcase ventalation"?
 
Actually I think it worked really well -- problem was that it vented to the atmosphere which, despite all warnings to the contrary, humans and other living things persist in breathing.

The attempt to close the system (around 1964) was initially problematic as it did not (IMO) offer enough relief for the pressures that builds up. It relied on engine vacuum which possibly looked good on paper and at idle but, say, under acceleration when the crankcase pressure builds vacuum is dropping it isn't much help. In addition, the holes & tubes were rather small and all on the top end.
 
For 94,000 miles after my engine re-build for my 1958 TR3A in 1990, it leaked (that's more than dripping) black engine oil out the original vent pipe below the mechanical fuel pump on my 1958 TR3A. This happened in my garage, on the driveway and I assume all the roads where I travelled. This was with 20W30 Castrol so I switched to 20W50 Castol but it still leaked (lost) oil at a rate of 600 miles to a quart.

In 2007, I took out the engine and spoke to the owner of a reliable engine re-build shop. He told me to take him all the parts and he measured everything. It was still like new but he said I needed to change the rings. My carbs had been running too rich he told me and the excess un-burned gas had been washing the oil off the cylinder walls and down into the sump. This condition wore the rings and the blow-by had been pressuring the oil pan sump and blowing out the oil. So I ordered new rings for my 4-groove Hepolite pistons by phone directly from Hastings near Detroit.

I re-built the engine and have now done 10,000 miles since this 2007 rebuild and have been running Castrol 10W30 and the bottom of the vent pipe is dry. In the two periods between oil changes (3800 miles each time), I have not needed to add any oil to top it up.

If this sounds like your symptoms, maybe you need a ring job.
 

Attachments

  • 22047.jpg
    22047.jpg
    74.3 KB · Views: 386
I've seriously considered putting a PCV system on my TR3. Perhaps the best info I've run across is here, where five attempts on a GT6 finally resulted in excellent results.

However, after finishing my TR3 resto with the original road draft tube on, and experiencing virtually NO oil leakage, (meaning I never see any drops of oil on my garage floor), I'm a bit hesitant to start messing around solving a problem that doesn't exist. If you are leaking oil, a PCV system <span style="font-weight: bold">might</span> help contain it more then a road draft tube, but the effort involved in getting a good working system on there could be better spent on actually fixing the leaks.

These engines can be put together where there is virtually no oil leaks. I think the biggest problem people have is with the "rear main seal". It's been discussed here, that the setting dimensions in the "Service Instruction Manual" are not correct. I set mine according to the prevailing wisdom, and have no leaks in that area. <span style="font-weight: bold">DO NOT</span> buy the rear main setting fixture from Moss, as the dimensions are even <span style="font-weight: bold">bigger</span> then what the book calls for, resulting in bigger oil leaks. Of course, you could cut the tool down on a lathe to the <span style="font-weight: bold">correct</span> dimensions.

I'm all for cleaning up the atmosphere, but the amount of miles I'm going to drive this car, it will have virtually no impact on anything, so I've decided to leave things as they are.
 
Actually I don't have the engine put back together yet, but I was wondering if there was something I could do now, before it's back in the car, rather than wish I would have, after the fact. It sounds like I don't need to worry about it.

I used the teflon tape method of setting the original type (but new) seal in position. I hope I did it right.

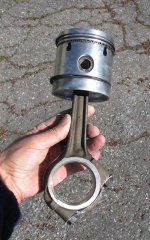
I have new rings to go on new pistons in matched liners, but the pistons are 3-ring type, without the bottom ring as shown in Don's photo. I did have the small end bushing in the rods replaced and resized as the originals had noticeable slop. -not to mention new lifters, (stock) cam, valve job, new guides in the head, timing gears & chain, crank & main bearings...

I'll be happy when it's running, even it does leak a bit. This is the only part of what became a complete restoration that I wanted to do. Finally I get to put the engine together. After it's back in the completed frame, and the 5-speed is attached, I get to finish the body work, paint, put the body back on...

At least I'm no longer waiting on the machine shop.
 
Have the bores honed if your new liners look nice and shiny. I think that was my problem all those 17 years and 94,000 miles. The honing should leave a dull finish on the bores with a 45 degree criss-cross angle. This will wear smooth and shiny as the rings and bores "bed in". Use a good startup oil and add 4 ounces of ZDDP during the run in period.
 
Back
Top