• Hi Guest!
    You can help ensure that British Car Forum (BCF) continues to provide a great place to engage in the British car hobby! If you find BCF a beneficial community, please consider supporting our efforts with a subscription.

    There are some perks with a member upgrade!
    **Upgrade Now**
    (PS: Subscribers don't see this gawd-aweful banner
Tips
Tips

TR2/3/3A tr3 lever action shocks

sp53

Yoda
Country flag
Offline
Hi tr3 people I was wondering if anybody has purchased either new lever action shocks, rebuilt lever action shocks or put a rebuilt kit in their old ones. I have never rebuilt any before, I was fortunate enough to some that I collected over the years from junk yards and parts cars. Anyways I ran out, I guess the best thing is to buy new, but they seem to be kinda priceie. I would like to rebuild my old ones if can and I am looking for the people who have gone before me for input.

Regards George
 
Sounds like you have several sets, send one set to Apple Hydraulics. The cost was a lot less than new.
 
Hi George,

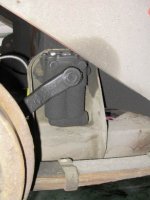
I don't know if it's feasible to rebuild Armstrong levers at home. I don't know of anyone offering rebuild kits and you'd probably need some specialized tools to do much more than change the valves and oil.

First of all, are you sure they really need rebuilding? Often all that's needed is a change of oil. That's pretty easily done.

Unless the shock is leaking excessively at the shaft or top cover, I'd first try oil replacement and see if the lever action smooths out. Incidentally, I think the shaft is designed to leak slightly, so that any dust or dirt is moved outward.

Oil replacement can be done without removing the top (which would need a new seal). Just carefully remove the valve at the bottom to drain. I say carefully (and slowly) because there are several small parts and springs in there that need to be reinstalled in a specific order.

Next remove the filler screw at the top. Let it drain in a pan for a while. Once empty, put the valve back in snugly. Place the shock upright in a vise and refill it with proper oil. Moss sells shock oil. Or, a motorcycle shop will have fork oil that will work. Fork oil comes in various weights, too, if you want to change dampening characteristics. I think 20W was the original weight, but it seems that shock and fork oil weights aren't consistent from on manufacturer to another. Might need to experiment a little.

Once the shock is full, work the lever by hand, up and down a number of times. You'll probably feel some roughness in the stroke initially, but that should go away as air is worked out of the valving. Shock resistance should be smooth and consistent over both up and down strokes. If it continues to be rough and/or uneven, there might be internal wear, damage or dirt that means you'll need to replace the shock. It's possible that just a replacement valve would solve the problem, but that's would be an expensive experiment if it doesn't resolve the problem, so it might be wise to just get a rebuilt set.

If you really need to replace, have you checked out Apple Hydraulics? Their prices for rebuilt Armstrongs seem pretty good. They also offer heavy duty upgrades if you are interested. www.applehydraulics.com

While in there working on shocks, unless they are relatively new I'd suggest replacing the links. They seem to wear out much more often than the lever shocks themselves.

Hope this helps!

Alan Myers
San Jose, Calif.
'62 TR4 CT17602L
 
I went with the heavy duty rebuilds from Apple Hydraulics on my TR6, very pleased. I think they are about the best you can do with levers before just cashing in and going to a tube shock conversion and the price was a good deal cheaper.
 
tr3 lever action shocks Redux

Oil replacement can be done without removing the top (which would need a new seal). Just carefully remove the valve at the bottom to drain. I say carefully (and slowly) because there are several small parts and springs in there that need to be reinstalled in a specific order.

Next remove the filler screw at the top. Let it drain in a pan for a while. Once empty, put the valve back in snugly. Place the shock upright in a vise and refill it with proper oil. Moss sells shock oil. Or, a motorcycle shop will have fork oil that will work. Fork oil comes in various weights, too, if you want to change dampening characteristics. I think 20W was the original weight, but it seems that shock and fork oil weights aren't consistent from on manufacturer to another. Might need to experiment a little.

I am mystified by looking at my shocks, and reading Alan's post,(and no, it's not Alan!). I'm attaching a picture of my shock on my '59 TR3A. There's no filler plug at top, and if there was, how could it be reached? Is it possible to drain and refill these "in situ", or must they be removed to be filled, (and where?) Thanks in advance for wisdom! Kevin
 

Attachments

  • 127105-101_RTSHOK149_2.JPG
    127105-101_RTSHOK149_2.JPG
    51.2 KB · Views: 217
Re: tr3 lever action shocks Redux

Alan said "remove the filler screw at the top" not "on the top". I think the screw you seek is the hex head there in your picture (sorry cannot recall for sure if it is the left or right one).

I certainly top them up in situ but I think it would be a challenge to drain them in place.

To top then up I use a small funnel & a bit of black 1/4" irrigation tube with the tip angled and one side scraped flat with an Xacto so air can get back out the hole as it fills.
 
Re: tr3 lever action shocks Redux

Yes, in the picture, the filler hole is the hex head just to the right of the lever, maybe 1/2-3/4" down from the top lip of the shock.

Clean around it really well before removing (you don't want *any* dirt getting inside the shock), unscrew it and fill until the oil overflows. It also serves to measure the correct amount of oil contained in the shock, when the shock is held vertical (just like a gearbox or differential filler hole, but on a smaller scale).

Since the filler hole is on the side and the shock needs to be held upright during final filling, something to "inject" the oil might be useful. I've got a large plastic syringe-like tool that was originally designed to force oil into cables. It works well for this purpose. Some oils come with caps that help, too.

You can lean the shock over initially and add *some* oil - roughly 2/3 or 3/4 - then place the shock in a vise to hold it upright for final topping off.

After adding roughly half or 2/3 of the oil to the shock, start to operate the lever up and down the full stroke a number of times to work air out of the valve mechanism. Gradually add more oil and continue operating the lever until (hopefully) the full stroke is nice and smooth over it's entire arc, both upward and downward.

If the shock continues to feel "gritty" or rough in it's operation, anywhere along the arc of the lever, or there is little or no resistance, or it leaks badly at the lever shaft, it will need a rebuild.

The shock pictured looks to have some oil gathered on the outside. It *might* be due for a rebuild, if there is a lot of leakage. Or, it could just be many years of accumulation from minor seepage and nothing to worry about. The only way to tell is to clean it off thoroughly, refill it with fresh oil and observe closely for a lot of new leakage. Slight seepage by the lever shaft seems to be normal.

Another thing. When removing the shock from the car, those bolts holding it to the bracket can be difficult to get onto with a socke. There is very little clearance in there to work. If you can't get a socket onto the bolt head, try slipping a large-bladed screwdriver between one of the flats of the bolt head and the body of the shock, to hold the bolt from turning while you remove the nut from the backside of the bracket. Be careful to not damage the shock body, which is cast pot metal or aluminum. This screwdriver "trick" usually works unless there is a lot of rust. If rusted and frozen, I'd just carefully cut the nut and bolt at the back, with a Dremel tool.

Next, when you reinstall the shocks, replace the 4 bolts (2 per shock) with 3/8" NF socket-headed bolts. With these, you can use a long allen wrench to hold the bolt while tightening the nut on the inside. This makes it much easier to install, remove or just check that the bolts are snug in the future.

Because this is a fixture prone to vibration, try to get bolts that have a longer shank (unthreaded portion), so that threads aren't inside the hole in the shock or the bracket. This is so the bolt threads don't "mill" the hole oversize over time and might mean adding a washer or two or three to the backside so that the nut can be fully tightened. Be sure to use new Nylock nuts to prevent vibration loosening. And maybe add some blue or medium strength Locktite as a little extra security.

You might need some sort of tool to break loose the shock links from the lever, too. I've found a small tie-rod tool that works well for this (plus TR tie-rod ends & ball joints). It's listed as a VW tie-rod tool at JC Whitney.com, item #ZX881770B and sells for $11 or less. New shock links are recommended if the ones on the car are more than a few years old.

Again looking at your photo, the leaf springs look like they could use a soak of old motor oil or penetrating oil. The leaves of the springs slide against each other and act to augment the dampening action of the shock absorber. If the spring leaves are rusty in between, this can effect rear suspension action. Best way would be to remove the springs for a nice long soak in an used-motor-oil "bath". But that's a lot of work, usually means installing new bushings at the shackles and, possibly, replacing the front eye bushing. Perhaps you could accomplish a lot just by carefully spraying some penetrating oil or brushing some old motor oil on them. Redo this several times after driving the car for a while and "working" the suspension. Then make it a regular service item to oil the leaf springs every once in a while, depending on how much road time the car sees.

One last thing, while the shocks are removed is an ideal time to clean the brackets really well and inspect their welded attachments to the frame. Look for *any* signs of cracking or fatiguing. From the picture, this one looks okay. But careful and close inspection is highly recommended. After cleaning and inspecting, paint to protect from corrosion.

Hope this answers your questions.

Alan Myers
San Jose, Calif.
'62 TR4 CT17602L
 
Re: tr3 lever action shocks Redux

A tip of the hat to both Geo and Alan for their responses. This is a question that has perplexed me for the year I've had my car. All the literature shows a fill plug on top of the shock; Alan has pointed the way to the real fill plug.

I've thought for a year I've needed new rear shocks; just last week I replaced all four flat-spotted tires. Holy cow, I've got a new car! I will eventually check out my shocks and springs... thanks, Alan, for the spring maintenance.
Next up is that J.C. Whitney tool for my tie-rod ends.
Best, Kevin
 
Back
Top