• The Roadster Factory Recovery Fund - Friends, as you may have heard, The Roadster Factory, a respected British Car Parts business in PA, suffered a total loss in a fire on Christmas Day. Read about it, discuss or ask questions >> HERE. The Triumph Register of America is sponsoring a fund raiser to help TRF get back on their feet. If you can help, vist >> their GoFundMe page.
  • Hey there Guest!
    If you enjoy BCF and find our forum a useful resource, if you appreciate not having ads pop up all over the place and you want to ensure we can stay online - Please consider supporting with an "optional" low-cost annual subscription.
    **Upgrade Now**
    (PS: Subscribers don't see this UGLY banner)
Tips
Tips

TR2/3/3A TR3 Floor pan

Psevins

Freshman Member
Offline
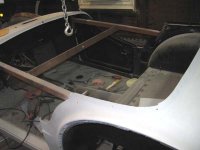
So im working on the plans for my TR3 and I've hit upon a question concerning the order of my process. I restored a Spitfire some years ago and cut out and replaced the floor pans while it was still on the frame. As I'm planning my tr3 work I've found a bit of a difference of opinion on this. My own eyes tell me it looks more difficult to do while attached but I'd rather not torque the whole tub out of shape. I should note I'm replacing the sills as well. I've seen numerous restos where they just separate the tub front from back and weld the floor and sills in that way. Looks interesting but is there a consensus on these methods? My ideal plan would be pull the tub (reinforced btw) and set to the side so I can work on frame/drive train issues this summer.

Any recommendations would be appreciated!
 

TomMull

Darth Vader
Silver
Country flag
Offline
It is obviously much easier to do it with the tub off but that is a lot of work. It is possible to weld in a new floor with the body on the frame but I haven't found a way to do that without making a coupe of cuts in the new floor (not the worst thing in the world). Still, IMO, body on is the best option if the body isn't coming off for other reasons. Most drive train and some frame issues don't require the body off. When it comes off, a full restoration project usually results before it goes back on. Tom
 

martx-5

Yoda
Country flag
Offline
If you're going to replace floors and sills, you're going to have to brace across the doors before removing anything. I also welded a brace across the middle, drilled a hole, and used my engine hoist to lift the body off the frame. Since I only have a one and a half car garage, being able to lift it off, move it around and put it back on with the engine hoist proved very convenient. Do one side at a time, and be aware that you essentially have to build the car around the doors. If you don't get the door openings correct, nothing else will fit right.

Also, Get this book. There's a wealth of knowledge in it. It covers every aspect of the restoration.
 

Attachments

  • 28560.jpg
    28560.jpg
    28.8 KB · Views: 357
OP
Psevins

Psevins

Freshman Member
Offline
My full plan was a total resto. The frame is in need of cleaning and paint and I have issues with needing to do things over again later so I'd like to do all together one time. Time and space isn't an issue ( for once). I suppose I could separate the body and frame and mount the body to a temp. holding rig that would give me better access and such but still maintain some body rigidity.

I've read that cutting to get the panels in is needed but I've not read/seen where the issue lies. I know my past experience that there isn't a perfect fit replacement panel out there so I'm prepared for that.

Got the day off today so I'm gonna move the car into the shop and start cataloging everything.

Thanks!
 
OP
Psevins

Psevins

Freshman Member
Offline
-martx-5

Did you remove the old metal prior to lifting off or after? I've collected the needed metal for support frame just waiting on the arrival of my welder.
 

Tr3aguy

Jedi Knight
Country flag
Offline
I had a shop do that part because I wanted to make sure it was right. I left it on the frame and took the car to them.
I have heard several different versions of how to do it, but make sure you take measurements between the door pillars so you know where it goes back. Do one side at a time...
Floors
Check some of the posts in here....several guys have great metal skills...
 

martx-5

Yoda
Country flag
Offline
Psevins said:
-martx-5

Did you remove the old metal prior to lifting off or after? I've collected the needed metal for support frame just waiting on the arrival of my welder.

I drilled most of the spot welds cut what I could while the tub was laying on the frame, but it wasn't bolted down. There were times when I would just lift it up a few inches to get at various areas. Same went for putting in the new floors. Of course, there was some work underneath that required me to roll the tub out to the driveway. I must have lifted and rolled that tub around a hundred times. If you have the room, a rotisserie would be ideal.

BTW, I found that drilling out the spot welds worked best using 3/16" cobalt split point stub drills. Some welds required a 1/4" size, but there weren't many of those. Split point drills are self-centering, cobalt lasts longer on the welds then high speed, and the stub (short) lengths don't flex or walk around.
 
OP
Psevins

Psevins

Freshman Member
Offline
Hmm, while tooling about with the tr3 I removed my transmission cover and saw something that made my heart sink just a bit...a quarter sized hole knocked out from the inside of my transmission...not sure what happened but it must scared the errr fecal matter out if the driver. I'll post a pic later.
 

Andrew Mace

Moderator
Staff member
Country flag
Offline
Psevins said:
Hmm, while tooling about with the tr3 I removed my transmission cover and saw something that made my heart sink just a bit...a quarter sized hole knocked out from the inside of my transmission...not sure what happened but it must scared the errr fecal matter out if the driver. I'll post a pic later.
Presumably a long-ago blown clutch? Been there, done that....
 
OP
Psevins

Psevins

Freshman Member
Offline
2012-05-17_20-18-18_260.jpg


Thats what I found. Things are starting to make sense though...The car hasnt been titled since 1968 and presently has 58k miles on the odometer...hopefully I can just replace the casing & rebuild the guts. Out of curiousity would a Spitfire gearbox line up right? I have one of those sitting around (well and a gt6 drive train but that might be going too far :cool:)
 

HerronScott

Darth Vader
Offline
Sorry but a Spitfire transmission would definitely not work.

Scott
 

M_Pied_Lourd

Darth Vader
Country flag
Offline
Personally, I don't think that the hole in the casing is that big of an issue. I would just patch it and be done with it personally.

Cheers,
M. Pied Lourd
 

CJD

Yoda
Country flag
Offline
I agree...and if it does bother you, it can be welded easily. In fact, with the proper wire feed sleeve and an argon gas bottle, you can weld it with your MIG...

John
 

martx-5

Yoda
Country flag
Offline
:iagree: 
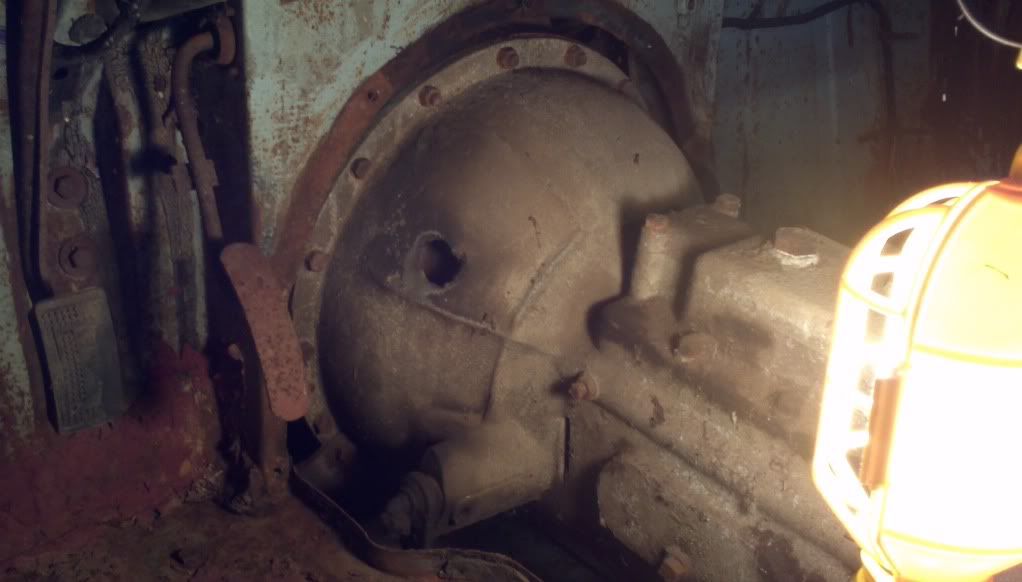
Just repair the hole, even if it's just with a piece of sheet metal and a couple of machine screws...or leave it as one of it's battle scars.
 

mallard

Luke Skywalker
Country flag
Offline
I have a bare housing if you want to go that route. PM me. Make sure you check and see if the housing has any cracks in it.
 
OP
Psevins

Psevins

Freshman Member
Offline
Thanks for the input. I wasn't sure if that could be patched or not. If that's the case then I'm not worried about how it will look since no one will have much of an occasion to see it.
 
OP
Psevins

Psevins

Freshman Member
Offline
Perhaps off topic but its my thread :cool:. Are there any sources for rear panels? The whole thing from inner fender across. Mines a little rough on the spare tire compartment seams. Haven't gotten to that area yet so it may be salvageable but haven't been very fruit full with the Google searches thus far.
 

mallard

Luke Skywalker
Country flag
Offline
Here it is
 

Attachments

  • 28578.jpg
    28578.jpg
    85.8 KB · Views: 142
Similar threads
Thread starter Title Forum Replies Date
71TR6 TR2/3/3A TR3 floor pan to firewall question Triumph 2
S TR2/3/3A Tr3 floor pan removal Triumph 5
K For Sale TR3 front passenger side fiberglass floor panel.....$100 CAD OBO plus shipping. Triumph Classifieds 3
Joel Lester TR2/3/3A Any advice for new floor install on my TR3? Triumph 9
Tinkerman TR2/3/3A 1960 tr3 a carpeting the floor Triumph 8
T TR2/3/3A TR3 floor / frame mounting point question Triumph 13
T TR6 TR3 - TR6 floor pans the same? Triumph 2
T TR2/3/3A Are Classic2Current TR3 floor pans good quality? Triumph 14
T TR2/3/3A TR3 trans cover to floor gasket Triumph 8
S TR2/3/3A Tr3 Gas pedal height from floor Triumph 15
ekamm TR2/3/3A Original tr3 floor mats in place of carpet? Triumph 3
T TR2/3/3A TR3 - sloped vs "square" rear floor area Triumph 7
T TR2/3/3A TR3 floor removal Triumph 4
T TR2/3/3A TR3 floor replacement. Engine in or out? Triumph 3
mountainman TR2/3/3A TR3 Floor Boards Triumph 13
G TR2/3/3A New TR3 floor pans & rockers Triumph 1
S TR2/3/3A new guy here....replacing floor TR3 Triumph 5
martx-5 TR2/3/3A TR3 Trunk Floor Triumph 0
mctriumph For Sale front apron 57 Tr3 Triumph Classifieds 0
R TR2/3/3A TR3 rack and pinion kit problem... Triumph 10
S TR2/3/3A differential hubs early tr3 and tr2 Triumph 22
S TR2/3/3A Tr2 and early tr3 differential. Triumph 10
71TR6 TR2/3/3A TR3 WIper Wheel box Triumph 2
RonC General TR TR3 Shifter on TR6 Triumph 8
jfarris TR2/3/3A Modern Temporary Donut Spare for a TR3 Triumph 1
G TR2/3/3A What color is my car? TR3 1958 Triumph 16
S TR2/3/3A Rebuilding a tr3 transmission and second gear, Triumph 57
mctriumph For Sale Odd bit for Tr3 and early 3A Triumph Classifieds 0
S TR2/3/3A turn a tr3 non-full syncro transmission into a full syncro Triumph 3
Y TR2/3/3A I cannot get my TR3 in correct timing. Triumph 7
mctriumph TR2/3/3A Safety mods every Tr3 should get Triumph 12
Editor_Reid TR2/3/3A Whitewall Tires for TR3 Triumph 11
curdy TR2/3/3A TR3 Stalling Issues Triumph 8
S TR2/3/3A Anyone cut out the spare tire compartment on a tr3? Triumph 4
S TR2/3/3A put a differential back into a tr3. Triumph 2
S TR2/3/3A tr3 breather pipe Triumph 2
2 For Sale 1957 Triumph TR3 Small Mouth Triumph Classifieds 0
Jim_Stevens TR6 Barn find of TR6 and many TR3 parts Triumph 9
J For Sale 1958 TR3 Partout Triumph Classifieds 12
R For Sale TR3 Dash Triumph Classifieds 0
D TR2/3/3A Thread and size for tr3 fuel tank vapor line fitting Triumph 0
S TR2/3/3A Aluminum door capping for tr3 Triumph 12
tinman58 TR2/3/3A TR3 at Mammoth Lakes Triumph 4
G TR2/3/3A TR3 starter disassembly rebuild early M428G bomb Triumph 6
luke44 TR2/3/3A Calling all Wiring experts TR3 Overdrive Wiring ver A or ver B or are they the same? Triumph 8
A TR2/3/3A VERY wobbly TR3 - help needed!!!! Triumph 53
vpanza TR2/3/3A EARLY TR3 hubs for wire wheel????? Triumph 5
vpanza Wanted TR3 FRONT backplates needed Triumph Classifieds 2
mctriumph For Sale Cluster gears Tr3 Triumph Classifieds 0
T TR2/3/3A TR3 pistons and liners Triumph 14

Similar threads

Top