
-
 Hey Guest!
British Car Forum has been supporting enthusiasts for over 25 years by providing a great place to share our love for British cars. You can support our efforts by upgrading your membership for less than the dues of most car clubs. There are some perks with a member upgrade!**Upgrade Now**
(PS: Upgraded members don't see this banner, nor will you see the Google ads that appear on the site.)

Tips
- We have a special forum called "Member Articles" where you can submit actual articles for consideration for publication. Learn More
- Don't have an Avatar? If not, your avatar will default to the 1st character in your username. Go into "Account Details" to change your Avatar.
- Some basic forum navigation info: click
 Hey - did you know if you click on the title of a thread it will take you to the first unread post since you last visited that thread?
- Hey Guest - Is your British Car Club in our Clubs database? If not, send me a PM - Basil

- Looking for a local club? Click the "Clubs" tab above and browse hundreds of clubs world-wide.
- Add Android or iPhone APP: click
- Did you know - any picture or video you add in your posts in any marque-specific forum will also get added to the Media Gallery automatically.
- A few more tips about posting and replying: click
- Hey there Guest - be sure to keep your profile page up to date with interesting info about yourself: learn more
- More tips and tricks on Posting and Replying: click
 but were afraid to ask:
  STOP!! Never post your email address in open forums. Bots can "harvest" your email! If you must share your email use a Private Message or use the
  smilie in place of the real @
- Want to mention another member in a post & get their attention? WATCH THIS

- So, you created a "Group" here at BCF and would like to invite other members to join? Watch this!
- Hey Guest - A post a day keeps Basil from visiting you in the small hours and putting a bat up your nightdress!
- Hey Guest - do you know of an upcoming British car event?
 Pretty Please - add it to our Events forum(s) and add to the calendar! >> Here's How <<
- Hey Guest - you be stylin' Change the look and feel of the forum to fit your taste. Check it out
- If you run across an inappropriate post, for example a post that breaks our rules or looks like it might be spam, you can report the post to the moderators: Learn More
- If you would like to try some different "looks" or styles for the site, scroll to the very bottom, on the left and click the Style Selector.
You are using an out of date browser. It may not display this or other websites correctly.
You should upgrade or use an alternative browser.
You should upgrade or use an alternative browser.
TR2/3/3A TR3 floor / frame mounting point question
- Thread starter tdskip
- Start date
AEW
Jedi Hopeful
Offline
If the pad is removed, do the threaded holes in the frame extension line up with the bracket holes on the sill? I take it you are doing the floors while the tub is mounted. You might weld a thin plate over the sill between the floor to pretty it up since the stamping of the floor pan is not a critical contact. The bolts hold it all together. That center rust hole is where they touch. On the whole I might just clean it and paint it *. Really, with new floors it is not going anywhere. The bad thing I think would be if the frame extensions are rotted at their tube supports.
* these are just the thoughts of another future DPO
* these are just the thoughts of another future DPO
AEW said:If the pad is removed, do the threaded holes in the frame extension line up with the bracket holes on the sill?
No - they don't, which is the concern as they should.
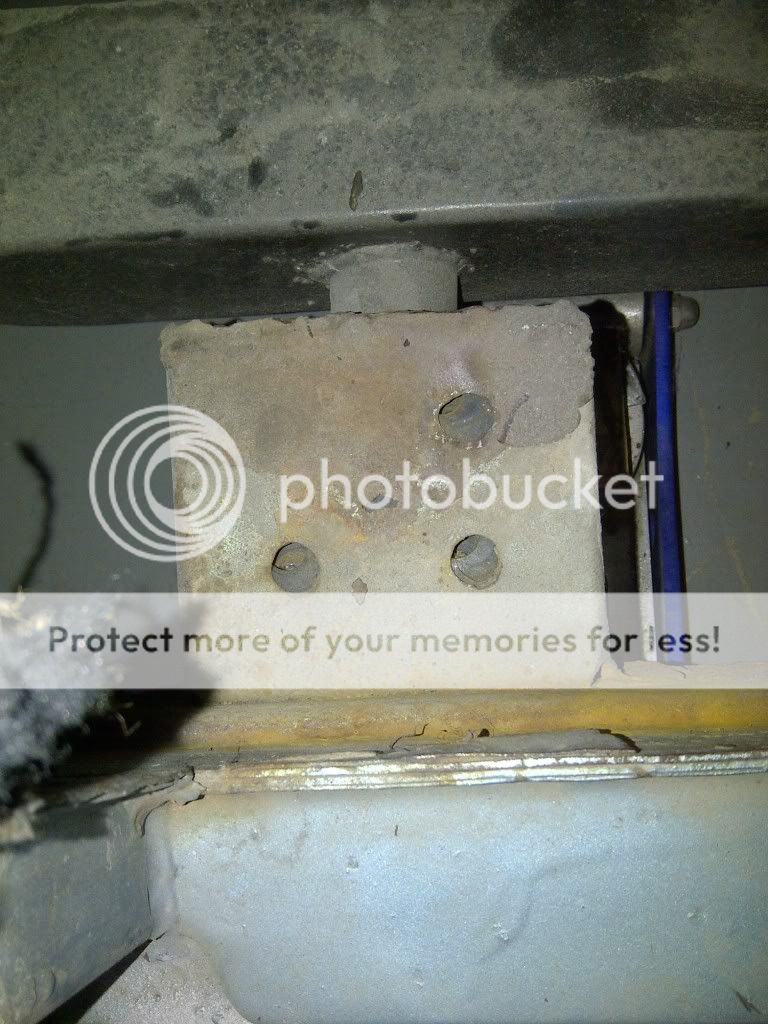
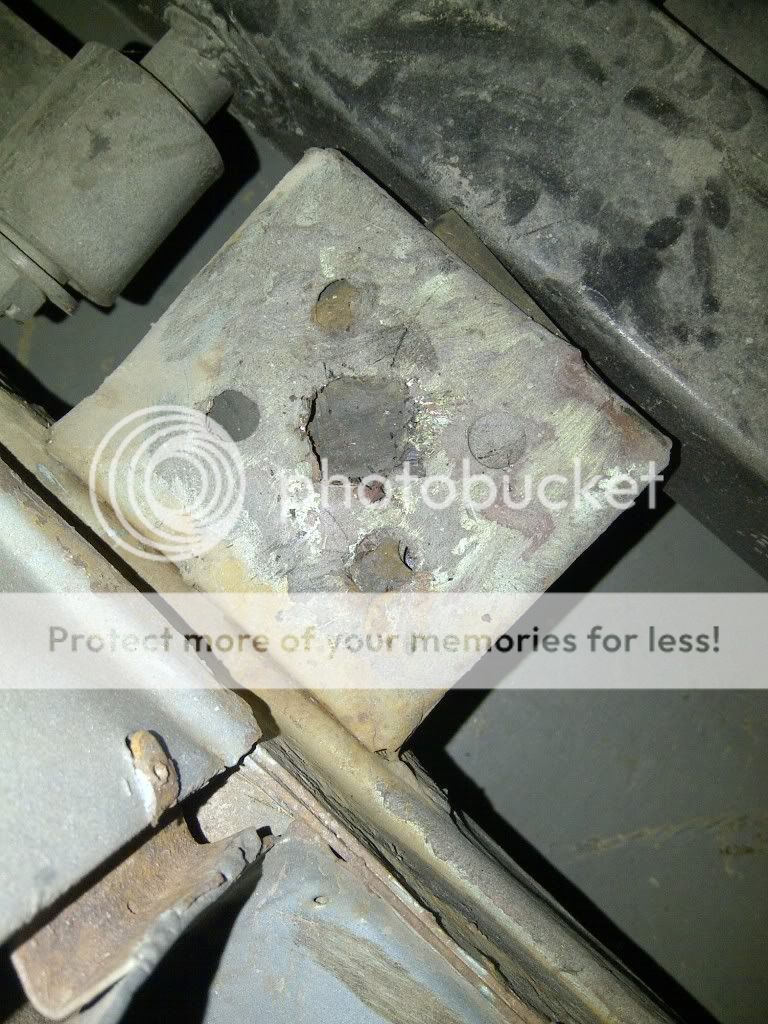
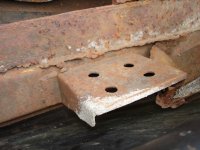
CJD - these were taken looking down at the mounting point from above. The floor to body mounting bolts should screw in there there (I believe).
Is there a pad between the top metal part of the sill and the frame? Might that be what is under the holes? I've not take the body off one of these yet, so forgive the question.
TexasKnucklehead
Jedi Knight
Offline
Oh. I see a little of your floor is missing. That section of the sill should have 4 holes, but the floor will only have 2 holes that align to the threaded holes in the out rigger of the frame. If you push that little pad around that is sitting between the sill and the rigger, you should find the holes -hopefully without broken bolts in them.
The tub should move around enough to align the holes.
The tub should move around enough to align the holes.
Attachments
CJD
Yoda
Offline
There are pads. That's why I say I can't see what we're looking at. It could be the rubber pads are just slid so their holes do not line up with the holes in the mounting tab. With the floors removed, the body will have some ability to twist, so that can also account for a mis-alignment.
It does all need to line up so you are satisfied before the floor pans are even tacked into place.
John
It does all need to line up so you are satisfied before the floor pans are even tacked into place.
John
CJD said:There are pads. That's why I say I can't see what we're looking at. It could be the rubber pads are just slid so their holes do not line up with the holes in the mounting tab. With the floors removed, the body will have some ability to twist, so that can also account for a mis-alignment.
It does all need to line up so you are satisfied before the floor pans are even tacked into place.
John
Hi John - but the bolts have to pass thought the four openings, right?
AEW
Jedi Hopeful
Offline
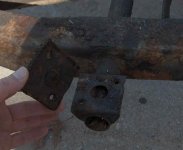
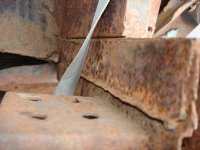
Just to add to the points made by all, these are a couple of pictures of a scrap tub I was cutting up last year. Note the distance between the original floor and the sill bracket. The floor contour reinforcement is about 5/8 inch deep. There are only pads under the sill bracket, the two layers of metal above just sandwich together.
Attachments
Hi guys - thanks for the coaching here.
So in the picture above the floor mounts to that sill structure, correct?
If so, then as suggested, I have some packing/mount materials from the old floors sitting on top of that in my pictures, correct?
Do I just cut that off/back to the sill structure in the picture above?
Thanks, and sorry for being denser than usual on this (insert joke here:______)
CJD
Yoda
Offline
Like I said, I am having trouble from your pics seeing exactly what you've got going on. It appears the rubber may be stuck underneath and blocking the holes on the mounting plate...but it's really hard to tell without poking at it with a screwdriver or something. It also kinda looks like maybe seam filler could have gotten all over it...like a putty filler.
I think you'll have to clean it up and see what is left when you are done...
John
I think you'll have to clean it up and see what is left when you are done...
John
HerronScott
Darth Vader
Offline
I agree as well that it's tough to tell from the pictures. Almost looks like someone's attempt to repair the mounting plates.
Scott
Scott
CJD
Yoda
Offline
Got bored, so sat here looking over the photos.
I am guessing that some PO squirted seam filler between the floor pan and the inner sill body mounts. It looks like the filler spread out all over the mount. But, it does not look like the mount is rusted at all, which is great. I even think you can see the rubber pads underneath, just off center. It appears the mounting bolts were never installed after the seam filler was added. Perhaps to stop the rattle from not having the bolts in??
Anyway, it will be interesting to see what you find when you clean off all the goop.
John