• Hi Guest!
    You can help ensure that British Car Forum (BCF) continues to provide a great place to engage in the British car hobby! If you find BCF a beneficial community, please consider supporting our efforts with a subscription.

    There are some perks with a member upgrade!
    **Upgrade Now**
    (PS: Subscribers don't see this gawd-aweful banner
Tips
Tips

TR2/3/3A TR3 Bonnet Adjustment

Geo Hahn

Yoda
Country flag
Offline
If I wish to move the bonnet forward about 3/32" -- do I loosen the nuts holding the bonnet side of the hinge or the body side of the hinge?

IOW - Is one set of holes slotted or is there just some 'wiggle' room in both sets?

I've got lots of photos but none with enough detail to reveal if those holes are anything other than round.
 
On my car, they both have some wiggle room, but the holes in the scuttle have more. Also easier to adjust there, IMO, as you can tighten the nuts with the bonnet closed.
 
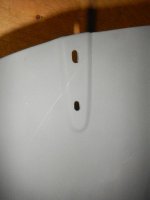
The hood holes have a slot from the factory to pull down. The cowling holes are round out over sized so you can slide side to side and come down some. I say get the movement from the hood by losing the bolts just enough to move it with some light force and then snug up. Maybe put some business cards or heavy paper on the edges. Is the vent not opening?
 
Thanks, I will start with the nuts/studs on the scuttle and see what gives - I only need a tiny bit.

The vent opens (probably because years ago I ovalled the mount holes for it to move it back a tiny bit) but when the vent is closed and the bonnet open the rear edge of the bonnet touches the vent lid. The finish is new clear coat (about a month old) and in my experience is still a bit soft. Eventually it hardens but that takes a long time, meanwhile almost anything that touches it leaves a mark.

Yeah, I can get around it by laying a piece of cereal box cardboard on top of the lid to spread the contact but who wants to have to always think about that?
 
I fit my bonnet numerous time while in the body-work stage of my car. I think I ended up ovaling the bonnet holes as well, but after paint, I still had some fitment issues. Those holes will accept any filler (even filler primer) and build up such that I used a little roll of sand paper to slightly open them up. Like you said, the paint has not yet cured, so do not pull the sandpaper back and forth in the hole -roll it and spin it so as not to pull a chunk of paint off.

And don't forget the right and left hinges are different. -and some of the new studs in the hinge will bottom out in the lip if not cut shorter.
 
Here is a photo of my bonnet holes. This is how they came to me and it looks factory oval

David
. Bonnet slotted holes.jpg
 
Hi.. bringing back an old topic. Had one hinge break. To unbolt the small side attached on the body (the long side being on the bonnet) can you reach up under/behind the dash to get to the nuts..? Any tricks or suggestions?
 
Hi.. bringing back an old topic. Had one hinge break. To unbolt the small side attached on the body (the long side being on the bonnet) can you reach up under/behind the dash to get to the nuts..? Any tricks or suggestions?
Yes they are accessed from the underside. Driver side may be easier than passenger side. Glove box may be in the way.
Charley
 
Ken.... remember on the hinges... there are fronts and rears...
As well as lefts & ringots. More than one set of hinges replaced
for this reason.
gil. NoCal
 
I did purchase a front specific set and read that they each bow in a little toward the middle.. so hopefully can identify them that way.. I plan to have two friends hold each side of the hood up while I do this since it will be “free flying” on one side. Thinking hood end attach first, put hood down, then do the body side.
 
That job is finished.. took an hour.. only had to do the right side/passenger side (left hand drive car/USA). Removed the two body nuts first. Glove box is a little in the way but could reach up behind it. Had 3 friends steady the hood while I slipped my arm under the hood to do those. Had the hood/bonnet raised up just enough to squeeze under as I left the left/DS hinge attached. Not dropping nuts and washers and making sure to avoid paint damage is why it took awhile. Patience is key as always. Thanks for the replies everyone.
-These are the two under the scuttle, behind the dash (1/2 inch I think. Beneath the hood were a different size)
 

Attachments

  • FAB1F7C4-22D7-421B-B87C-11A993F07019.jpeg
    FAB1F7C4-22D7-421B-B87C-11A993F07019.jpeg
    18.7 KB · Views: 93
  • 2EB0E7E5-D22E-43B5-BAA8-34AB573BD175.jpeg
    2EB0E7E5-D22E-43B5-BAA8-34AB573BD175.jpeg
    32.9 KB · Views: 77
Back
Top