• Hey Guest!
    British Car Forum has been supporting enthusiasts for over 25 years by providing a great place to share our love for British cars. You can support our efforts by upgrading your membership for less than the dues of most car clubs. There are some perks with a member upgrade!

    **Upgrade Now**
    (PS: Upgraded members don't see this banner, nor will you see the Google ads that appear on the site.)
Tips
Tips

TR2/3/3A TR3 Battery Box

Gordo

Jedi Hopeful
Offline
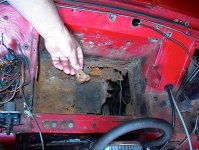
Last night during dinner, UPS dropped off a box from TRF and the wife was very excited and opened it. VERY disappointed wife!! She said "This must be yours, I don't even know what it is".

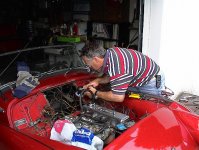
Well it was a battery box I've been waiting on since who knows when. It seems to be a very nice piece, but I don't know how well it will fit for awhile yet. All the proper brackets, captive nuts and holes appear to be in the right spots. It is of a heavier gage metal which should out last me!

Happy Holidays to everyone.

Gordo
 
I welded in a new battery box when I did my restoration from 1987 to 1990. I bought it in England. After it was in, I found that it was about 1/2" less deep. It doesn't matter if the battery sits about 1/2" higher but this means that the brackets which hold the supports for the dash are also 1/2" above where they should be. This caused me problems with the heater doors and the choke cable attachment clip being too high and it was hitting the heater doors. Also I had to add an extension plate downwards to hold the relay for my overdrive as there was not enough clearance for the left heater door to open.

On the green TR3A I finished in 2006, we had similar problems and had to shorten the heater height to get it to fit where it is secured to the dash supports and to avoid the heater to choke cable interference. Measure these dimensions before you start. This car didn't have overdrive therefore the heater relay position was irrelative.

Attached is another I did in 2000. You have to remove the old battery box, dress the mating surfaces smooth and flat and it will "pop" into place from the top with the help of a 2 by 4 and a few hefty swings from a 5 lb sledge hammer.

Also on all 3 replacement battery boxes, the new ears on each side to hold the bottom ends of the battery clamps were not like the original ones and I had to remove them all and re-weld the original ones onto the new boxes so they would appear as "original".
 

Attachments

  • 8988.jpg
    8988.jpg
    93.2 KB · Views: 175
Geez Don, you ought to post some sort of warning before showing an attachment like that... something like "Full frontal rust and non-original parts content -- may be too intense for some TR owners".
 
Hey George - I was helping out a guy in our local club - for free - and he was most appreciative of what we did together. It was a club event and I felt like the chief surgeon in this operation.
 

Attachments

  • 8992.jpg
    8992.jpg
    83.9 KB · Views: 151
One more tip. In the photo above, notice the poly bags we put over the air filters for his Weber carbs so that the grinder dust and chips didn't get into the engine.
 
I thought Charles redesigned the battery box to get rid of all the above problems? It was supposed to be an exact replica... will be interesting to find out if in fact it is...
 
Let us all know. I seem to remember that those two most recent battery boxes may have been from a major west coast (Calif) TR parts supplier. I didn't order them. They arrived with the owners who had bought them.
 
Back
Top