• Hi Guest!
    You can help ensure that British Car Forum (BCF) continues to provide a great place to engage in the British car hobby! If you find BCF a beneficial community, please consider supporting our efforts with a subscription.

    There are some perks with a member upgrade!
    **Upgrade Now**
    (PS: Subscribers don't see this gawd-aweful banner
Tips
Tips

General Tech TR2/3 Gearbox Rebuild

Now on to more inspections during a rebuild. Here are 3 3rd gears.


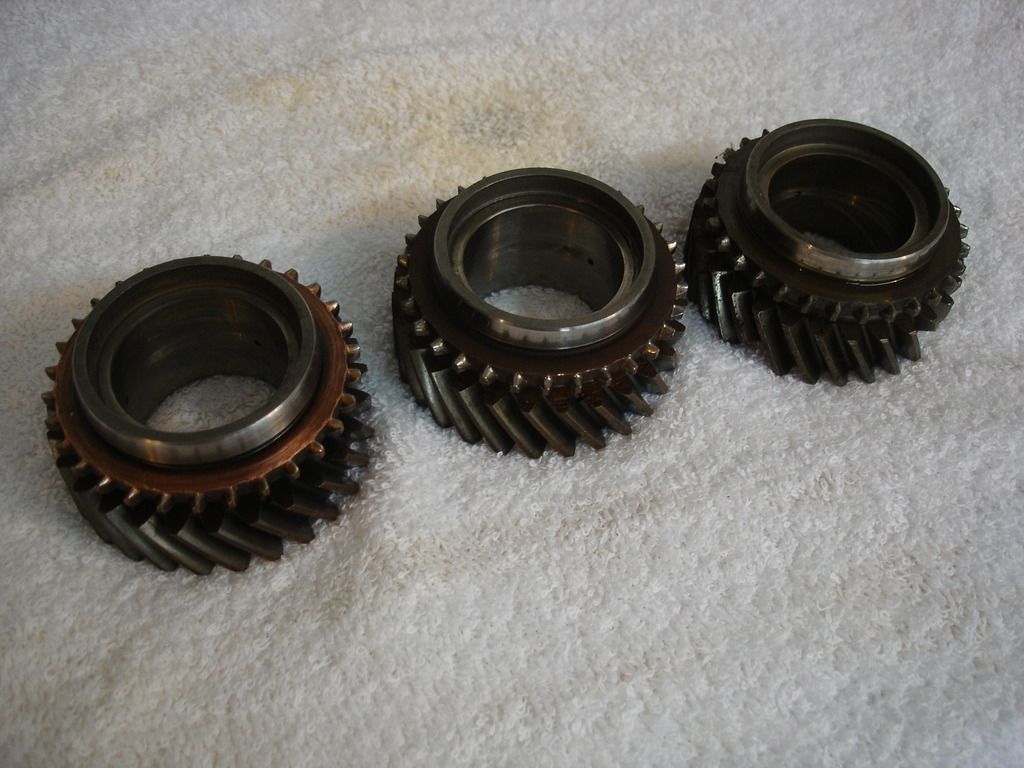
At first glance they look about the same, but these are the areas you are looking for...


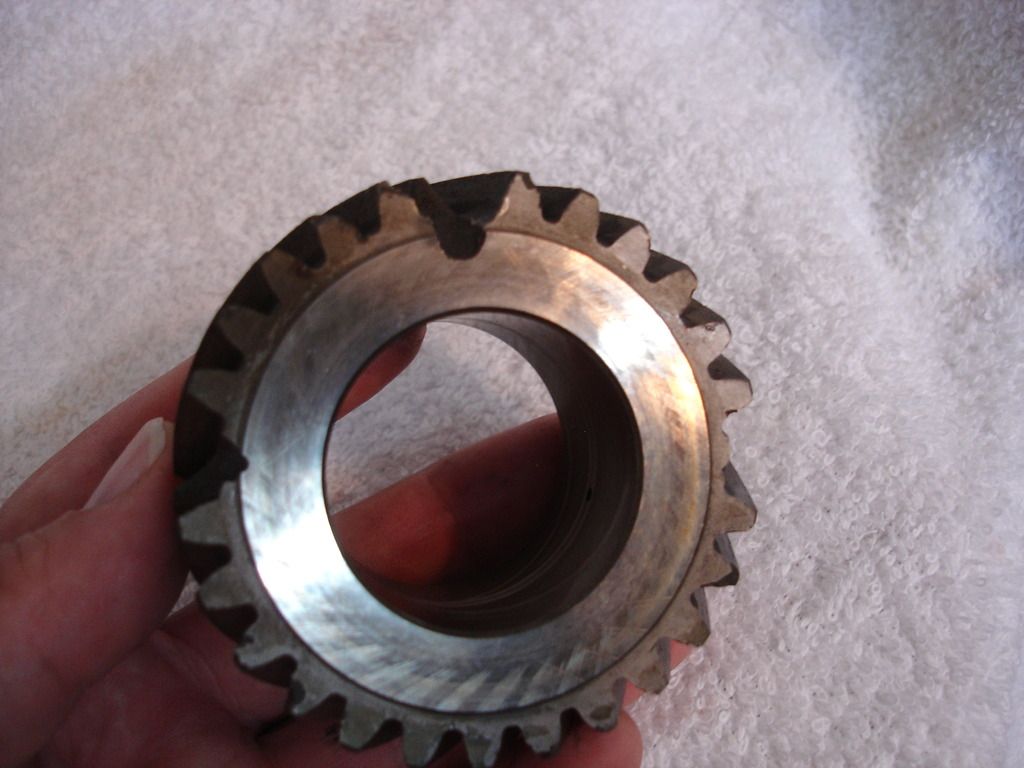
Bad...missing teeth.


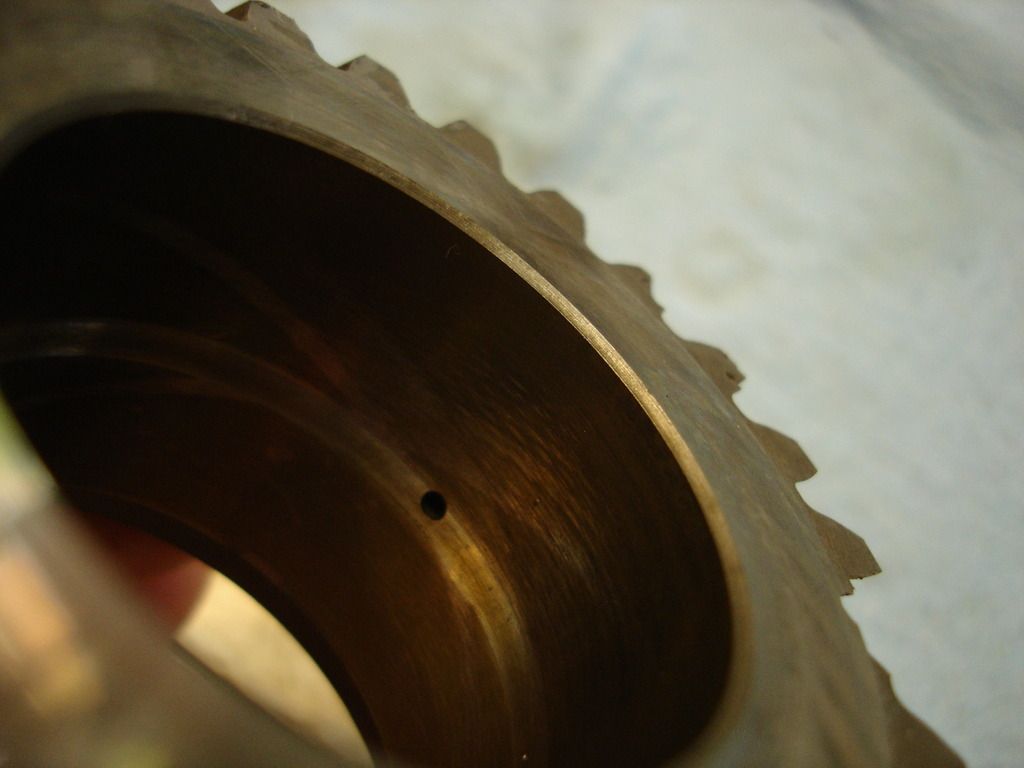
Oil holes free and clear on both sides.


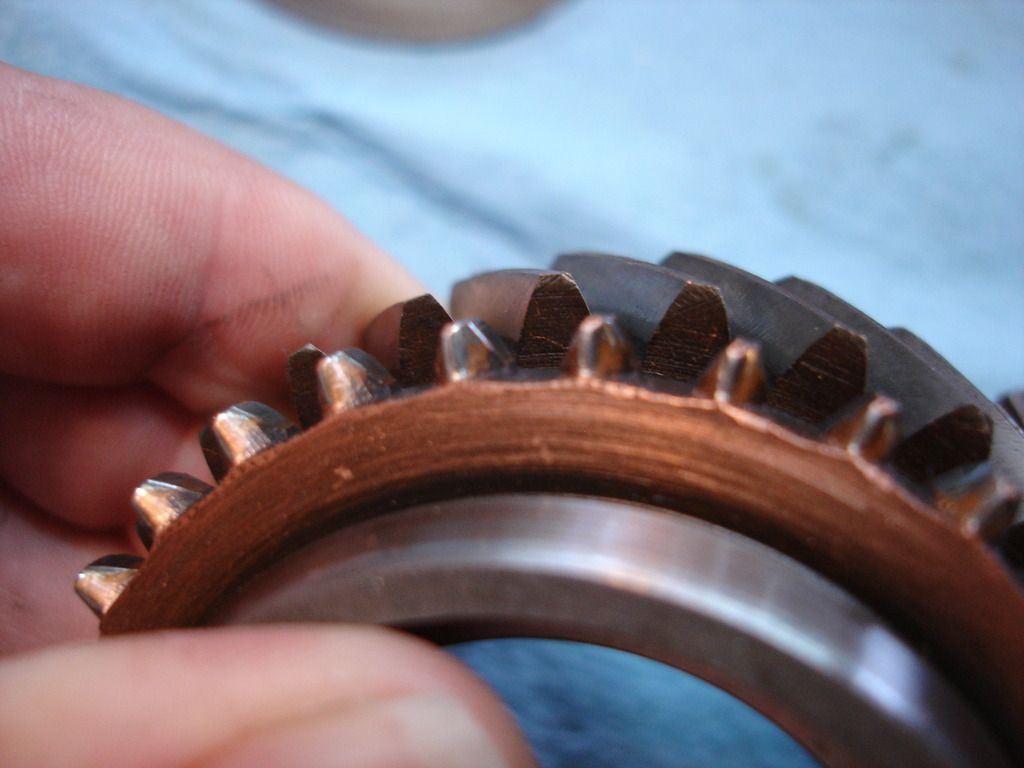
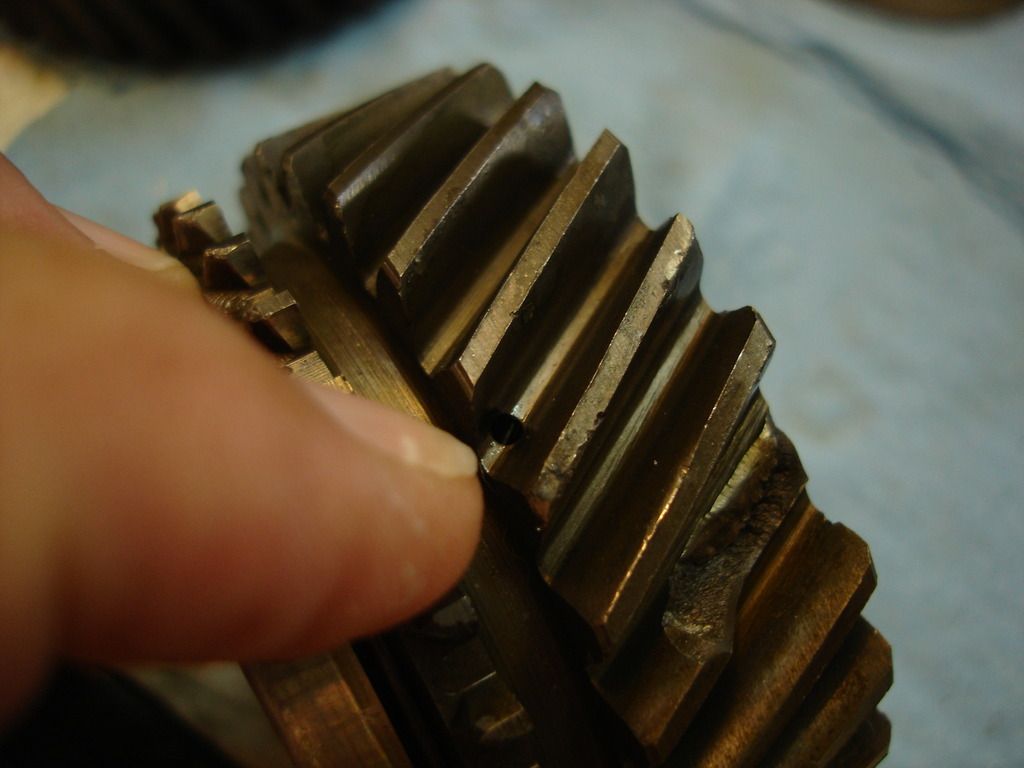
Dog teeth. This gear has relatively rounded dog teeth, so I would expect it to jam when shifting every so often. The teeth should be sharp and well defined at the front.


These dog teeth are actually worn so the teeth look like they were cut at an angle. They were not...this is from many grinding engagements.


This example is about as bad as I would consider putting back in the box. They can be mildly dressed and made to work perfectly. Any worse and it's best to find a new gear.


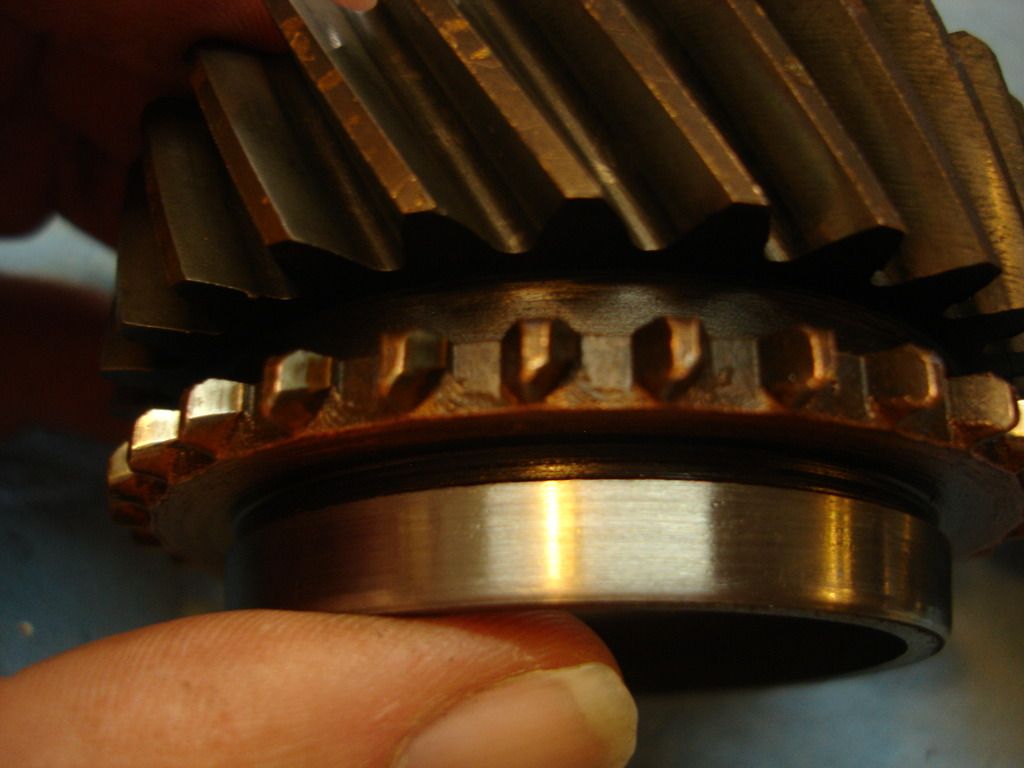
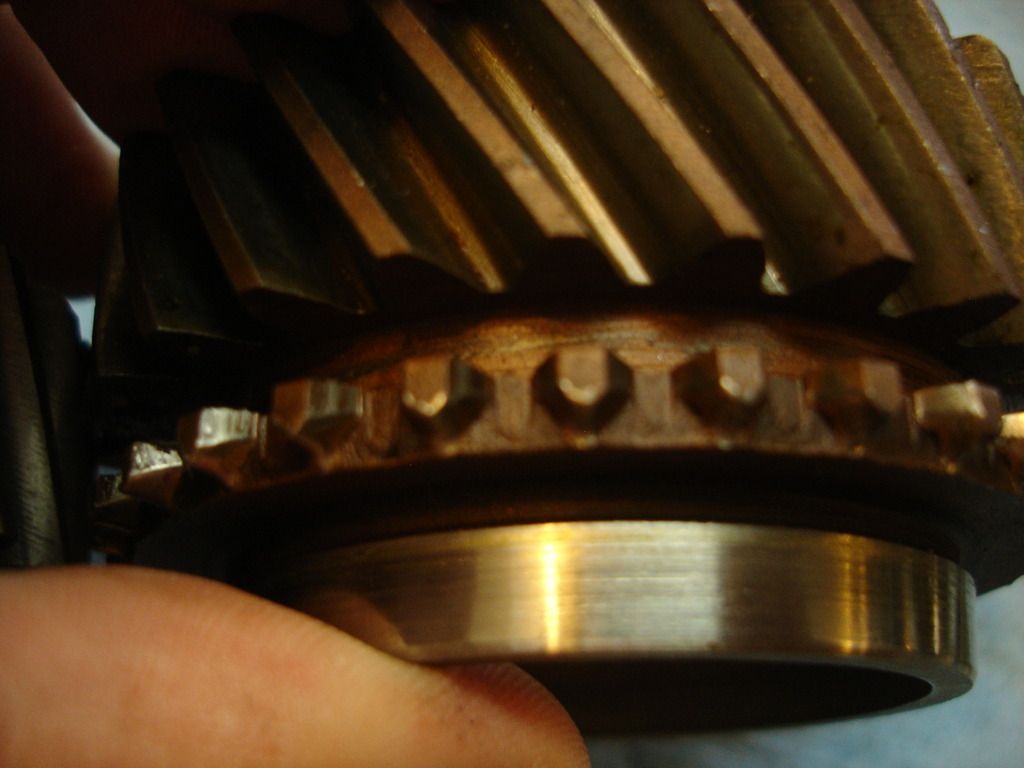
Don't forget to watch for corrosion. At rest, only the lower 1/4 of a gearbox is covered in oil. If a car sits for long periods, many of the gears are out of oil and exposed to condensation, and corrosion. This gear is pitted and marginal for re-use.
 
The part of the dog clutch that engages the gear teeth also needs a close look. It is the outer ring of the clutch...


These are too rounded for my taste. They can be dressed, though, since they are not worn very far.


This one is a bit better. I would dress it a bit, but would also not be afraid to use it as-is.


The outside ring of the 1-2 dog clutch has the gears for reverse gear. This one is toast as it sits. For reverse I would not be afraid to dress it, though, and re-use it...assuming that the dog teeth are decent. If I saw this, along with bad 1st and 2nd teeth, I'd start working ebay.


And here is a better ring. Still some bad teeth, but nothing that can't be dressed. If you look past the ring to the 2nd gear dog teeth, you can tell this box has been grinding 2nd for some time. All those teeth are rounded. Overall, I'd replace this gear if one was readily available...but would not be opposed to re-using before spending the $300+ on a brand new clutch. It does need to be dressed, though.
 
In addition to roller bearings, there are several bronze bearings used in our boxes. Here are some of the 2nd gear top hat bushings...


At a quick glance all three look pretty decent...but they are not all equal. As you notice at first glance looking at gearboxes, the gears are all cut in a helical pattern. This allows the gears to contact each other on one edge softly, gradually increase the load towards the center of the teeth, and then come off each other gradually once again as the next tooth takes the load. The advantage to the helical pattern is a much quieter box. The down side is that the gears impart side loading on each other. So, lets look closer at each bushing above.


This one had a perfect edge.


Not so with this one. The gear side loading has gouged the bearing on its edge. This is not reusable.


And, up close this one is really bad. It turns out the washer portion has fractured from the axial portion.


Also not reusable.

Worth mentioning...all the regular suppliers offer steel top hat bushings now. They will forever prevent the failures you see here. Bronze is $60...steel about $120.

Edit...after going through the manual clearance checks on the box I am currently rebuilding, it occured to me that the TR4 box has a bit of a design flaw with the top hat 2nd gear bushing. I have looked in 5 boxes, and in all 5 the top hat bushings are broken. With a little study I think I see why. The bushings are about .006" larger than the width of the gears they support. When you move the shifter from 1st to 2nd or back, the gears are being pushed towards each other...but the washer on the top hat takes all of that load since the width of the bushings prevents the gears from supporting one another.

Because of this design, the top hat will always break the washer loose over time! The good news, the tranny should work fine with a broken top hat bush. But, I think I would recommend going to the 2 piece steel bushing offered by the big 3. I have already ordered the bronze one for this rebuild, and will use it, but I think I will modify the bushing lengths to equal the gear lengths. In theory this will take the stress of the top hat...more word on whether this works after this rebuild gets a few thousand miles!
 
Last edited:
These are the gears on the TR4 countershaft...also called the cluster gears in the manual...


The front gear which engages the input shaft. Left gear...good. Right gear...bad.


This is the side of the front gear that contacts the forward thrust washer. Remember earlier that oil is drawn past this washer into the cluster gear. The shaft and thrust washer are also the lowest parts in the box. If metal is in the box, this is where it starts its damaging trek through the bearings.


This is the gear from a good box. No sign of scoring.


These are two thrust washers. The left one is heavily scored, and a sure sign all bearings in the box need replacing. The one on the right is still dirty, but is in good shape. They are only $5...so worth replacing even when they look good.

Of note, in the above pic of the thrust bearing, you can see a groove cut in the face of the bearing washer that is not lined up. Note it allows oil to be drawn from the key slot around and into the cluster gear.


This is the end of the counter gear that contacts the washers shown above. Notice the scoring which corresponds to the scoring on the thrust washer. I would not reuse this gear. It is steel and will quickly wear the new thrust washer, which in turn will increase the axial clearance for the gear in the box. The counter gear will then loudly bang for and aft when going from drive to coast.


And, this is the gear on the countershaft gear that engages reverse on the TR4. This is brand new gear, but the driver was in the habit of jabbing reverse while the car was still moving forward. Thus the occasional nicks. A little dressing and this gear is good to reuse.
 
Here is the shifter slot where the shift lever engages second.


Compare that to the un-worn shift lever on the left and you can see the wear.


This wear is from sliding the shift lever from second to third across the "H" pattern. This is no big deal, and the shifter may actually feel better when using it. One of the beautiful things about our TR boxes is that the cover locks out all other gears if the box is in any gear. I had some old cars with external shift linkages that would allow the box to go into 2 gears at once...after a lot of miles and wear. The TR boxes will never do that to us!

Of note in the above pic, the lever on the left is for reverse. You can see that the slot for reverse is more shallow than the slot in the right lever for 1/2. This difference in slot height is the amount you have to "raise" the shifter to be able to move it over into reverse. The shift lever is spring loaded down and must be lifted to clear the extra metal in the reverse lever.


Here is a TR4 mainshaft above a TR2/3 shaft. The only difference is the length of the sprocket in the area of the 1-2 gear towards the right side of the shafts.


This is the reverse gear fork for a TR4 top, TR2/3 below.


And a TR4 input shaft (constant speed gear) along side a TR2/3 input. The only difference is the hole in the back for the mainshaft. The TR2/3 hole is smaller (right side) to take a simple bronze bushing. The TR4 shaft, left, has a larger hole and needle bearings.
 
Last edited:
Very Cool and Educational John.

Cheers
Tush
 
Thanks...Tush! Not as good as your Utube vids, but hope it helps somebody, someday.

Here is another common failure. The following TR4 case was the victim of a starter gear coming off the end of the motor shaft. The parts bounce around inside the bell housing until they decide they've had enough fun and find their own way out...through the side. Currently, there are plenty of used cases around, so repairing a busted case is not a cost effective option. But, I have the tools and the time, so I will show what the repair entails. The day will come when our cases are not so easily found.

So, this first picture is the inside of the bell housing portion of the case, where the nose of the long starter resides. You can see the ring mark the starter return spring made shortly before it went walkabout. The other pictures show some of the internal nicks from the pieces being flung around by the clutch and flywheel.


So, most of these are just cosmetic...and since the inside of the case is not visible, I am not concerned with them. The damage that needs attention are any of the gouges bad enough on the inside to make a crack on the outside...and of course, the gaping holes. These must be repaired. For the minor cracks, just run a bead down the crack to rejoin the metal. Then you can grind the bead off flush.


First step, we need some replacement metal to fill the hole. The early cases are only about 1/8" thick. The later "thick flange" cases are about 1/4" thick. Find some non-alloy aluminum to cut a plug out of. In my case (no pun intended), I have the case from the earlier shown failure in which the countershaft bored the hole in the case too large to easily repair. I will use this "junk" case to cut plugs for my 2 holes. To re-emphasize, practically any non-alloy aluminum in the right thickness will work. If it comes from a sheet, beat it to the correct curve. I chose the old tranny since I could perfectly match the curvature without any effort on my part (read that as...I'm lazy!)


Trace the outline of the plugs around your holes, and use a cheap air powered die grinder to match the hole to the plug.


Now it is just a matter of welding the plugs into the case, and I like to hand grind the welds flush. If the welds have full penetration, the weld beads offer no extra strength. Aluminum welding is a bit specialized, so I am not going into the details, but I did this with a Mig welder and tri-gas shield. A quick brushing and the case is ready to go...


The final, very important step is to check the case for distortion. In most cases there will be none, as aluminum tends to crack if it was tramatized badly enough to bend the alignment. But it is worth a check to save later frustration if it is bent!

If you have to farm this out...expect a good $3-500 bill. Like I said, it is currently not cost effective compared to an Ebay junk tranny case. But, if you have the welder and time to learn aluminum welding, the cost drops to about $5. I give the costs just for planning...
 
That's a great repair.

Cheers
Tush
 
Nice job! You had me at I get teared up just looking at a new gear it's so beautiful!

Now I have to go find Tush's videos!
 
Please...if anyone has tips or techniques, chime in! This is kinda just a thread to answer questions about tranny rebuilds that come up.

This weekend the TR4 box will be going back together. I'm making the kids do the work, so I can take pics!
 
Please...if anyone has tips or techniques, chime in! This is kinda just a thread to answer questions about tranny rebuilds that come up.

I wish I had something to offer, but pulling a tranny completely a parts scares me:cool:

I have had the top cover off before and said to myself " nope, not going in there !"


Once I get into my TR250 resto, I will need to learn, so stand by for questions.

Cheers
Tush
 
Back
Top