• Hey Guest!
    British Car Forum has been supporting enthusiasts for over 25 years by providing a great place to share our love for British cars. You can support our efforts by upgrading your membership for less than the dues of most car clubs. There are some perks with a member upgrade!

    **Upgrade Now**
    (PS: Upgraded members don't see this banner, nor will you see the Google ads that appear on the site.)
  • When posting a classified ad, you MUST select a prefix from the drop-down next to the subject line. If you don't you will get an error and your ad will not be posted!
Tips
Tips

TR2/3/3A TR-3 Top Webbing Installation

af3683

Jedi Trainee
Country flag
Offline
Hi,
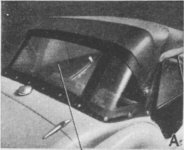
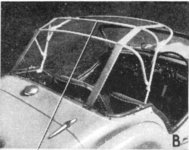
I'm try to install webbing on my TR-3 top frame and have a few questions. I recently got the car and have never used the top so I'm a bit unclear as to whether I have it extended properly. The manuals I have do not provide any information. Any help would be appreciated. Also, I know the webbing is supposed to be tight between the 3 bows when the top is up, but I don't think it is supposed to be tight between the back bow and the plate on the back of the car. How much slack should there be in the back? Thanks.

Art
 
The webbing will be tight when you erect the hood (top).

You will get different replies to your question. I just adjust the spacing between the bows until the bows align with the seams in the hood.
 
Thank you. Unfortunatley my 2 tops are probably original and don't have any seems. TerAnn's web site says it's 8" from the second to 3rd bow and 15 3/4 from the 3rd bow to the back of the car. I also have some original webbing which match TerAnn's measurements. However, using the 15 3/4 from the 3rd bow to the back of the car will not cause that section to be tight. Does anyone agree? Thanks again.

Art
 
I bet your tops do have seams. There is a seam for each bow. Look at your tops, you'll see what I mean.

There is enough variation between tops and top bows and cars that I feel the webbing should be adjusted to fit, rather than to someone else's measurements. The measurements will get you in the ballpark, though.
 
TerriAnne's diagram is for an Amco top. I have an Amco top and her measurements didn't line up. So as Twosheds say, just line them up with the seams as you go. Every car is different.

I might add that what I did was to use a piece of white chalk and mark the webbing as I went. I used a small squeeze clamp to clamp the webbing to the bows and check check chek your measurement to make sure it lines up and the top is straight. Then chalked the position, folded back the top and use a rotary hole punch (leather/fabric punch) to make the holes in the webbing, and screwed them in.

Take it slow and it will come out alright.
 
I checked the 2 tops again and there are no seams. I think they are original or at least many years old and maybe they were seamless back then.

Also, I know the webbing is supposed to be tight between the 3 bows when the top is up, but I don't think it is supposed to be tight between the <span style="text-decoration: underline">back</span> bow and the <span style="text-decoration: underline">plate</span> on the back of the car. Could someone please confirm this fact. How much slack should there be in the back? Thanks.

Art
 
Are you sure you're working on a Triumph TR3??

The top has a very definite concave shape and is sewn from flat material, so no way are there no seams. And the webbing is the only thing keeping the top bows from falling down in your lap, so of course they have to be tight between the rearmost bow and the body.
 

Attachments

  • 23443.jpg
    23443.jpg
    72 KB · Views: 258
Art,

Here are some other threads which cover the webbing and soft top frame. The first has what I thought was a good picture of the frame and webbing with the frame up. The second has some dimensions but based on what everyone posted those will vary.

TR3 webbing thread #1

TR3 webbing thread #2

Do you have any pictures of the tops you have?

Scott
 
Thank you all very much for answering my novice TR-3 top / webbing questions. The picture and the link really helped alot.

Regarding the issue of seams, what I should have said was that there are no seams running across the entire top. Yes, there are seams toward the rear on the side. I just figured out that I apparently did not have the top frame fully extended and now I can see that the webbing could very well be approximately 15 3/4" from the 3rd bow to the back of the car.

For now I plan on using one of existing tops and plan on putting it on the car and matching the bows with the seams. Am I correct in that it is really only the 3rd bow and where the webbing connects to the back of the car that can really vary, since the 1st and 2nd bows must lock into position?

I could take some pictures of the 2 tops but I know they have to be on a serve to post here.

Thanks again for all your help.

Art
 
Hopefully, you will believe me this time.

The front two bows also align with the seams that you do have on your hoods.

They do not lock into position. The webbing holds them in position.
 
:iagree:
To maybe clarify a bit more, the "dog legs" at the bottom of the main bow do lock into position, but the main bow & dog legs still pivot around the point where the dog legs are fastened to the car. So the webbing still controls the fore/aft placement of the main bow. The front bow likewise remains loose on its pivot, as Moseso showed in the link above.

FWIW, an oldtimers trick that makes it easier to erect the top in cold weather is to leave the rearmost bow loose from the straps. You can then fully erect the top from outside of the car, leaving the rear bow folded against the main bow, which will leave the top somewhat loose. Then from inside, push the rear bow back to pull the top snug. As you drive and the vinyl stretches out (from heat and/or moving around), reach over your head and push the bow back to keep it snug. Usually it will stay in place just from friction, if you get the top tight enough (the felt on the bow helps too).

Along the same lines, you should choose a fairly warm day and leave the top out in the sun before doing any fitting. The vinyl definitely stretches and contracts with temperature; and the top won't seal to the side curtains if it isn't tight over the bows.

Oh, and while we're recapping the basics, be sure to watch your fingers when pulling the dog legs straight. They are famous for catching a fold of flesh and leaving a nasty bruise or even blood blister.

Here's another view from Practical Hints
 

Attachments

  • 23444.jpg
    23444.jpg
    91.9 KB · Views: 213
af3683 said:
I could take some pictures of the 2 tops but I know they have to be on a serve to post here.

You just need to set up a Photobucket account, upload the pictures there and then post the link here.

Randall posted some brief instructions on pasting the img code in this thread.
Posting Photobucket links

Scott
 
HerronScott said:
Randall posted some brief instructions on pasting the img code in this thread.
Posting Photobucket links

TR3driver said:
Ctl-C to copy the IMG Code to your clipboard,

BTW, Photobucket has now updated their scripts so you can just click on the IMG code and it will be copied to the clipboard (so you don't need the Ctl-C). However, you must move the mouse away from the popup to use Ctl-Tab.
 
Well I am glad I read through the posts and saw what Randall suggested before I wrote out my version of the top bows. I basically do what Randall suggests, I leave the last/back bow a floater. I figured this out thirty+ years ago when I tried getting my first tr3 top up.
Steve
 
Back
Top