• Hey Guest!
    British Car Forum has been supporting enthusiasts for over 25 years by providing a great place to share our love for British cars. You can support our efforts by upgrading your membership for less than the dues of most car clubs. There are some perks with a member upgrade!

    **Upgrade Now**
    (PS: Upgraded members don't see this banner, nor will you see the Google ads that appear on the site.)
Tips
Tips

TR 3 A Door Fitment

Tinkerman

Darth Vader
Offline
Afternoon all, still chugging away at my frame off on the 3A. I installed the doors and the driver side fit real well but the passenger side dips down a tad too much. Note that the hinges and bolts are all new so no play there. My question is where to adjust? Do I fiddle with the outrigger bolts? Or perhaps with the one at the drive train tunnel? No experience here, so what ever anyone could come up with would be deeply appreciated.
 

Attachments

  • 18223.jpg
    18223.jpg
    74.5 KB · Views: 327
  • 18224.jpg
    18224.jpg
    71.9 KB · Views: 324
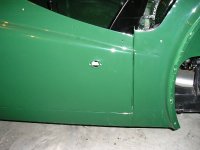
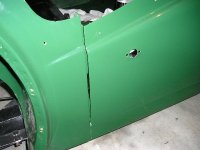
IIRC, there is play in the mounting of the doors on the A pillar both up and down and in and out. Loosen up the screws where the door bolts onto the A pillar and see if you can lift the door up and then re-tighten. I know I had to mess with that when I mounted my doors. I also had a hanging door, but it was at an angle (your's don't appear that way), and I had to shim out the bottom hinge to get things to align nicely.

The angle and gaps at the rear of the door can be tweaked by adjusting the shims where the body bolts onto the chassis at the very rear. I also messed with that a little to get the gaps at the rear of the doors looking better. Also, on the subject of the doors, I bought new latches that bolt onto the B pillars. They give you a bunch of shims to get that right, but in my case, I had one door that I had to grind the back of the latch to get the door to close properly.

Doors are alot of fastidious work, but just keep trying differnet things and you will get it them right, You aren't too far off.
 
were these test fitted when the body work was done?
 
As written above, you can add or remove several of the rubber pads under the floor pan where it is bolted onto the inner sill out-rigger just inside of the "B" post. You may have to fiddle with the pad selection near the "A" post too.

You could also cut a shim made of this brass or a piece of thin flat cardboard and slide it under the hinge plate where the hing is attached to the door. To close a gab at the "B" post down near the bottom, put that shim (or shims) under the lower hinge. A this shim will lift the rear of the doe a whole lot.

You'll get it right. When you do, come back and tell us how you achieved it.
 
hermanmaire said:
were these test fitted when the body work was done?

Yes they were, before and during and after the body work. After I got it home I had to take the body off to install everything on the chassis, easier that way.

Tinkerman
 
So I will be fiddling with it this weekend and I will let you know how I made out. Thanks for the replies.

Tinkerman
 
Top photo - It looks like the door to rear 1/4 detail is lower at the rear of the door. If you raise the rear of the door on the bottom, which you'll need to have room for the weatherstip, it will pull in the bottom of the door edge closer to the b-pillar. Then rock the door to get an even bottom which should pull in the top rear edge towards the b-pillar. Keep hinges loose enough to adjust with a rubber or deadblow hammer. Tap on the edge several time lightly as you watch the gaps.

Second picture - loosen the hings, then try to pull the door outwards on the front edge sliding the front of the outside hinge holes. This would angle the door alignment out at the front and push the rear edge further back - and inwards(a little.) Hard to tell without looking down the side lines of the car which axis is off.

hth
 
Thanks, Peter! I can use all the help I can get. As I said I will be fiddiling with it this weekend so will let ya'll know how it comes out.

Tinkerman
 
Dick - If you had it fitting correctly before you had it painted, you should be able to get it right again. If you had welded braces across the top of the doors earlier to "keep it square" and now you have removed these braces, this may explain the problem.

If the door gaps are still really wrong after you fiddle with all the above suggestions, you can always fit the door, check where you have the wrong gaps and then you can grind off the paint where it's wrong and MIG weld a long line of new steel along the door edge where the gap is too wide, recheck the gaps and then have the door re-sprayed to match.
 
Back
Top