• Hi Guest!
    You can help ensure that British Car Forum (BCF) continues to provide a great place to engage in the British car hobby! If you find BCF a beneficial community, please consider supporting our efforts with a subscription.

    There are some perks with a member upgrade!
    **Upgrade Now**
    (PS: Subscribers don't see this gawd-aweful banner
Tips
Tips

tools for doing stuff with metal

G

Guest

Guest
Guest
Offline
So i always did woodwork.
Have a bunch of woodworking tools, use them just fine, so I'm not totally inept with my hands. I never did anything with metal more complicated than make holes in it though.

I have a hankering to learn to fix things on a project car (that doesn't exist) using tools that I don't have.

I got a mig for Xmas. Haven't even plugged it in yet. I need some bits of metal to try to stick together with it.

What else should I get?

Lets say about a 1k budget - less if possible - and I'd like to be able to cut, shape and srick together pieces of metal, mainly with an automotive bias. I plenty of hand tools, jus tnone that let me do stuff to metal - unless you count a hacksaw and a 4" grinder.

I was thinking one of those vertical/horizontal hacksaws, a metal brake, some clamps and a bench grinder to start, along with a bunch of assorted clamps and maybe a pillar drill, some nibblers and an electric cutoff wheel (a good compressor will blow the budget). I'm not going to be doing this for a living, so I priced things at HF.

If this were you, what would you buy, and why?
 
How are you fixed presently for air tools? Compressor (CFM)?

I've been doing a LOT of fabricating with the project I'm working on. A decent grinder is essential; I use a 4 1/2 " DeWalt and have about worn it out during the past year. Not a day goes by that I don't reach for it. A full compliment of disks also; cut off disks and grinding disks for sure, and my #1 friend is the flapper sanding disks (60 and 120 grit to start). I also reach for the little air die grinder routinely, but for the heavy stuff, the electric one is my choice.

The el cheapo 36" brake from HF has been used a lot and the HF bead roller as well. If you are doing any rust removal and have to work a number of corners a lower end needle scaler will pay for itself quickly; mine came from Northern Tools.

Light duty sheet steel and aluminum panels are easily cut with a power shear. They're available in both electric and air models; I use an air type from IR.

I have the most basic hand tools, hammers and dollies, and that's one of my favorite things to do; you can make metal do anything...if you have the patience.

You can see a number of the tools in use and the results of my efforts on my web site www.raysmg.com ; follow the "Spridget Project" link and then go on the the "Bodywork" pages.

Hope this helps,

Ray
 
I have an electric shear from Harbor that works well
92115-t.gif

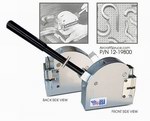
One thing that's a little pricier, but good to have is a shrinker. If you want a stretcher, you can get a separate one or get a combo shrink/stretch. The problem with the combo is changing the heads, but it is a little cheaper than getting two dedicated tools.
12-19800.jpg
 
Hi Folks
One good place to start is try to locate , build or buy a metal bench.
One that suites the size of your work area and is fairly stout. You will find with this tool you can adapt other important equipment like a vise a home made metal brake a place to hang your other tools and a great place to fab many small parts for your resto.
shop-equipjpg-6.jpg

Depending on what part of NY you are from we have a Grizley tool company here in N.E. PA. that has a wide assortment of cooool things. (bring a truck) :laugh: And while your in town stop on by :yesnod: I can give you the 50 cent tour and you are welcome to try out some of the tools you may need in the near future. :savewave:
 
Great suggestion, Steve.

I've already determined that one of the first additions to my new shop will be a steel topped bench. I've been making do with a hand made (I made it) rock maple wood working bench...with a 15"x15" off cut from a laminated beam laying on top. Cumbersome...but it kept me from burning and banging up the maple bench.

Alana...that would be a good project for you with your new welder.


Ray
 
Hi Ray
Rock Maple :eeek: I'm guessing (rock) meens very very hard :eeek:
That sounds like it would be great for shaping metal. :thumbsup:
 
I went to HF today - well what else can you do in the rain...

Bit the bullet and bought a proper compressor and a whole bunch of air tools. I know that HF stuff isn't the greatest, but it sure is cheap. Spent the afternoon rigging the air lines.

I also bought a power hacksaw - one of the $160 vertical/horizontal adjusting ones. I just got done putting it together and of course I had to try it out. That thing is <span style="font-style: italic">cool</span>. I didn't realise that it fed itself - I thought it was like my compound miter saw...

Now I have to get the compressor connected, buy some gas for the MIG and get some metal to practise on and I'm good to go.

grin.gif
 
Alana
Its sounds like your having fun, now are ya going to share it with us with some photo's :thumbsup:
 
just need a bead roller, or a couple of pieces of square tubing welded to a plate and my ball pein hammer
 
Sticking bits of metal together...

Spent an hour today with the MIG and some scrap metal. Used flux core wire so I didn't have to fiddle with the gas.

The first weld was awful. Looked like a line of popcorn. The middle one in this image was attempt #8. Butt weld on two triangles set at 90 degrees to one another. (The bit at the end where I disintegrated the corner was #7).

I thought all in all it looked ok since the two pieces are for sure stuck together, which was my aime for today...

I'd be interested in tips or comments from someone who knows what they are doing though!

weld.jpg
 
Re: Sticking bits of metal together...

Tip #1: Mess with the gas, <span style="text-decoration: underline">completely</span> different animal.

Tip #2: The corners will heat up faster, you might try shorter weld times when nearing the edge. Couldn’t hurt to get in the habit of doing tack welds also.

Tip #3: Have fun! Or should THAT be tip #1?
 
Re: Sticking bits of metal together...

I have all the stuff for the gas setup, but I wasn't in the mood to hook it up. This was just to get an idea of how it all sorta worked, but then just getting the spool in without the wire spalling was an adventure in of itself...

If I actually weld for real (I have some 20 gauge sheet metal on order) I'll try to stitch it rather than running a solid bead. This was just an attempt to stick something together.

I have to use gas on the 20 gauge anyway - the welder won't step down far enough (according to the handy reference guide inside) with this flux cored stuff, so it looks like I'll be getting some practise with that too.
 
Re: Sticking bits of metal together...

It might just be the way I weld, but I find those guides under the welder lid to be way to hot. I'll burn thru every time using a different MIG and it's guide. A good spot to start with, then I'll back the voltage down and maybe give a little extra on the wire speed.
 
Re: Sticking bits of metal together...

Thx, I'll bear that in mind.
 
Re: Sticking bits of metal together...

To stay within your budget, keep an eye on your local Sunday paper for flea markets and auctions. I've attended several going-out-of-business garage auctions where I got very good tools for excellent prices.
I'm not a flea marketer, but some friends have gotten great deals at them.
 
When I bought my house (just over a year ago), at the closing the seller said "I left that steel work table in the garage, but if you don't want it I can come get rid of it". The table is about 30" deep by 60" wide. He also left me a 3' length of railroad track, which makes a great anvil. I said it would be fine for him to leave it there.
grin.gif

AND, he left pink curtains in the garage, apparently put up by his friend "Diesel Dave". The table and the length of track are still there....
 
confused0031.gif
What happened to the Pink curtians
confused0031.gif
evilgrin0007.gif
 
Once my B is completely restored, I'll hang them from the visors to help keep the sun off the dash! The pink will go so well with the maroon body of the car! :thumbsup:
 
Back
Top