• Hi Guest!
    You can help ensure that British Car Forum (BCF) continues to provide a great place to engage in the British car hobby! If you find BCF a beneficial community, please consider supporting our efforts with a subscription.

    There are some perks with a member upgrade!
    **Upgrade Now**
    (PS: Subscribers don't see this gawd-aweful banner
Tips
Tips

Toggle Switch bracket

Lin

Jedi Knight
Gold
Country flag
Offline
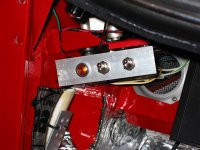
Roger inspired me and I thought I would share an idea. In the constant pursuit of ways to mount various "electrical modifications" to my car without drilling holes or permanently altering the vehicle, I came up with the following panel for some toggle switches and a warning light for my driving lights.

The photo shows it in bare aluminum before painting so that it is easier for you to see. After it was painted the car color it disappears from view. Just used a piece of L stock aluminum with holes drilled for switches. Then mounted the bracket to the threaded "legs" of the wiper motor with a couple of additional nuts. Very easy to do.

My car is a BT7 so I don't have the toggle switches on the dash console of the later cars.

Lin
 

Attachments

  • 15105.jpg
    15105.jpg
    56.4 KB · Views: 455
Lin said:
Roger inspired me
Lin

Dude, don't hold that against me...
Ok, enough of that Roger guy. Let's get back to the item at hand here.

So, there's the photo of the bracket before painting.
Next photo Lin will post will be of it installed/painted. With me so far?
Next photo Lin will post will be of the mirror he placed directly below the bracket, on the floor, cut into the rug, that will let him see the light next to the toggle, in the bracket, that lets him see that the toggle is on. (I did my best to make the a super long run on sentence).

Oh wait, maybe the bracket faces forward. Never mind.
Oh but wait, there's more. "After it was painted the car color it disappears from view." Then how can you see the light?

But who cares about that anyway, when old eagle eyes spotted a cardboard tube with a nifty aluminum plate with weight saving holes, held in position by the over engineered zip tie system. Yeah, what's that 007 Q gadget all about. Spill baby spill
 
Does this mean that for all of us that are still working on our cars we will go completely mad like you two, when we finish.
I get it, you spend several years restoring your cars then its all done and your wifes and kids tell the 'stranger' to go back in the garage, so you spend the next several years trying the can we? shall we? improve it? before they lock you up.
I hope you get to share a padded room together!

I bet Roger goes one better and installs a proper flip out console with full switches for rockets, ejector seats etc....
Andy
 
andybj8 said:
Does this mean that for all of us that are still working on our cars we will go completely mad like you two, when we finish.
I get it, you spend several years restoring your cars then its all done and your wifes and kids tell the 'stranger' to go back in the garage, so you spend the next several years trying the can we? shall we? improve it? before they lock you up.
I hope you get to share a padded room together!

I bet Roger goes one better and installs a proper flip out console with full switches for rockets, ejector seats etc....
Andy

Dear Andy,

Where do I begin? I know...OMG! It's all true! Well, about me anyway.

Who says I'm completely mad. I'm sure there's a way to go. But thank you for the compliment.

"go back in the garage, so you spend the next several years trying the can we? shall we? improve it?"

OK, it's a little out of my persona for me to think outside the box, but I will give it a try.

"Installs a proper flip out console with full switches"...

Oh grasshopper, like I'm not working on one now!

I love this place.
Peace out,
Roger
 
Hello Lin,

So how about some details of these "Electronics for variable speed intermittent wipers", please.

I hope you didn't just paint the bracket as it's shown without removing the sharp edges and corners. It almost pains me to see it like that, it's not a criticism.

Andy

I guess it's up to me to advise you of this but if you're owning/working on an Austin-Healey then it's obvious that you're mad. It doesn't just come with time although with hanging out/conversing with other owners it's enhanced because we are also. Just enjoy it.

Regards,

bundyrum.
 
Bundyrum.

Edges are still square I am afraid, but all filed smooth before painting. I will probably leave it that way until I cut my leg - but nevertheless, a good point!

I learned about the intermittent wiper electronics when reading a "Tiger United" web site (for Sunbeam Tiger owners)four or five years ago. An enthusiast named Ed Esslinger made the kit.He was selling it at a very reasonable price as I recall. It is really a nice trick as it also includes the wiring to hook up to the lights so that they come on when the wipers come on (just like today and as now required in most states I believe).

I was so pleased with it that I was going to buy another one for my Bugeye, but I have not been able to locate Ed and I believe references to the kit on the web site are no longer evident. I will admit that I have not worked hard to find Ed, perhaps someone else will.

Cheers,
Lin
 
I didn't jump in before since I didn't have any pics of my switch bracket.... but I reinstalled it yesterday. It is powder coated in black wrinkle finish which has a look much like the BMC things that were added it in the day. Now if I can figure out how to add the pic.... You can also see my A/C drivers side duct.

Cheers,
Steve
 

Attachments

  • 15354.jpg
    15354.jpg
    87.6 KB · Views: 249
Hey Steve,

Wow, do I see a lot of things wrong!!!

As in it's just wrong that some of you guys are doing such an outstanding job. Man that is one sweet bracket.
Got Hot feet? Not me mister. Look at all the heat shielding.
I could go on and on about how many upgrades I see you have done, (AC, heater, knobs, safety toggle) but it would humble my attempts at what I've done. (Hey guys, look what I've come up with...fuzzy dice hanging from the mirror. I know, sweeeet!)

WoW! looks great!

I thought it was Lin's car at first. You guys seem to doing the same thing. (Hey wait just a minute. I think I saw you two guys on Pepsi's Super Bowl ad...MacGuber. Who played MacGuber and who was Pepsuber?)
Cheers,
Roger
 
Thanks Roger....I think ;-). Actually, those knobs are from right to left... dimmer for aux. center console led's, dimmer for center console instruments, hazard light switch, and fresh air pull (I modified the fresh air box to feed both the drivers side and passenger side (I cut out the partition inside the box)). The A/C controls are on top of the center console. I'll include a pic of that since I now know how to do it. The insulation is double layered on all engine facing surfaces (doubling this insulation triples it's insulating rating).
 

Attachments

  • 15355.jpg
    15355.jpg
    89.6 KB · Views: 230
Nice work Steve. The next tip for you shall be editing posts (since you've gotten adding pictures down). At the bottom of a post you made, you'll see a "edit" button. You have a couple months I think to change stuff. :thumbsup:
 
Hello HealeyPassion,

That looks pretty nice congratulations on a fine job.

Is the gearlever the stock length?, and did you put the insulation on the inside of the tranny cover to reflect the heat also?

Hello also to Lin, sorry to hijack your topic here but I just had to give some credit.

Of course credit goes to you also because of the work you have done. I love it.

Regards,

bundyrum
 
Bundyrum/Lin, I didn't really mean to sidetrack the topic, I was just trying to clarify for Roger the knobs and such.

Anyway, insulation on inside of tunnel... I put aluminum panels spaced 1/4" off the tunnel to direct the hot air away from the tunnel...with the double layered top insulation it is hasn't shown any heat during dyno tuning. The gear shift lever is shortened...and, although it is an AH lever, it connects to a Toy 5 spd.

Now back to the brackets :smile:.

Cheers,
Steve
 
Back
Top