-
 Hey Guest!
British Car Forum has been supporting enthusiasts for over 25 years by providing a great place to share our love for British cars. You can support our efforts by upgrading your membership for less than the dues of most car clubs. There are some perks with a member upgrade!**Upgrade Now**
(PS: Upgraded members don't see this banner, nor will you see the Google ads that appear on the site.)

Tips
- We have a special forum called "Member Articles" where you can submit actual articles for consideration for publication. Learn More
- Don't have an Avatar? If not, your avatar will default to the 1st character in your username. Go into "Account Details" to change your Avatar.
- Some basic forum navigation info: click
 Hey - did you know if you click on the title of a thread it will take you to the first unread post since you last visited that thread?
- Hey Guest - Is your British Car Club in our Clubs database? If not, send me a PM - Basil

- Looking for a local club? Click the "Clubs" tab above and browse hundreds of clubs world-wide.
- Add Android or iPhone APP: click
- Did you know - any picture or video you add in your posts in any marque-specific forum will also get added to the Media Gallery automatically.
- A few more tips about posting and replying: click
- Hey there Guest - be sure to keep your profile page up to date with interesting info about yourself: learn more
- More tips and tricks on Posting and Replying: click
 but were afraid to ask:
  STOP!! Never post your email address in open forums. Bots can "harvest" your email! If you must share your email use a Private Message or use the
  smilie in place of the real @
- Want to mention another member in a post & get their attention? WATCH THIS

- So, you created a "Group" here at BCF and would like to invite other members to join? Watch this!
- Hey Guest - A post a day keeps Basil from visiting you in the small hours and putting a bat up your nightdress!
- Hey Guest - do you know of an upcoming British car event?
 Pretty Please - add it to our Events forum(s) and add to the calendar! >> Here's How <<
- Hey Guest - you be stylin' Change the look and feel of the forum to fit your taste. Check it out
- If you run across an inappropriate post, for example a post that breaks our rules or looks like it might be spam, you can report the post to the moderators: Learn More
- If you would like to try some different "looks" or styles for the site, scroll to the very bottom, on the left and click the Style Selector.
You are using an out of date browser. It may not display this or other websites correctly.
You should upgrade or use an alternative browser.
You should upgrade or use an alternative browser.
TR2/3/3A tips for mig plug welding vertically?
- Thread starter sp53
- Start date
Frank Canale
Jedi Warrior
Offline
Are you talking about a vertical plug weld, or an overhead plug weld? Either way gravity is the enemy. On vertical plug weld focus on starting top center of the plug. Overhead setup is absolutely critical. You don’t want a large plug because by the time you get it filled molten metal will be falling on you. Over head you may have to do 2 or 3 short burst, hotter than what you would normally do. May not be the best way but that is how I would approach it, try and set up some test pieces to get the welder set up like you want it before you do it for real. That will save you grinding and filling holes burned thru. Another way of looking at it, more heat less metal. Reduce you wire speed to control amount of weld metal buildup. Good luck, Frank
The hole is 3/16 and the weld is up and down vertical 18gauge metal, so more amperage and less fast on the feed. I am at 2 on the feed and as hot as the machine goes. I did not anticipate a problem because all the flat stuff went so well. Your right more practice will help.
Frank Canale
Jedi Warrior
Offline
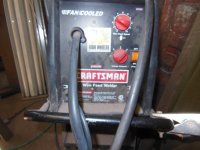
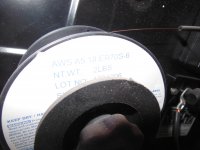
What kind of machine are you using?, solid wire with gas or flux core wire.? 18 gauge should not take much power to do a plug weld. Take a piece of 18 gauge and do a spot weld on it. You want it to be quick, if you have to spend time getting it hot there will be too much buildup. Set machine till you get penetration on back side. No need for a piece with a hole in it. Once you get a nice flat spot on a single piece you are close on setup then try your plug weld. Frank
Frank Canale
Jedi Warrior
Offline
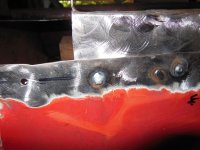
better and best were a little hot but our machine has a high speed motor for wire feed on aluminum so thin steel is hard to do. Better and best were 1 second burst. The too cold weld was about the right heat but took too long so more build up. Frank
Thanks for looking at my welds and machine you guys. Only one of the welds held. I have the machine on D setting which should be the highest and the feed at 2 which seems to feed enough maybe too much. I do not know I am at a loss. The ground connection should have been good any idea for more penetration?
One thing I might have done wrong wash hold the tip tight against the metal and perhaps I should have held it away a fuzz so the weld could sizzle better.
One thing I might have done wrong wash hold the tip tight against the metal and perhaps I should have held it away a fuzz so the weld could sizzle better.
Attachments

Frank Canale
Jedi Warrior
Offline
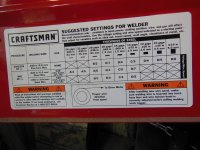
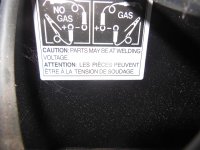
Steve,I can't tell what model machine you have but I would suggest you try setting B and set the wire speed so that it starts and welds smoothly, no spitting or spatter. The wire speed looks low for the highest D setting. General rule of thumb is 1 amp per .001 thickness of metal. If you are welding 18 gauge you only need 48 amps so I am guessing about 1/2 the capacity of your machine. Wire diameter and the gauge of metal would help to help with set up. Your voltage setting and wire speed is a balancing act and they must work together. There is usually a chart in the owners manual or the inside cover that gives general set up guide lines. On this machine I also believe that the polarity set up is different for gas less welding ( flux core wire) and gas welding ( solid wire ), it would not hurt to check that. Are you using 75/ 25 argon/co2 or 100% co2? You do not want the tip to touch the metal, Hold it with the site sticking out about 1/8" just so you can see it and the wire about 1/16 or so from the metal you are welding. you will get a feel for how far from the metal to be so you can see the puddle but not so far away you loose the shielding from the gas.I am no expert just offering some suggestions. Take your time do some practicing on some scrap play with the settings till you find what you are comfortable with. Good luck Frank
Thanks Frank you are the poop. I saw the stuff on the door but never thought about it; I did not get a manual because I bought it on Craigslist. The wirer must not be fluxed, and I see on the chart that when welding with flux they suggest no gas is needed.
The polarity dealie has me confused. Anyways if you have some extra time perhaps you can share what you think a beginner might need to know.
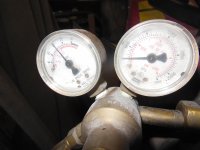
I am not sure what is in the tank. I bought the tank and welding wire at an industrial welding supply store. The guys were cool, I told them what I was doing. I believe they did me good. The tank looks low on the gauge, but I do not understand the tank gauge and not sure what I should have on the tip. I believe it is at 20 lbs. I bought the gauges from a different shop and he might not of had my best interest in mind.
My welding skills are from being a Carpenter working on commercial construction jobs where we welded galvanized 18 gauge track down to rusty metal decks with 6010 stick rod outside in the rain. We place a large washer about the size of quarter on the track put that on the deck then started in the center and worked out until the 3 ran together.
Every time I asked someone about my MIG they say "turn it up" you are penetrating. But no i see maybe not
Thanks Steve
The polarity dealie has me confused. Anyways if you have some extra time perhaps you can share what you think a beginner might need to know.
I am not sure what is in the tank. I bought the tank and welding wire at an industrial welding supply store. The guys were cool, I told them what I was doing. I believe they did me good. The tank looks low on the gauge, but I do not understand the tank gauge and not sure what I should have on the tip. I believe it is at 20 lbs. I bought the gauges from a different shop and he might not of had my best interest in mind.
My welding skills are from being a Carpenter working on commercial construction jobs where we welded galvanized 18 gauge track down to rusty metal decks with 6010 stick rod outside in the rain. We place a large washer about the size of quarter on the track put that on the deck then started in the center and worked out until the 3 ran together.
Every time I asked someone about my MIG they say "turn it up" you are penetrating. But no i see maybe not
Thanks Steve
Attachments

Frank Canale
Jedi Warrior
Offline
Hi Steve, We are going to have you welding like a pro before you know it. If you look on the bottle there should be a sticker around the main cutoff that will tell what gas is in the bottle. On your gauges, The right gauge is how much gas you have in the bottle. A full bottle will usually have 2000 PSI and you are down to 250 so you will need to keep an eye on it so you can plan to have it refilled. Get in the habit of always turning the gas off with the main valve. The regulator could leak a little as well as all the hoses and you don't want to waste your gas. The gauge on the left is the flow regulator to the welding torch. You might want to bring that up to 25 on the gauge. turn the regulator adjustment to the right and you should see it go up. un plug the machine then open the cover where the wire is. Just below where the wire goes thru the pinch rollers you should see a couple of large wires connected to terminals maybe with wing nuts. They should be marked with + and - Just like the sticker shows the ground clamp connected to - and the welding torch should be on +. if you look at the chart you can go to 18 gauge follow it down to MIG and it uses the same setting for either size wire. You want to set the machine voltage to B and your wire speed to 4. I decided to use the mig to weld some of the plug welds on my closing panels so I had to go thru what you are doing. I used a scrap piece of 18 gauge about 3" X 6" and it took me 16 tries to get it to start and weld good. I had everything from chicken poop to blowing a hole in it so I knew about where the middle was as well as having the wire burn back to the tip and had to take it apart to get it unstuck. I am telling you this so you don't get discouraged. It takes a little time and it may take you a little longer but that is ok. Welding is not as easy as the shows make it look. There is a lot to learn and you are not going to pick it up over night. Feel free to ask any questions, The only dumb question is the one that is not asked. You will get it. Frank