Hey Guest!

 Hey - did you know if you click on the title of a thread it will take you to the first unread post since you last visited that thread?
 but were afraid to ask:
  STOP!! Never post your email address in open forums. Bots can "harvest" your email! If you must share your email use a Private Message or use the
  smilie in place of the real @
 Pretty Please - add it to our Events forum(s) and add to the calendar! >>
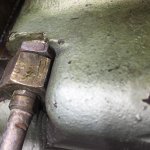
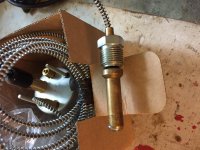
I am slowly putting my '62 AH 3000 tri car BT7 back into its original configuration. A previous owner for some reason removed the dual oil pressure coolant temperature gauge and replaced it with separate gauges. The fuel gauge was relocated to a fabricated panel mounted below the heater control assembly along with an Amp gauge. The replacement gauges are black where the correct configuration is white. I purchased the correct dual oil pressure water temperature gauge from Moss and going to install it found the existing sensor to head attachment very strange indeed as the pictures show.
The Moss sensor attaches with a 5/8" nut where the existing sensor has what appears to be a 7/8" nut. There are abrasions on the nuts which indicates it was tightened with a chisel. There is also another nut between the sensor nut and the head which might be some kind of adapter to get the correct thread to the head. I cannot get a wrench or vise grips on the nut to turn it. Even if I cut the cable there is insufficient room to get a socket onto the nut.
The temperature gauge is working fine and I would like remove the sensor without damaging it so someone can reuse it in another application. I have not figured out how to get this nut off. Any ideas out there??