but were afraid to ask:
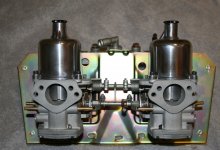
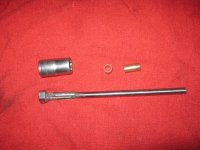
 Found a great article at the Chicago Land MG club web site on how to line ream throttle shaft bushings. The article is by Anne & Jake Snyder and provides all the details. I did the job this past weekend in about an hour and cost me $15 including the shipping cost for the reamer. Bought all the stuff from McMaster Carr. The key is the shank OD on the reamer is the same as the bearing ID. This keep everything in line as you ream out the old bushings. I used my variable speed hand drill to speed up the process and then lapped the new throttle shafts to match the new installed bushings. I did coat the outside of the bushings with high strength thread lock prior to installing. I used the 3/4" bushings and trimmed the inside bushing flush to the carb body. Also used JB Weld to attach the nut to the front of the reamer as my driver. I've attached some pixs on the set up, but the article details the process. The good news is after the rebuild, the car started up on the 1st try, just need to dial em' in today.
-
 Hi Guest!
If you appreciate British Car Forum and our 25 years of supporting British car enthusiasts with technical and anicdotal information, collected from our thousands of great members, please support us with a low-cost subscription. You can become a supporting member for less than the dues of most car clubs.
There are some perks with a member upgrade!**Upgrade Now**
(PS: Subscribers don't see this gawd-aweful banner

Tips
- We have a special forum called "Member Articles" where you can submit actual articles for consideration for publication. Learn More
- Don't have an Avatar? If not, your avatar will default to the 1st character in your username. Go into "Account Details" to change your Avatar.
- Some basic forum navigation info: click
 Hey - did you know if you click on the title of a thread it will take you to the first unread post since you last visited that thread?
- Hey Guest - Is your British Car Club in our Clubs database? If not, send me a PM - Basil

- Looking for a local club? Click the "Clubs" tab above and browse hundreds of clubs world-wide.
- Add Android or iPhone APP: click
- Did you know - any picture or video you add in your posts in any marque-specific forum will also get added to the Media Gallery automatically.
- A few more tips about posting and replying: click
- Hey there Guest - be sure to keep your profile page up to date with interesting info about yourself: learn more
- More tips and tricks on Posting and Replying: click
 STOP!! Never post your email address in open forums. Bots can "harvest" your email! If you must share your email use a Private Message or use the
  smilie in place of the real @
- Want to mention another member in a post & get their attention? WATCH THIS

- So, you created a "Group" here at BCF and would like to invite other members to join? Watch this!
- Hey Guest - A post a day keeps Basil from visiting you in the small hours and putting a bat up your nightdress!
- Hey Guest - do you know of an upcoming British car event?
 Pretty Please - add it to our Events forum(s) and add to the calendar! >> Here's How <<
- Hey Guest - you be stylin' Change the look and feel of the forum to fit your taste. Check it out
- If you run across an inappropriate post, for example a post that breaks our rules or looks like it might be spam, you can report the post to the moderators: Learn More
- If you would like to try some different "looks" or styles for the site, scroll to the very bottom, on the left and click the Style Selector.
You are using an out of date browser. It may not display this or other websites correctly.
You should upgrade or use an alternative browser.
You should upgrade or use an alternative browser.
SU Throttle shaft Bushings
- Thread starter ralph_s
- Start date

Offline
Very nice work, Ralph! And thanks for the heads-up on the article.
Mickey
Mickey
I have tried this for my Spitfire carbs and I am not having as much good luck.
How did you back cut the reamer?
I also just chickened out. The shaft on one carb had already been reamed oversize and I had a bit of wobble with the reamer. It just didn't seem to want to cut very well either, which I attributed to not filing down the cutting head correctly. I may have to man up and try again.
The wobble is not a good thing but the shank should provide plenty of stability as it runs through the opposite (guide) bushing. Looking from the nut end toward the shank, I cut a 30 deg angle on each blade. I took it to my bench grinder and had at it!! Initially I was cutting by hand, but then hooked up the hand drill and it went very quickly. To get the final fit between the new bushing and the new throttle shaft I chucked the throttle shaft into my drill and ran it in and out of the bushings several times. That got the final clearance and a really nice fit.
I have to admit reaming the 1st bushing caused some "pucker" but I'm naive enough to keep going. Fortunately it had a happy ending. Just finished fine tuning the carbs and there is a major difference.
Note.....don't ream completely through the carb body. You should leave some material to seat the bushing into the carb body.
Good luck and keep at it!
Well I got down and dirty with the carb this weekend. Made a bit of a mes as I figured I would. I just put the reamer in a drill and pulled it through. First side went OK, but I went too deep and almost went all the way through. Thats not as bad as it sounds because the carb had already been reamed oversize anyway and there was going to be a bit a leak if I had left it short. The second size I stopped well short, but got the reamer a bit off center and cut through the side of the old bushing. That side had already been re-bushed with a thicker OD bushing than I had bought. I ended up having to pull the old bushing out and the hole was bigger than my bushing. So I whipped up some JB weld and am trying that. We'll see how this works out. Hopefully this will break my log jamb and I can move on.
Hap Waldrop
Yoda
Offline
Joe Curto make special reamers for this, some folks have fiquired out ways to do this without special piloted remaers, but you leave alot of room for error. I done this job without the use of the special reamer from time to time, but much car has to be taken, normally did this on the mill where I could insure straightness. The best path on a HS4 with standard shaft is to use the special piloted reamer and go to the .010" oversize shafts, wit the special reamer, this takes all of 5 minutes to do 2 carbs. I never bother with going back to standard shaft in a set of carbs with standard shafts, the OD shaft works great is better repair overall then repalcing the bushing, as the original HS4 shaft bushings were cast into the body of the carb not pressed in, so much can go wrong using the replacment bushings, as for air gaps near ID of the body causing air leaks around the throttle plate.
Bill if you need some more carbs, come see me.
Bill if you need some more carbs, come see me.
Hap Waldrop
Yoda
Offline
Joe Curto make special reamers for this, some folks have fiquired out ways to do this without special piloted reamers, but you leave alot of room for error. I done this job without the use of the special reamers from time to time, but much car has to be taken, normally did this on the mill where I could insure straightness. The best path on a HS4 with standard shaft is to use the special piloted reamer and go to the .010" oversize shafts, with the special reamers, this takes all of 5 minutes to do 2 carbs, and you know they are straight. I never bother with going back to standard shaft in a set of carbs with standard shafts, the OD shaft works great is better repair overall then repalcing the bushing, as the original HS4 shaft bushings were cast into the body of the carb not pressed in, so much can go wrong using the replacment push in bushings, as for air gaps near ID of the body causing air leaks around the throttle plate.
Bill if you need some more carbs, come see me.
Bill if you need some more carbs, come see me.
Hap
I knew if I screwed it up I could get snother carb. That's why I tried. It may still work, but I haven't looked at it for a couple of days. The real problem with this carb was it had already been reamed oversize and had a wobbley shaft even with a new throttle shaft. I had stopped by your shop a couple of times to see if we could do it on your mill, but you were out. Shoulda called ahead.
I knew if I screwed it up I could get snother carb. That's why I tried. It may still work, but I haven't looked at it for a couple of days. The real problem with this carb was it had already been reamed oversize and had a wobbley shaft even with a new throttle shaft. I had stopped by your shop a couple of times to see if we could do it on your mill, but you were out. Shoulda called ahead.
I guess it's always better to be lucky then good!! My rebushing went w/o a hitch BUT mine were original and not O/S bushings. The reamer shank kept everything in line as I did the reaming. I did locktite the bushings in place.
Hap, I'll keep you in mind for carb bodies when I screw up my next set and my luck runs out!!!!
Hap, I'll keep you in mind for carb bodies when I screw up my next set and my luck runs out!!!!

Online
Hap said:so much can go wrong using the replacment push in bushings, as for air gaps near ID of the body causing air leaks around the throttle plate.
That li'l issue can drive ya to drink. ----------------- :madder:
First encounter was waaay back, on a set of DCOE Webers on a Lotus Cortina. NO amount of fettling made it idle properly. On the *second* R&R of the carbs it was discovered the throttle shaft on one had been over-torqued and the slot for the plate became an "added" air passage... DPO apparently "replaced" the bearings and must have used a pipe wrench to tighten the nut. Same effect as the SU push-in bushes not being carefully fitted.
Hap Waldrop
Yoda
Offline
OS shafts are .320" for HS4, and HIF4.
fogliner
Senior Member
Offline
Ralph s ;
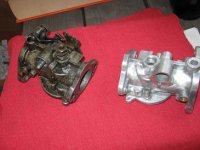
Love what you've done with your carbs!! I am about to embark on a carb project myself.(hif4 to Hs4 conversion)
They look like the carb on the left now and I need to know how to clean the body's and float bowls so they gleam like yours .
.
I think I may get lucky on the shafts as there is just barely any slop now and I took 1 out and there is slight indentations in the brass so I'm hoping just the new standard sized shafts that come in the rebuild kit will be enough....I can always order some OS shafts if there is still some slop i guess and I have a buddy who is a machinist so getting them line reamed if I need to won't be a problem. I want them to Gleam though and standard carb cleaner and Lacquer thinner just don't cut it.
I have a buffing wheel on my grinder and some different rouges etc but is there an aluminium cleaner that takes the black out of the metal before you buff?
Thanks
Mark
Love what you've done with your carbs!! I am about to embark on a carb project myself.(hif4 to Hs4 conversion)
They look like the carb on the left now and I need to know how to clean the body's and float bowls so they gleam like yours
.I think I may get lucky on the shafts as there is just barely any slop now and I took 1 out and there is slight indentations in the brass so I'm hoping just the new standard sized shafts that come in the rebuild kit will be enough....I can always order some OS shafts if there is still some slop i guess and I have a buddy who is a machinist so getting them line reamed if I need to won't be a problem. I want them to Gleam though and standard carb cleaner and Lacquer thinner just don't cut it.
I have a buffing wheel on my grinder and some different rouges etc but is there an aluminium cleaner that takes the black out of the metal before you buff?
Thanks
Mark
Keoke
Great Pumpkin
Offline
but is there an aluminium cleaner that takes the black out of the metal before you buff?
Just get any good Mag or Aluminum paste polish such as Mothers and you will do fine cleaning the bodies up. However, be very careful with the buffing wheel it can cause problems.---Fwiw--Keoke
Just get any good Mag or Aluminum paste polish such as Mothers and you will do fine cleaning the bodies up. However, be very careful with the buffing wheel it can cause problems.---Fwiw--Keoke
Hap Waldrop
Yoda
Offline
I do my rebuilds with a glass beaded carb body, float chamber and lid, the hand and chemically clean the piston dashpot, then polish the outer portion of the dashpot with a buffing wheel. Here's an example.
Bill sorry I see this in time, give me call, reaming your carb body will take about 5 minute tops.
Bill sorry I see this in time, give me call, reaming your carb body will take about 5 minute tops.