 but were afraid to ask:
I'm cleaning the jet assembly before doing the rebuild. I would like to separate the lower jet bearing from the jet locking nut but turning the "jet adjusting" nut just turns the lower jet bearing! There dosn't seem to be any way to hold the jet bearing still to remove the jet adjusting nut. Or would I be further ahead to just leave it assembled and clean it out as best I can with some carb cleaner and Q-tip etc?

-
 Hey Guest!
British Car Forum has been supporting enthusiasts for over 25 years by providing a great place to share our love for British cars. You can support our efforts by upgrading your membership for less than the dues of most car clubs. There are some perks with a member upgrade!**Upgrade Now**
(PS: Upgraded members don't see this banner, nor will you see the Google ads that appear on the site.)

Tips
- We have a special forum called "Member Articles" where you can submit actual articles for consideration for publication. Learn More
- Don't have an Avatar? If not, your avatar will default to the 1st character in your username. Go into "Account Details" to change your Avatar.
- Some basic forum navigation info: click
 Hey - did you know if you click on the title of a thread it will take you to the first unread post since you last visited that thread?
- Hey Guest - Is your British Car Club in our Clubs database? If not, send me a PM - Basil

- Looking for a local club? Click the "Clubs" tab above and browse hundreds of clubs world-wide.
- Add Android or iPhone APP: click
- Did you know - any picture or video you add in your posts in any marque-specific forum will also get added to the Media Gallery automatically.
- A few more tips about posting and replying: click
- Hey there Guest - be sure to keep your profile page up to date with interesting info about yourself: learn more
- More tips and tricks on Posting and Replying: click
 STOP!! Never post your email address in open forums. Bots can "harvest" your email! If you must share your email use a Private Message or use the
  smilie in place of the real @
- Want to mention another member in a post & get their attention? WATCH THIS

- So, you created a "Group" here at BCF and would like to invite other members to join? Watch this!
- Hey Guest - A post a day keeps Basil from visiting you in the small hours and putting a bat up your nightdress!
- Hey Guest - do you know of an upcoming British car event?
 Pretty Please - add it to our Events forum(s) and add to the calendar! >> Here's How <<
- Hey Guest - you be stylin' Change the look and feel of the forum to fit your taste. Check it out
- If you run across an inappropriate post, for example a post that breaks our rules or looks like it might be spam, you can report the post to the moderators: Learn More
- If you would like to try some different "looks" or styles for the site, scroll to the very bottom, on the left and click the Style Selector.
You are using an out of date browser. It may not display this or other websites correctly.
You should upgrade or use an alternative browser.
You should upgrade or use an alternative browser.
SU Rebuild Question
- Thread starter karls59tr
- Start date
dklawson
Yoda
Offline
If you are talking about the older H series carbs... please ignore my post.
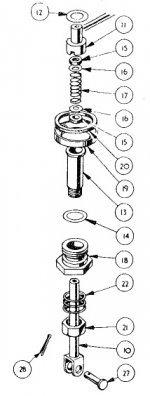
I'm a bit confused by your description of what is going on. The lock nut should hold the bearing firmly in place against the carb body. The adjusting nut should be below that and separated from the lock nut by a compression spring. If you remove the linkage from the jet (assuming we're talking about HS series carbs) then you should be able to remove the jet followed by the adjusting nut, spring, and finally the lock nut.
I'm a bit confused by your description of what is going on. The lock nut should hold the bearing firmly in place against the carb body. The adjusting nut should be below that and separated from the lock nut by a compression spring. If you remove the linkage from the jet (assuming we're talking about HS series carbs) then you should be able to remove the jet followed by the adjusting nut, spring, and finally the lock nut.
TR3driver
Great Pumpkin - R.I.P
Offline
You definitely need to get that nut so it turns easily, so you can adjust the carb later on without the jet bearing spinning.
As a first level, you can try reassembling the jet to the carb body, and see if that clamps the lower bearing tightly enough to remove the nut.
Otherwise, you have to find some other way of grabbing it tightly without damaging it (or just replace it). As long as you are careful not to mar the tapered seat inside, some light internal damage won't hurt anything. I once removed one that was tightly stuck by sanding down a piece of wooden dowel rod so it fit snugly inside the bearing, sawing a thin slot across it, tapping it into the bearing and then driving in a nail through the jet hole. I could then grab the dowel in the vise while I unscrewed the nut.
Soaking overnight in carb cleaner would probably help, too.
Yes I'm refering to H6's. I guess what I'm trying to say is....Once the locknut is loosened and the jet removed from the carb is it possible to separate the jet bearing(the brass part that the jet slides into), the locking nut and adjusting nut and spring into four separate components?
TR3driver
Great Pumpkin - R.I.P
Offline
Normally, yes. Just stick your finger in the end of the bearing and hold it while you unscrew the adjusting nut. But if it has set for awhile, it's not unusual for the threads to bind, and hence the instructions I gave above.karls59tr said:Yes I'm refering to H6's. I guess what I'm trying to say is....Once the locknut is loosened and the jet removed from the carb is it possible to separate the jet bearing(the brass part that the jet slides into), the locking nut and adjusting nut and spring into four separate components?
Note that there is a 5th piece, there should be a thin copper washer that fits between the bearing and the locking nut.
Attachments
Randall I might try your method of removal. The jet adjusting nut appears to screw on to the threads of the the lower jet bearing so if they are seized together what affect would that have on adjustment?(The reason I'm curious is I have a different set of SU's on my TR3 now and am wondering if they have this same issue and I wasn't aware of it?) Is the adjusting nut supposed to turn independently of the lower jet bearing and if so what is actually being raised or lowered when an adjustment is being made? A) Also while we are on carb rebuild:I have new carb disc spindles that when installed only show a tiny amount of up and down movement. Included in the rebuild kit are bushes that a machine shop can install if required but I've been told that normally new spindles do well enough on their own that rebushing isnt necessary. What's your take on what's considered too much play in the spindle bore? B)I think this was covered in another thread but I cant find it ....I still seem to have quite a bit of a halo in the carb throat with the new disc installed . Is it possible that the carb throat itself is worn out of round and is this a serious problem to the function of the carb? Thanks for your advice. Karl
TR3driver
Great Pumpkin - R.I.P
Offline
When the choke is not active, the jet rises until it's head rests against the bottom of the adjusting nut. So the farther the nut is screwed onto the lower bearing, the higher the jet rises, which in turn allows the needle to fill more of the jet opening and thus leaning out the mixture. The bearing is not supposed to move at all (once it is locked in place by the locknut).
Sorry, I can't really help with the other questions. In my case, a substantial portion of the wear appeared to be in the carb body, so I installed the bushings. The limit, IMO, is when the throttle disc drags against the bore instead of closing cleanly (which was the main thing that prompted me to replace the shafts & bushings).
Certainly it would be possible for the bore to become worn after long operation with the throttle dragging, but I've never heard of it being a problem. And the issue of course would be that the throttle can't close off enough air to bring the idle down. Are you checking this with a new shaft & throttle plate ? Is the throttle plate turned the right way over? (There should be a very slight taper on the edge, that should match the direction the shaft turns.)
Brinkerhoff
Jedi Knight
Offline
Karl , I find that leaving the screws loose slightly while you are opening and closing the butterfly with the throttle rod will seal the throat , provided like Randall says you have the tapered edges oriented properly. Use a drop of locktite on the screws and or split the ends. The jet itself should be smooth on the outside and free of any markings so as not to chafe the small cork seals causing gas to flow around the jet and not inside of the jet where it is metered. Kevin
TR3driver
Great Pumpkin - R.I.P
Offline
Just to amplify what I think Kevin is saying, when you install the throttle plate you should hold it closed firmly while tightening the screws. The holes are deliberately made oversize so the plate can move around and match the bore.Brinkerhoff said:Karl , I find that leaving the screws loose slightly while you are opening and closing the butterfly with the throttle rod will seal the throat
IMO staking the screws is mandatory, even if you use Loctite as well. If one comes loose, you'll never know it until after it's embedded in a piston.
BTW, if anyone is contemplating installing bushings themselves, there is an interesting "how to" using a (modified) cheap reamer at
https://www.chicagolandmgclub.com/driveline00/1001/jasw.html
You can also accomplish the same thing by grinding flats on the normal handle end of the reamer and using a tap handle on it. I think Tony Rhodes has a writeup of that method on his website.
Note that the hole for the bushings should not be cut all the way through. Leave some of the original bore wall behind, so it fits the throttle shaft better.
TR3driver
Great Pumpkin - R.I.P
Offline
It's not clear from that article whether they did it that way or not; but it is certainly not required. You start on one side, cutting from the outside in, and stop before the reamer teeth get to the carb bore. Then you have to install the new bushing on that side, to act as a guide while you cut the other side. Once again, stop before you get to the bore.karls59tr said:Wouldn't using that "chigagoland mgb DUI" method described cut the bore holes all the way thru?
You need to stop and clear the chips fairly often anyway, but I also made a mark on the reamer teeth with a 'Sharpie' pen. (Alas, I wasn't smart enough to think of the "backwards reamer" method, but I shan't bore you with my drill press method as the backwards reamer is definitely better.)