• Hey Guest!
    British Car Forum has been supporting enthusiasts for over 25 years by providing a great place to share our love for British cars. You can support our efforts by upgrading your membership for less than the dues of most car clubs. There are some perks with a member upgrade!

    **Upgrade Now**
    (PS: Upgraded members don't see this banner, nor will you see the Google ads that appear on the site.)
Tips
Tips

Stromberg 175CD

T

TRDejaVu

Guest
Guest
Offline
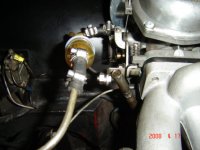
I am looking at fixing the worn throttle shafts on the TR4 to improve the idle. I have seen a lot of posts talking about replacing the shaft bushes etc. etc. The pair that were with the car in the barn for all those years were badly crudded up, so I replaced them right from the start with a worn, but serviceable pair that I obtained locally. All four have excessive shaft play.

Tonight I took one of the original ones apart for a look see at the shaft setup. The shaft is very worn on one side, but fits much better in the body holes on the unworn portion. These units are the early C 1825 variant and they don't appear to have shaft bushes. The Moss website shows a bush, but https://www.oldengine.org/members/diesel/Carburettors/ZenithSP53.htm doesn't. If you haven't seen this site, they have a lot of other cars when you access the "Carb Menu" at the bottom of the page.

I am spending enough on other improvements (overdrive conversion, carpets, mig welder) at the moment, so it is preferable to just replace the shafts and have it last for a couple of years before getting them overhauled properly. It looks like a gentle polishing of the bore will make it very smooth with a new shaft.

Has anyone else come across this lack of bushes and just replaced the shafts?
 
TRDejaVu said:
Has anyone else come across this lack of bushes and just replaced the shafts?

Yep. A CD150, but same design. There must have been 1mm worn off of the shaft on both sides and the plate in the center had a flat side worn onto it. I got the big service kit, put everything back together and it works fine. NO play in the throttle shaft, and I can turn down the idle as low as I want. Based on the time I spent playing with a 4 gas analyzer, it is not running lean at idle so there aren't any major vacuum leaks either.
You only need bushings if the shaft holes are actually worn, and then, at least in the old days, they would normally be reamed out slightly oversized and a slightly larger than normal shaft would be used.
If the shafts fit properly at the unworn section you will be just fine.
 
When I re-did my SUs (same setup with the throttle shafts), the shafts were worn very badly, but when I put new shafts into the bores, there was virtually NO slop. All the wear had occured on the shafts.
 
Did you get the shafts from Moss/TRF or from one of the specialty places?
 
Mine came in the master rebuild kit I got from Moss, but they do sell the shafts seperately.

Edit: Also get new screws that hold on the throttle plate to the shaft. They are special split screws that will most likely get destroyed when taking them out of the old shaft. And be careful of the orientation of the throttle plate when reassembling. There are bevels on the edges that have to face the correct way or the throttle plate will not close properly.
 
I don't believe bushings were ever on the original carbs. Bushings are used when the carb body is worn out. You need to drill the carb all the way through from one side to ensure the throttle shaft will fit properly after pressing in the bushings. That effort is not within my abilities so I simply replaced the shafts and I'm living with a little play until I can have the carbs bushed by a professional with the equipment needed to do the job right.
 
Thanks to all. I ordered shafts, throttle plates and screws from Moss today. Looks like I have my Saturday morning work schedule set.
 
New shafts and discs came UPS ground overnight so I fitted them; what a difference.

Now I need to rig the throttle linkage properly from the crosshaft to the front carb. I noticed that the dog-bone link is bottoming out on the front side of the front carb preventing me from achieving low idle. I looked in the original workshop manual, but it only had on-carb adjustments. Anyone got any advice?

Also, I had already cleaned up the linkage pivot points and noticed that the seats are spring loaded. How tight should they be?
 
Can you post a photo of your set up? My camera batteries are dead but I can post a photo of my set up tomorrow if you need that.
 
<div class="ubbcode-block"><div class="ubbcode-header">Quote:]There are bevels on the edges that have to face the correct way or the throttle plate will not close properly. [/QUOTE]

You cannot believe the lean condition that can cause. I never did it on a ZS carb, but made a huge mistake on a GM Q-Jet that nearly burned a hole in a piston.

Never take a lunch break while assembling your carb(s) from a bench full of pieces. The answer to why is above.
 
TR4 said:
Can you post a photo of your set up? My camera batteries are dead but I can post a photo of my set up tomorrow if you need that.
My batteries are also dead. I look forward to seeing your pic of the front vertical rod in the idle position. It would also be useful to see what angle the dog-bone link is at and how close it is to the carb body, although that may be difficult to get a camera angle on. Thanks for the help.
 
What photos specifically do you need? I took a few shots previously of my TR4 project ZS setup which shows the front linkage, maybe this location will help:

Misc pics

Randy
 
Thanks Randy. The IMG_2044.JPG image angle is very good, but I would like to see the bottom of the vertical link where it connects to the pivot piece (dog-bone?). I am trying to see how close the vertical part of the pivot piece is to touching the carb body. Mine touches, which restricts the throttle disc from being allowed to fully close. What is the length of your front adjustable vertical link from extreme end to end?

Also a shot that shows what angle the throttle cross-shaft arm (bottom left of IMG_2046.JPG) is at compared to vertical when everything is at the idle position.
 
Does this photo help? I took it this morning in the dark garage.
 

Attachments

  • 10957.jpg
    10957.jpg
    58 KB · Views: 440
That wasn't my post, that was TR4's (unless his name is Randy too!). You can tell because his carbs are a lot better looking than mine. I'll try to get you some supplemental shots and measurements tonight to compare notes.

Randy
 
Whoops. "Must pay attention, must pay attention, must pay attention." :blush:

Any and all pictures and measurements are much appreciated.
 
Hi Phil not Randy,

I do have the bellcrank (which is what I meant by the dog bone, probably not an accurate description) and it is mounted correctly. However, it does have quite a bit of slop in it as the pivot washer (#88) has worn a groove into the crank. I have another crank off a spare set that isn't as bad, so I will try fitting that this evening and see if it improves it.
 
There still seems to be too much slop on the bellcrank pivot. I am going to see if I can find a thin shim washer to improve it. Also, I am now not sure about the bellcrank being properly mounted. The Moss site shows the longer leg pointing down and connected to the long rod back to the cross shaft, but mine is the other way around. Can anyone confirm the correct orientation?
 
Back
Top