Hi Folks,
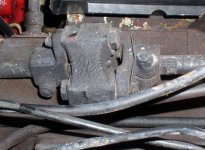
Hmmm. I've never found it any big deal to change the "rubber donut" steering couplings on a TR. The Moss illustration actually gives most the info on how it goes together. Be sure to replace the ground wire, while in there. Also, the bolts *must* be safety wired, as I see they are in your photo.
The rubber couplers on my TR4 were replaced twice in the 25+ years I've owned it, and really could have been used a bit longer the last time. So, no, I don't think they are prone to give problems.
The upper column bushings are more difficult to replace (the two #8s in the Moss illus.) These wear and contribute a lot of play to the steering, too. If your steering wheel rocks from side to side, they need to be replaced. Essentially, the steering wheel has to come off, then the switches and wiring need to be removed, then the column unbolted and pulled out of the dash (there are a couple brackets and braces under the dash).
The upper column bushings have rubber buttons on the outside, that seat into holes in the outer column to trap them in place. To remove, cut the rubber button off with an Xacto knife, then press out the bushing with a close fitting socket. Sometimes they are really stuck, in which case you might need to carefully use a hacksaw blade to cut through them most of the way, then press them out. Use a little WD40 or lighter fluid on the new ones to make them slippery, then press into place until the button is seated in the hole. (WD40 or lighter fluid will evaporate in a short while, and they will no longer slip around.)
Another thing to look at while working on the steering is the column mounting bracket on the firewall, not shown in the Moss illustration, but #18 lays on it, and the column is held onto that with 17 & un-numbered part right next to it. The bracket is prone to breaking away from the firewall and is another major contributor to sloppy steering. Welding will be needed if it's broken, although I've seen more than one homemade, bolt-in bracket used instead since it's a lot of work to clear the area under the dash to do any welding.
You might want to plan to replace #16, 17, 18 & 19 in the Moss illus. too. They often need it. #20, the aluminum end cap, will wear badly too, if there has been a lot of slop. Might also need to be replaced.
 Hi Guest!

 Hey - did you know if you click on the title of a thread it will take you to the first unread post since you last visited that thread?
 but were afraid to ask:
  STOP!! Never post your email address in open forums. Bots can "harvest" your email! If you must share your email use a Private Message or use the
  smilie in place of the real @
 Pretty Please - add it to our Events forum(s) and add to the calendar! >>