Hey Guest!

 Hey - did you know if you click on the title of a thread it will take you to the first unread post since you last visited that thread?
 but were afraid to ask:
  STOP!! Never post your email address in open forums. Bots can "harvest" your email! If you must share your email use a Private Message or use the
  smilie in place of the real @
 Pretty Please - add it to our Events forum(s) and add to the calendar! >>
tony barnhill
Great Pumpkin - R.I.P
Offline
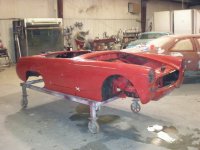
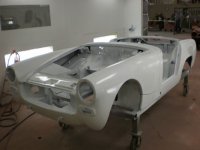
Here's the sequence we're following on my '63 Midget - a little different than I usually do a car. This car had only been painted once after some accident repairs & was solid so I decided not to srip it to bare metal or to completely disassemble the tub.
1) First photo is the tub as we started.
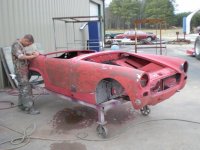
2) Second photo is as we took the 2nd coat of paint off to identify the previous repairs & evaluate the original factory work.
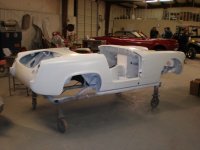
3) Tub completely covered with 2-part epoxy primer.
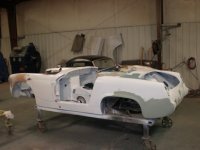
4) Body work being done. We removed all the previous bodywork which was very good & redid everything to our standards.
- the entire car was wiped down with foamy glass cleaner to cut any grease or body oils from it. Then,
5) A second coat of epoxy primer was put on all the repairs.
Next (not shown in photos, they'l come later) we'll spray a red sandable primer on the body - photos Thursday. Sanding that coat will reveal any minor bodywork that still needs to be done.
Then, we're wipe the car down again with window cleaner & reprime it. The final sanding should give us a straight tub (if not, we'll continue working on it to achieve that).
We don't spray a sealing primer. What we do is spray 1 coat of body color & let it 'tack off' for about 15 minutes. It then becomes our sealer over which we'll spray the remainder of the color.
Then we'll sand the finished cars & spray the clear coats.
Here are those first photos:
1) First photo is the tub as we started.
2) Second photo is as we took the 2nd coat of paint off to identify the previous repairs & evaluate the original factory work.
3) Tub completely covered with 2-part epoxy primer.
4) Body work being done. We removed all the previous bodywork which was very good & redid everything to our standards.
- the entire car was wiped down with foamy glass cleaner to cut any grease or body oils from it. Then,
5) A second coat of epoxy primer was put on all the repairs.
Next (not shown in photos, they'l come later) we'll spray a red sandable primer on the body - photos Thursday. Sanding that coat will reveal any minor bodywork that still needs to be done.
Then, we're wipe the car down again with window cleaner & reprime it. The final sanding should give us a straight tub (if not, we'll continue working on it to achieve that).
We don't spray a sealing primer. What we do is spray 1 coat of body color & let it 'tack off' for about 15 minutes. It then becomes our sealer over which we'll spray the remainder of the color.
Then we'll sand the finished cars & spray the clear coats.
Here are those first photos: