Follow along with the video below to see how to install our site as a web app on your home screen.
Note: This feature may not be available in some browsers.
Hey Guest! British Car Forum has been supporting enthusiasts for over 25 years by providing a great place to share our love for British cars. You can support our efforts by upgrading your membership for less than the dues of most car clubs. There are some perks with a member upgrade!
**Upgrade Now** (PS: Upgraded members don't see this banner, nor will you see the Google ads that appear on the site.)
When posting a classified ad, you MUST select a prefix from the drop-down next to the subject line. If you don't you will get an error and your ad will not be posted!
Tips
We have a special forum called "Member Articles" where you can submit actual articles for consideration for publication. Learn More
Don't have an Avatar? If not, your avatar will default to the 1st character in your username. Go into "Account Details" to change your Avatar.
Hey there Guest - be sure to keep your profile page up to date with interesting info about yourself: learn more
What the heck is that "Resources" tab up there all about? Learn more
More tips and tricks on Posting and Replying: click
Everything you've ever wanted to know about bookmarks, but were afraid to ask: Learn More
STOP!! Never post your email address in open forums. Bots can "harvest" your email! If you must share your email use a Private Message or use the smilie in place of the real @
Want to mention another member in a post & get their attention? WATCH THIS
So, you created a "Group" here at BCF and would like to invite other members to join? Watch this!
Hey Guest - A post a day keeps Basil from visiting you in the small hours and putting a bat up your nightdress!
Hey Guest - do you know of an upcoming British car event? Pretty Please - add it to our Events forum(s) and add to the calendar! >> Here's How <<
Hey Guest - you be stylin' Change the look and feel of the forum to fit your taste. Check it out
If you run across an inappropriate post, for example a post that breaks our rules or looks like it might be spam, you can report the post to the moderators: Learn More
If you would like to try some different "looks" or styles for the site, scroll to the very bottom, on the left and click the Style Selector.
I will soon be installing my tr3 soft top soon and it all looks pretty straight forward, except the front. The tenax fasteners are easy but what to do with the flap? I searched the site and didn't see anything to help. A good pic would help
Thanks Eric
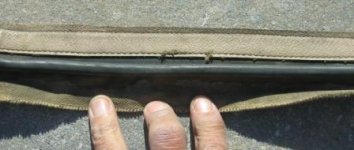
This has come up before. The flap goes between the front of the top and the windscreen. Holes must be made in the flap to allow the Tenax pegs to pass through the flap to the fasteners in the top. The diameter of the holes is a little bigger than the hex heads on the pegs. Sometimes they are oblong holes.
My new top had no such flap, just a sewn on furflex strip that runs across the top and sits against the seal at the top of the windscreen. My old Amco top didn't have "the flap" either although Don posted photos of his ISTR.
I recently installed my new top.
One install detail I missed slightly: When marking the center line of the top fore and aft, also take into consideration the topmost LTD peg at the top of each b-post to be sure that the "ears" that snap closest to the door are also centered left to right. I got one ear longer than the other. So this means that although the centerline was correct, my top was actually rotated slightly to one side.
The entire install probably took a combined time of 8 hours. After each snap install, I reinstalled the top, marked the next and removed the top to punch and install the snap. It's tedious work to get it right and tight. Adjust the top webbing as you go to fit the seams of the top.
Also if you have side curtains, this is the time to get them lined up too. Mine required a little adjustment.
I see said the blind man! I was reading the old post while everyone was posting. Just didn't search it correctly the first time. My top is not new and I assume that my dad didn't know that the flap needed holes. He being the consummate instruction reader that surprises me. I will put holes in the flap before erecting the top.
The new tops with the flap come with no instructions - or at least there were none when I ordered and received mine in 1989. Still looks like new. Buy a bag to keep it clean and protected. If you only plan to drive on sunny days, it will be stored in the bag in your trunk for years like mine.
Peter - Here is a photo of the front "fur-flex" trim edge of my original top which came with my 1958 TR3A. It only shows a bit because the top is over 51 years old and I used some of the material from the top to repair my hood stick cover. The colour matched perfectly.
An old top is great for making repair patches. btdt before I opted for an entire new top. The Amco was still good and the windows clear but had a couple of split seams.
This site uses cookies to help personalise content, tailor your experience and to keep you logged in if you register.
By continuing to use this site, you are consenting to our use of cookies.

 Hey Guest!
 When posting a classified ad, you MUST select a prefix from the drop-down next to the subject line. If you don't you will get an error and your ad will not be posted!
 Hey - did you know if you click on the title of a thread it will take you to the first unread post since you last visited that thread?
 but were afraid to ask:
  STOP!! Never post your email address in open forums. Bots can "harvest" your email! If you must share your email use a Private Message or use the
  smilie in place of the real @
 Pretty Please - add it to our Events forum(s) and add to the calendar! >>