• Hi Guest!
    You can help ensure that British Car Forum (BCF) continues to provide a great place to engage in the British car hobby! If you find BCF a beneficial community, please consider supporting our efforts with a subscription.

    There are some perks with a member upgrade!
    **Upgrade Now**
    (PS: Subscribers don't see this gawd-aweful banner
Tips
Tips

Small rewiring project

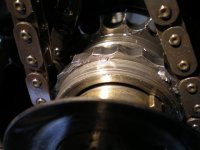
The switch is hydraulicly activated, yes. Fluid will escape and re-bleeding the system is likely necessary if you remove it. Clean around the base of the switch with a small brass wire brush, lessens the chances of foreign stuff getting into the lines and allows application of some loose-juice. There should be a copper washer at the base of the switch as well, IIRC. Should be replaced. A good (and cheap) penetrating concoction in lieu of commercial brews is a 50/50 mix of acetone and ATF, shake and apply, pause and repeat. Tho it is likely you will have no issue removing that switch.

If you're quick (and somwhat lucky :wink: ) you will be able to swap the new one in and start the threads without loss of too much fluid. I'm never too lucky with getting threaded leaking things started... be aware most brake fluids will EAT paint, too. Wash/rinse the drippage with water soon after the job.
 
TR3driver said:
Andrew Mace said:
In this particular case, the main GREEN indicates switched power
Switched and fused. If it was switched but not fused, it would be white....
Ah, thanks for catching that. I have amended my original post, and apologies to everyone for the original confusion! :blush:
 
Dr. Entrophy,

Your description give me a clear idea of what I will encounter when I tackle this "little job." Once again... many warm thanks.

I'm not reluctant to bleed the brakes after doing this procedure, but if I'm quick -- as you say -- and lucky -- I should be able to get the new switch started in little time. The amount of fluid that leaks out should easily and immediately be replenished from the resevoir, so it seems to me that no air should get into the brake line. If that sounds too optimistic on my part, however, let me know and I will plan to bleed the brakes after putting in the new switch. I would, of course, test the brakes after the switch is in but before bleeding to see if they are soft.

What led me to this plan to do this "little job" was not a malfunctioning brakelight switch, but some pretty scruffy looking wire leading from the snap connectors to the switch. I began with the simple of idea of replacing the wires, and then moved on to the idea of replacing the wires and the switch. I may just clean up the switch, leave it in place, replace the wires, and wait until the switch fails (if it is going to fail).
 
DrEntropy said:
There should be a copper washer at the base of the switch as well, IIRC.
Usually that would be true, but in this case the threads are tapered pipe threads, so no washer used.

What I did to limit the amount of fluid lost was to prop the brake pedal slightly depressed, just enough to close off the valve in the MC. I have a carpenter's bar clamp that is turned around backwards to make an adjustable spreader; but you could probably just trim a piece of 1x2 to length. Result was I only lost a drop or two of fluid, even though it took me some time to swap the switch. Best of all, I didn't need to bleed afterwards.

While cleaning wouldn't hurt, personally I wouldn't use penetrating oil. The fitting is brass, so corrosion shouldn't be a problem. And I wouldn't want to risk getting penetrating oil into the braking system where it could eventually attack the seals.

I use DOT 5, so no worries about damage to the paint. But from what I've seen, DOT 3/4 will do significant damage even if you wash it off immediately; so it would be best to put some sort of barrier (maybe plastic plus a shop rag) under the switch.
 
Ed said:
What led me to this plan to do this "little job" was not a malfunctioning brakelight switch, but some pretty scruffy looking wire leading from the snap connectors to the switch. I began with the simple of idea of replacing the wires, and then moved on to replacing the wires and the switch. I may just start with the wires and wait until the switch fails (if it is going to fail).

The slippery slope of: "might-as-well"! :jester:

...it can snowball into a complete resto project. :wink:

I'd go with: replace the wires... then drive it!
 
LexTR3 said:
I'm not reluctant to bleed the brakes after doing this procedure, but if I'm quick -- as you say -- and lucky -- I should be able to get the new switch started in little time. The amount of fluid that leaks out should easily and immediately be replenished from the resevoir, so it seems to me that no air should get into the brake line.
A little trick that might help: put a bit of "Saran Wrap" or similar clingy plastic wrap over the filler of the reservoir, then replace the cap not quite tight. The Saran Wrap might help to keep the fluid flowing down. Not much of a difference usually, but it helps. But do take the Saran Wrap off once you're done! :wink:

Oh, and I've swapped a couple of those switches out without having to rebleed.

Good luck!
 
Randall, Dr. Entrophy, and Andrew,

Good, useful information. Many thanks.

Randall: I'm not sure I understand how the "propping the brake pedal slightly depressed" works, but if it does, that's good enough for me." What is the "MC"? What holds your spreader -- or the 1/2 -- in place to hold the brake pedal down? (extended to the seat or dash?) And how much is "slightly depressed"?

I'm afraid I just can't picture it in my mind.

I'm still leaning to replacing the wires and letting it go until the switch dies, but then I'll know how to replace it, thanks to you'all (or, as they say her in the South... ya'll.)
 
Hmmm, something just occurred to me: Does the "apparently original" switch still function properly? If so, I suggest leaving it there. I have heard that, like so many other bits, currently available replacement switches aren't nearly as good. Wires? Sure, especially if they've gotten brittle or otherwise damaged. Otherwise, <span style="font-style: italic"><span style="font-weight: bold">if it ain't broke....</span></span> :driving:
 
Andy,

As far as I know, the switch is still functioning properly. In fact, I began all this by thinking that I would only replace the wires, which are very ratty and brittle. One thing led to another (Dr. Entrophy's warning!) and I began to think that I might replace the switch while I was at it. And although I am glad to know how to replace it, thanks to all the good advice I've received, I am -- indeed - inclined to leave the switch alone until it dies and only replace the wires.

I have to admit that I am replacing a lot of stuff on my car -- in the name of preventive maintenance and aesthetics -- but not everything. I, too, have heard that a lot of reproduction stuff is not as good as original stuff, so I am moving very carefully.
 
LexTR3 said:
Randall: I'm not sure I understand how the "propping the brake pedal slightly depressed" works, but if it does, that's good enough for me." What is the "MC"? What holds your spreader -- or the 1/2 -- in place to hold the brake pedal down? (extended to the seat or dash?) And how much is "slightly depressed"?
MC is master cylinder, the brake master cylinder in this case. With the pedal fully up, there is a valve inside the MC that allows the brake fluid to pass between the pressure pipes and the reservoir. (Very important that this valve be open during normal driving, as otherwise the brakes will bind when the fluid gets warm.) As soon as you step on the brake pedal, though, the valve has to close so you can build pressure in the system.

How far the pedal has to be pressed to close the valve probably varies with how loose your linkage (and adjustments if any) are, but it shouldn't take more than maybe 1/2" or so. On my car it's only about 1/4". This is the zone that feels like free play before the brakes start to move.

My 'spreader' originally looked somewhat like this:
41KC0GCFXYL._SL500_AA300_.jpg

but I drilled out the rivet that holds the fixed jaw to the bar, and reversed both jaws. (Used a bolt to replace the rivet, so I can switch back if needed.) I just put it through the steering wheel, with the end resting on the brake pedal, then slid the moving jaw up against the wheel. It's an old service trick, I can't claim credit for thinking of it. (Probably came from Popular Mechanix or some such.)
 
Randall, Great idea. I will file it away for when I decide to replace the brakelight switch. I have several of those clamps and can modify one for this purpose. A neat trick. I hope you'll include it in the book I have been encouraging you to write!

One thought on "If it ain't broke, don't fix it." Generally, I agree, and I certainly have found that "fixing" something that didn't need "fixing" sometimes led me to a much larger project. But with this car... in great shape but 50 years old and having had several POs "tinker" with it ... a number of times when I began looking at something that didn't appear "broke," I found that indeed it was "broke." Take for example, my carburetor. It was functioning fine, but I decided to replace a jet lever and some other parts. Only then did I find that the last guy who worked on the car left off three strategic cotter pins! And when I decided to change the oil in my O/D... though it didn't need it... I found that the last guy who had worked on the car had forgotten to tighten the O/D drain plug! So, I have mixed feelings about all this.
 
LexTR3 said:
So, I have mixed feelings about all this.
It is a fine line, no doubt. But the prevailing tendency seems to be what some know as "Shipwright's disease". I know people who literally started out just to change the engine oil, and wound up doing a full frame-off restoration! And of course some of them never finish the restoration.

And as noted, many replacement parts are dubious. This timing sprocket had less than 7,000 miles on it:
 

Attachments

  • 24913.jpg
    24913.jpg
    21.9 KB · Views: 142
Randall,

You are right, it is a fine line. I guess the "safest" approach is to carefully inspect everything that you can, within reason, to make sure it "looks right" or "sounds right" or is "acting right." If it doesn't seem right, then consider "fixing it." But if it looks right, then leave it alone.

The exception to this is routine maintenance (periodic valve adjustment) and replacement of points, plugs, lead wires.... things like that.

I went beyond this to replace my old starter with a high torque starter, installed a new generator, replaced my old radiator with a new aluminum radiator, new water pump, timing chain, clutch, etc. -- while the engine was apart for rebuilding. Those old items would have continued to serve, but the engine was out, so I decided it was a good time to do this other work.
 
I agree that if the old switch is fine it may well be better than the available new replacement, however: in my case the switch did not suddenly fail but rather it took more and more brake pedal pressure to activate it. The result was that I would frequently come to a complete stop w/o the brake lights coming on -- yet if I pressed the pedal to test them they would illuminate.

So as part of your decision whether to replace the switch you might consider how easily it operates.
 
Hi, George,

That's a very good point. I have not checked it that closely and should do so. I have not installed an auxiliary stop light, like yours, so I need to make sure that my brake lights are working.

Thanks for the idea.

Hope you got my PM. I'm not very experienced in sending PMs.
 
LexTR3 said:
That's a very good point. I have not checked it that closely and should do so.
Easy way to check : with the key on but the engine off, watch the ammeter as you press the brake pedal. The brake lights present a very definite discharge. With experience, you can even tell the difference between one and two.

It's tougher to see with the engine idling, but still there.

BTW, I agree entirely with George. I had the same exact thing happen, enough times that I got disgusted and converted to a mechanical switch. The dang switch should last at least as long as the bulbs!
 
mehheh.

As a "light check" routine I will go to a shopping plaza with business frontage made of glass, top to bottom. Easy to see the reflection of your lights in the window! One man operation. :wink:
 
Dr. Entropy,

Ha... Ha... That's exactly how I check my lights, blinkers, and stop lights!

I think I'm OK... So I'll stick with my original plan: to replace the wires from the snap connectors to the switch, clean the switch a little, and watch for any failure of the switch.

I've learned a lot from this thread. Many thanks.
 
Back
Top