• Hi Guest!
    You can help ensure that British Car Forum (BCF) continues to provide a great place to engage in the British car hobby! If you find BCF a beneficial community, please consider supporting our efforts with a subscription.

    There are some perks with a member upgrade!
    **Upgrade Now**
    (PS: Subscribers don't see this gawd-aweful banner
Tips
Tips

side moulding installation

jvandyke

Luke Skywalker
Offline
I'm psyching myself up to drill holes in my body panels to install the side mouldings. PO removed during restoration so no existing holes.
I bought the kit from Moss with a gazillion little bits in it.
Here's the plan.
Last fall I made up plastic strips that fit into the moulding, I epoxied earth magnets to it so I can stick the trim on the car. I was thinking to get them on like that, all lined up nice and purdy, then run painters masking tape along the top and bottom edges of the trim, then pull it off again, leaving a very precise "stripe" where the trim should go. Then I must figure out where the "bolt on" type hardware must pass through the body panel where I can get at the backside to put the nuts on. Then I can rivet the little clips in between. How many of each type and where the holes should go I haven't figured out yet.
Any advice on this greatly appreciated!!
BTW it seems the rear quarter trim pieces have a slight downward curve as they near the taillights, both pieces do it so it seems like they're supposed to?

I was going to go just above the front wheel opening as pictures I've seen seem to show the trim running very close to that, then I'll line the rest up according to fitment.
sidemoulding.jpg
 
I wonder about accessibility for A pillar type, haven't explored much yet. One of my A pillar trim pieces wasn't so perfect so I went ahead and took the pins off the back, for the magnet trick. That one may well stay magnet attached, the other I can attach properly, then get another A pillar one and do it properly as well.
 
Hi, I did my side moulding install last year (after having the parts for about 18 months!!) and did it the traditional way by drilling the 50 odd holes and then hoping for the best. Never has measure twice cut once been more apt.

With the trim for the A pillar you would normally drill 2 holes but only 1 is accessible to fit the securing clip once the door is open as the other is actually inside the panel. I used an epoxy resin around the 2 prongs and then a liberal coating on the accessible one behind the door, it hasn't budged since.

The nut/fitting question, you have 1 on each of the main lengths of trim and they are fitted as follows, front fender (by headlight), door (in the centre) and rear panel (by the tail lamp)


Mark
 
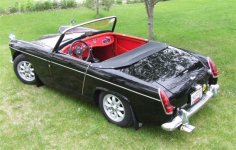
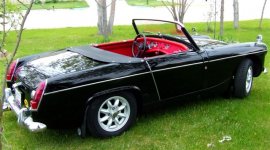
The trim runs pretty much level from the centre line of the headlamp across the front wheel arch to underneath the door lock, from then on itruns about a third of the way across the rear panel following the curve of the top of the panel and finishes at the line between your turn and brake light.

[img:center]https://[/img]
 
and the termination point.


The one type of fitting for the A panel isnt available (in the UK anyway). Not sure of the type of rivets but there are 40 of them, Moss list them as 8 to each front wing, 5 to each door, and 7 to each rear wing, you also add your 1 nut/bolt fitting to each panel as well, I bought a complete kit of rivets/clips/nuts/bolts/washers listed as HMP815009 in Moss UK not sure if that would be relevant to you.


Mark
 
Here are a couple more shots Jeff. Mark's look spot on though (all except for that door lock comment :thumbsup:smile:.

Beautiful car Mark.. Is it a 68?
 

Attachments

  • 17480.jpg
    17480.jpg
    75.1 KB · Views: 1,168
These have never been off from the A pillars back.
 

Attachments

  • 17481.jpg
    17481.jpg
    62.4 KB · Views: 1,253
Extremely helpful guys, thanks a ton!!!
Another quick question, I was planning on "swabbing in" some primer when I drill the holes, as an anti rust measure, unless there's something better to use.
 
I would use some primer then something like rustoleum to go around the edge of each hole. You can spray some into the cap of the can then use a tiny brush to apply it. I have also sprayed the inside of everything with home made waxoyl type stuff. A bit messy, but it coats really well.
 
we get our other cars done at Krown. they gave me a can of their stuff - which I used everywhere - they have it for sale
 
Hi scout, yep spot on, its a 68 model. Thanks for the kind words. Always loved the black paint/red trim combo you have.

I think you license plate says it all!!! :driving:

jvandyke, I used waxoyl coated in the holes and on the rivets/clips and sprayed some more where I could once it was all assembled.

Mark
 
I still haven't done this, wussy.
Looks like all 6 (4 wing, 2 door) pieces each get one of the bolt on clips, where?
Judging by Moss, at the rear edge for rear wings, middle of door, and near front (headlight) for front wing.
The little clips: does it matter which side is up? one edge is notched, one isn't.
I put mine on again yesterday, again just with magnets, and it looks so nice I have to get them on for real.
 
Moss is correct for the location of the bolt clips. If memory serves me correct, I fitted the little clips with the notch upwards on every other clip as you hook the moulding over the notch and knock the other end home, just paranoid about them falling off I guess!!

Mark
 
Please post lots of pictures, measurements & pointers once you complete this task, I have to do the same to my Midget & I haven't got the guts to do it yet :smile:... I do have some references as I can see the weld spots on the backsides of some of the door & 1/4 panels, also inside front fenders, but pictures of the hole locations before the clips are installed etc. will be very helpful !
Good Luck, it will be worth it.
 
I also see some spots where holes used to be.
I plan on using my magnets to hold the pieces where they look best, use some masking tape and run a strip along the top and bottom of the trim, then when I pull the trim off I'll have a line along the body where the holes can be. Then I guess I drill and pop rivet...and pray. I've seen in that MGB restoration video (forget the show it came from) where they used a string but the trim isn't dead straight, the rear wing pieces bend down ever so slightly as they near the tail lights, at least on a Midget they seem to. I have yet to figure out what to coat the holes with as a sealant/rust preventative.
I think I counted 40 rivets/clips and 6 bolts. I'm guessing 8 rivets for each wing, 4 for the door and each gets a bolt too. A pillar pieces are a bit of a mystery yet.
 
Hi, for the A post:

With the trim for the A pillar you would normally drill 2 holes but only 1 is accessible to fit the securing clip once the door is open as the other is actually inside the panel. I used an epoxy resin around the 2 prongs and then a liberal coating on the accessible one behind the door, it hasn't budged since.

Not sure of the type of rivets but there are 40 of them, Moss list them as 8 to each front wing, 5 to each door, and 7 to each rear wing, you also add your 1 nut/bolt fitting to each panel as well, I bought a complete kit of rivets/clips/nuts/bolts/washers listed as HMP815009 in Moss UK

Mark
 
How were the original holes filled? I'll bet the PO just layed some bondo over them. If so you should be able to find them and open them.
KA
 
I'm guessing the clips get oriented like this picture, prongs up, angle the trim on, rotate down and push to catch the bottom?
trimclip.JPG
 
I got all geared up to tackle this today and my 8 year old co pilot freaked out. Not sure what bothers him, he doesn't like the look of it or the thought of drilling holes in the car. I really want that trim on there but his reaction was enough excuse for me to shelve it again. I might need to drive down to a gathering sometime where there are more confident spridgeteers willing to drill 46 holes in someone else's car.
 
Back
Top