• Hi Guest!
    If you appreciate British Car Forum and our 25 years of supporting British car enthusiasts with technical and anicdotal information, collected from our thousands of great members, please support us with a low-cost subscription. You can become a supporting member for less than the dues of most car clubs.

    There are some perks with a member upgrade!
    **Upgrade Now**
    (PS: Subscribers don't see this gawd-aweful banner
Tips
Tips

Seat recovering

bugedd

Jedi Knight
Country flag
Offline
I am going to attempt to recover me seats soon, maybe next week. The seat frames have the square cutouts in the bottom, and from what I understand they originally had some mesh in the cutout. Should I put something in that cutout, or not worry about it?
Also, if anyone has any tips, let me know! I am using the covers and padding from Moss.
 
You might want to go to page 2 and read through "Upholstery Progress". A number of tips are brought up in that discussion in covering Bugeye seats. I had a kit from Moss and did them myself too. When I do this again, I think I will do one seat at a time so that I have one for reference. One of the biggest mistakes I have seen is that the lines in the seat and back do not match up. The seats do have some perforated metal pieces in the center. Even though the seats seem to "rot" over the years, the center metal screen seems to stay intact. I was able to braze/weld/repair one seat base, but was forced to buy the second. If I can find the old bases, I would be happy to mail the screens to you. Do you have a mig or spot welder? They were just tacked into the seat bases with a few spot welds. I can't answer your question about whether you should put anything there or not except that if you decide not to, if you find you need to later, it would not be fun after all of your hard work.
Kevin
 
True, I don't want to redo the work. I don't have a welder, but I can have it done easily. I read that thread also, definitely some good info.
 
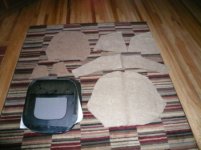
Here is a pic of the padding stuff that came with the Moss kit. The cushion is in the seat bottom, but I don't see how to attach it at the seat pan on the flat part. There are some little tabs that look like they can be bent out to puncture the cover and hold it. In the pic, its the lowest part of the image. The rest clips can hold it.
As for the padding, someone help me out with where this stuff goes. I don't have the original seats to go off of. The kit says its for the bugeye, so it should be correct. The top left is clearly the seat back, with a fatter area on the bottom. The rest, I don't know. Input anyone?
I am attempting to add an image...lets see if this works. If not, someone out there is going to have to help me out :smile:
 

Attachments

  • 22656.jpg
    22656.jpg
    84.2 KB · Views: 356
I have a bunch of photos of seats as I've disassembled them and a few as I've re-assembled them. I'll get them posted tomorrow.
 
Cushon is not attached.
 
Not attach the cushion, but the cover at the back of the seat pan. Its a flat area, so I cant see clips working there.
 
Well guess what, they don't very well. However, that's what they used.
 
However, I have never been sure wether they used glue as well or that is just age that kind of sticks it all together.
 
Those good photos should show where all the clips go, except for the lower seat back ears. These are slipped on and secured with some small points in the metal, and the cover's just rolled back under itself to the piping.The heavy jute-like stuff goes on first, and can be tacked on with some spray adhesive, then the padding goes on top of that, and can also be tacked so it doesn't shift.. It helps to slip a light plastic bag over the back to help putting cover on.
The hardest part I did was compressing the foam to attach the bottom cover. It is really stiff , but will soften up with some work. Put it on the floor and jump on it ? I think I used some clamps on it upside down.
The bottom panels keep the mice out mainly, I guess. if you don't get some real ones, hardware cloth would probably be fine, and you can also just pop rivet whatever you use. Then again, the solid ones ,tack welded, might give the seat some rigidity, though.
Bill
 
I don't know what you are supposed to use, but I did use a combination of spray 3M glue, and tube glue. The vinyl needs to be plyable, and I covered mine in the winter, so I actually ended up heating up the bathroom and working in there. I especially had a difficult time getting the vinyl over the seat bases. By the way, I still haven't found the metal base screen yet, but I am still looking. I know I have at least one of them.
Kevin
 
Edd,
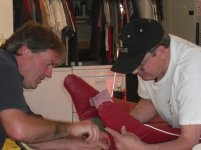
Here is the sock part of the seat back. It is stiched out of two pieces, pulled for the bottom part of the frame. I used a thin cloth underneath. It is then glued on.
cheers,
Scott in CA.
 

Attachments

  • 22681.jpg
    22681.jpg
    68.2 KB · Views: 292
Thanks for all the input guys. I got the clips today....and the $500 estimate from the seat guy to recover them....and it looks like I will be doing it myself! So, I assume the big clips go on the seat base/cushion, and the small ones are for the seat back? And whats the garbage bag tip? And should I glue all the pads in place with hot glue gun or 3M spray before I slip the seat back on?
Thanks again for everyones help, you are a great help!
 
No thanks on the squabs (and really, what kind of word is that?). Moss came through and out of nowhere I had the covers/cushions. Talking about crappy communication on their part.
 
Another question. I ordered extra upholstery material from AH Spares to cover my side panels and dash. Should I put some very thin foam under the material on the dash? Side panels?
Thank you
 
I don't know about the side panels, but nothing but the vinyl on the dash.
 
Back
Top