• Hi Guest!
    You can help ensure that British Car Forum (BCF) continues to provide a great place to engage in the British car hobby! If you find BCF a beneficial community, please consider supporting our efforts with a subscription.

    There are some perks with a member upgrade!
    **Upgrade Now**
    (PS: Subscribers don't see this gawd-aweful banner
Tips
Tips

SANITY CHECK PLEASE - 1-3-4-2 ???

RickB

Yoda
Offline
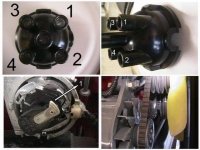
I have three or four MGB books here, they all say the firing order is 1-3-4-2 right?

Ok - first off I don't believe that's how I had mine. I don't know when I messed it up but apparently I got a couple wires crossed and I think it was 1-3-2-4. Strangely it ran ok like this sometimes. Mostly it was awful.

I removed the cap from the wires and cleaned it up and put it back on with the order 1-3-4-2 and got no fire.

I am assuming this is clockwise and number 1 is just "up" from the external wire connector?

None of my books have a diagram of this!!!

I also found my points were set at less than .010 so I adjusted them to .014 - this might also make a difference (if I ever get it to run again).
 
<sheepish grin mode on>
That's supposed to be counter-clockwise isn't it?
</sheepish grin mode off>
 
Yes, counter clockwise. If the distributor drive was installed properly then #1 is just above where the wire goes in the side. If you have no idea if the gear is in correct then bring the engine to top dead center and see where the rotor is pointing. No. 1 is there or 180 degrees from there. If you turn the engine over 1 complete revolution and bring it to TDC you will see the rotor is pointing 180 from the first go round. I hope this is clear enough and helps. bob
 
Thanks Bob,

You know how sometimes you just look at something and well you just don't quite 'get it' - that's what happened.

What's nice is that I had pictures of that side of the motor so I could see what it looked like when it was running good. :laugh:

So - on with the story now, guess I'll continue in the other thread...
 
RickB said:
<snip> None of my books have a diagram of this!!! <snip>

Here ya go....
 

Attachments

  • 13823.jpg
    13823.jpg
    53.2 KB · Views: 402
Nicely done Rick. That should be in the wiki or at least shared on the spridget list.
 
Rick - Nice....only thing missing is explaining what the arrow points to...it points to the position of the #1 wire.
 
And the number 1 plug in fact if the timeing is closeish.
 
jlaird said:
Nicely done Rick. That should be in the wiki or at least shared on the spridget list.

I cannot take credit for the original jpg...I found it a couple of years ago and realized its value...and share it whenever a question of this comes up in discussion.
 
Thanks guys - you know how it is when you start pulling what's left of your hair out right? :wink:
 
I've been right there before with ya Rick. Was this the root of your problem???
I said in the other thread, that it IS possible for these cars to run with the wires goofed up. It'll run, just not well. ;-)

You should try it on a Jag. No1 (firing order) is at the windshield and things can get really screwed up if you're not careful. Sometimes No1 is at the radiator. It all depends on what your working on.

BTW, When you gonna chuck that dizzy setup and switch to pertronix? You know you want it!
This cures all troubles and world hunger too!
41427P_m.jpg
 
Nah - this is a Jeff Schlemmer Dizzy - a work of art.
Seriously this thing was running fantastic until it went to heck recently.

No, the firing order wasn't the issue - just something I messed up while trying to fix stuff.
 
Hi Jeff, thanks but I didn't want to bug you as I really didn't think it was a problem with the unit you supplied.
Thanks anyway!
 
I was hoping this would turn out to be the source of the problem. Sorry Rick. Keep us posted.
 
Just ask Jeff super helpfull he is I'll tell ya!! One for the 67BGT, one for the 74B and one for the 52TD.

IMG_6315.jpg
 
Here's the 'end of the story':

<div class="ubbcode-block"><div class="ubbcode-header">Quote:]
It Lives!!!

New cap = no difference
New rotor = no difference
New condenser = no difference
Jumpering tach out = no difference
Jumpering ign switch out = no difference

After all that I was beginning to see the end of the rope so I metered things that really "looked" like they were right to see if the meter agreed.

With the points closed I was getting odd readings, like they really were not closed.

I opened and closed them several times and got differing readings.

Next I pulled the points out and hit the contacts with a file, the meter then showed closed when they touched and open when not.

After reinstalling the points and making sure everything else was right I tried it and - IT RAN!!!

I guess sometimes it's just that one "obvious" thing that puts you over a barrel.

Thanks again for all the help here.
[/QUOTE]

Now I need to do something about that big hole in the back muffler. :yesnod:
 
Back
Top