• Hi Guest!
    If you appreciate British Car Forum and our 25 years of supporting British car enthusiasts with technical and anicdotal information, collected from our thousands of great members, please support us with a low-cost subscription. You can become a supporting member for less than the dues of most car clubs.

    There are some perks with a member upgrade!
    **Upgrade Now**
    (PS: Subscribers don't see this gawd-aweful banner
Tips
Tips

Rmoving the King Pin [continued]

BN6_2197

Jedi Trainee
Country flag
Offline
Gents,

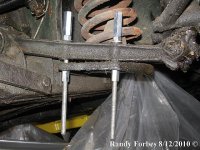
started to remove my king pin due to lubrication problems at grease nipple 99 (see attached picture). I tried to remove the Fulcrum Pin (77) but I was unable to remove it even with a lightweight hammer. Is this expected? Is there a specific order of the parts to be removed? My idea is to
  • start with the steering lever (for that I have to remove the brake drum first I think)
  • then the Fulcrum Pin
  • after that all the parts at the bottom of the King Pin (38-42) and
  • finally the slotted nut (23, 24).

Any comments on the procedure welcome.

Regards,

Volker
 
43.jpg

Ups, forgot to upload the drawing with the numbers I referenced in my initial post.
 
Volker,
I can't see your drawing, but my recollection is that the pin at the bottom (I think called the fulcrum pin) unscrews. There should be a slot in one end of it for a screwdriver.
 
The complete dismantling instructions are in the Service Manual in the "Front Hubs and Independent Front Suspension" chapter. You DO have the Service Manual, right?
 
Yes, I have the manual but the order is not christal clear for me. Referencing the workshop manual I plan to
* start to disassemble the steering arm 40 (after removed the brake drums)
* then continue with the joint bolt for top wishbone arms (5)
* after that 29-37 and
* finally the swivel pin nut (43)

Hopefully am I am able to have the king pin in my hands and find the reason why I cannot put any grease in the upper grease nipple of the swivel axle.

As I said, I cannot get the joint bolt for the top wishbone arm unscrewed even with a lightweight hammer.
 
Volker, Probably typical of old parts and minimum maintenance for years. Crude, Rust, etc. Soak copiously with penetratiing fuild maybe for days. Might need heat. (torch, hand held propane would work). Heat and impack with hammer and eventually you will see movement. Then keep working it. Dave.
 
Dave, thank you for the answer. If it is due to minimum of maintenance I am fine with that. I own the car for only five years only ;-) Just wanted to be sure that I do not have to pay any attention e.g. for the shock absorbers of something like that before removing the joint bolt. By the way, the car is jacked on the frame.
 
Oh yes Volker, you do have to pay attention to the tension of the coil spring. I always use what I call an under car walker style push jack. One that hinges up as a big lever like an alligator jaw. Something like a pit crew would use for a race car. You must have a stable platform type of jack under the lower a-arm to keep the spring alittle compressed until you unfasten the swivel pin, then lower the jack slowly to allow tension off the spring. You might be able to use a scissors type jack like some of the factory jacks to change tires. But I would make sure it is very stable an won't kick sideways as the spring is allowed to come down. Dave.
 
Bob, Dave, thank you for remembering me of the coil spring. It seems to be a big work to get the King Pin isolated ;-) Do you think, that is some kind of work that can be done by a rookie? It will be my first real job on the car. Until now I only did work on the electricity and small things on the steering. But I would like to do that by the way ;-)
 
If you feel comfortable controlling the spring you can do it. But your spring jack must be very stable.
You put the jack under the lower A-arm with alittle upward pressure on the spring and suspension. Keep the jack there until you get the swivel pin (kingpin) separated. (Remove the brake caliper, you can let it hang on a strong wire/cord if you don't want to unscrew the brake hose). After separating the kingpin lower the jack slowly. The jack will not have to move down very far before all the pressure is off of the spring. When it is time to put it all back together use the jack again to push the spring back up into the top spring 'hat' and compress it alittle to get the king pin all fastened together. The jack is your control easing it down and easing it back up. Dave.
 
Dave, I am not sure whether I feel comfortable with that. I will sleep a night or two and then decide ;-) Thank you very much again for your advice.
 
There's a sequence of pictures, beginning with the one below that offers an alternative way of releasing the tension on the front coil spring. I feel that it's a safer way than relying on the stability of a jack, but many people apply many methods; YOU decide what works best for you!

IMG_2394.jpg


One by one, remove the bolts holding the spring pan to the lower A-arms, replacing the removed bolt with a length of all threaded-rod, as seen above. You can run the nuts up finger-tight, until__one by one__all four (4) bolts are replaced with all=thread.

IMG_2395.jpg


After all four (4) bolts are replaced with all-thread, working around to each one, start lowering the spring pan in an even fashion.

IMG_2397.jpg


Eventually, all the tension__and energy__will be relieved, and you can go about dismantling the remainder of the components...

IMG_2400.jpg


... this entire suspension rebuild process, and more, can be found in this album of my gallery (link is in the approximate middle of this MKIII album, but please feel free to look at as much of it as you want. Be forewarned though, at present there are over 42,000 pictures__nearly all car-related__in the entire gallery...): https://www.spcarsplus.com/gallery3/index.php/reMKIII?page=48

My own BN6, is just a little bit older than yours, at VIN 942:

IMG_6849.jpg


IMG_6814.jpg
 

Attachments

  • IMG_2395.jpg
    IMG_2395.jpg
    80.3 KB · Views: 87
I've always done it the way Randy described. I think you have a lot more control and probably safer but remember there is a lot of stored energy in a compressed spring.

Marv J
 
Nice one Randy, I use that method to get the spring pan back up, but the jack method to remove it.

I also found that it was better when the engine was in,:wall: the last time I had the engine out for refurbishment and then decided to drop the front suspenders, that was a bit hairy, come to think of it I did use Randy's method eventually for dropping the pan then, it could not readily be done with the jack as there was no weight to counter the springs.

By the way, if you are having difficulty in getting the top trunnion off, undo the top nut of the kingpin, put a long bar through the hole in the trunnion where the rubber bushes and the bolt holding the shocker arms fit, and give it a good old push/pull in both directions to break the hold on the kingpin.

:cheers:

Bob
 
Randy, thanks for the detailed description. It became clear for me now :encouragement: Just one thing: which lenght and diameter are recommended for the rods?
 
Randy, thanks for the detailed description. It became clear for me now :encouragement: Just one thing: which lenght and diameter are recommended for the rods?
Well for certain, the diameter of those threaded rods are 3/8" (coarse thread, as "fine", while stronger, is more difficult to find at the common outlets). I'm sure I just cut whatever piece I had laying around into four (4) equal lengths, so if you're going out to buy some, 36" (yields _4_ 9" lengths) would be enough for your car. If you have MKIII springs, like the example above__an actual MKIII__then I'd get a 48" piece to have 12" long pieces. The MKIII spring is longer.

No reason to think that an 8mm all-threaded rod__if easier to obtain in Germany__wouldn't be capable of doing the same job. I'm afraid that the next common size, 10mm, would be too big to fit the existing holes.

If you want to make the job easier, and to have the tool last, ALWAYS grease the threads before each use. I also used all-thread coupling nuts, as it makes it MUCH easier the repeatedly get the wrech onto the flats. Using a ratcheting box-end wrench will speed up the process.

There's a myriad of Healey tasks in that particular (and embedded) albums, so you might be interested to see some of the other work I did, in the event that you have the same things planned for your car. Naturally, some of the things, like the convertible top, or brake servo wouldn't apply, but the rest is fairly common stuff. I wouldn't ever direct you towards doing something the hard, or the long way, as I try to be as efficient and practical as possible.
 
Stop,,,, Hopefully am I am able to have the king pin in my hands and find the reason why I cannot put any grease in the upper grease nipple of the swivel axle.

Why are you removing the king pin? Just because you can't get grease/oil into the top bushing? Remove the grease nipple, WARM the area up with a propane torch or a hair dryer to melt the old grease, fit a new grease nipple and refill with grease. I also pump 20/50 into the grease nipples to clean everything out then I pump in grease.

www.britishcarmechanic.com
 
Back
Top