• Hi Guest!
    You can help ensure that British Car Forum (BCF) continues to provide a great place to engage in the British car hobby! If you find BCF a beneficial community, please consider supporting our efforts with a subscription.

    There are some perks with a member upgrade!
    **Upgrade Now**
    (PS: Subscribers don't see this gawd-aweful banner
Tips
Tips

TR2/3/3A Requesting some Pictures for metal work

tallguylittlecar

Senior Member
Country flag
Offline
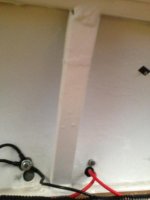
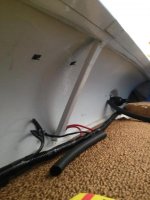
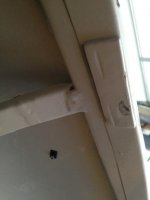
The TR3 is coming along despite a general lack of time to work on it. I have fit the new trunk floor, rear apron and fenders but I need a picture of the trunk in order to finish. I know there were different flanges around the trunk lid opening, one wide one that is more shallow and a deeper one. I need a picture of the wider flange and the trunk support brace from the inside of the trunk. The rear brace and the plate that braces for the trunk lid handle were already removed by the previous owner. Any help is much appreciated. I hope to have pictures up soon of the progress. The only real work I have left is getting the front gaps all set around the hood and the apron before I can move on to body work.
 
I think your commission number would help. I've not yet torn mine apart TS73xxx and can send pics. I would very much like to see the pictures of your process. Tom
 
Last edited:
I am working on a post 60K car, my rear apron I replace mine with was a bit different than what came off, primarily the drain rail around the trunk, any pictures would be much appreciated
 
Here's mine, (the dent in the brace is not original): Sorry pics were not helpful. Tom
 
Last edited:
I think I have some pics if you like. Please know that I replaced the rear apron on my car as well as that drip channel so mine is not original (although I tried as best to put it back like original). Let me know please.

Cheers
Tush
 
Oh, Tallguylittlecar (I should change my name to fatguylittlecars),

If you replaced the rear apron with a new remanufactured piece, check the depth of the channel around the spare tire opening where the cover fits on. I found that that channel was about a half inch shallower on the new apron than the old. The spare tire cover sits out quite far from the back of the car unless you modify the channel or the spare tire cover.....

Cheers
Tush
 
Thanks for the pictures, but my channel is a bit different, probably due to my replacement apron.

Tush - I would take whatever pictures you can give me, I have noticed some issues with the tire cover but have made the adjustments so it fits, thanks for the heads up. I just finished the trunk lid - had to section in the bottom and the right side to get even gaps. The doors are already done - adding and cutting to get even gaps as well. I had to mount a new right rear fender as well. The rear of the car is almost ready for body work. Now I just need to get the hood and nose fitment up to snuff and I should be able to press on - just in time to take a break for winter, no heat in the garage.
 
Here are a couple pics of the support brace that was referenced in the original string. Dimensions of the sheet steel brace are about 7-5/8 inch long, 1 inch wide, and the flange folded back on each side is about 3/8 inch deep. I had to cut and reweld mine, as evidenced in the photo.

I have lots of photos of the drip rail, boot floor, spare pan, and rear apron replacement. Let me know if you'd like for me to share those. My car is a pre-commission number 60000, so it has the two part drip rail rather than the wider one part drip rail. I'd be happy to share those photos. I did a lot of cutting, shrinking, stretching, welding and grinding back there.

Pat

attachment.php
attachment.php
attachment.php
 

Attachments

  • 023 (Large).jpg
    023 (Large).jpg
    19 KB · Views: 158
  • 026 (Large).jpg
    026 (Large).jpg
    31.5 KB · Views: 162
  • 027 (Large).jpg
    027 (Large).jpg
    16.5 KB · Views: 159
Pat, thanks for the pictures, they are exactly what I was looking for. Now I just need to press forward with the work so I can start on the body work. My next hurdle to tackle is the hood and front apron fitment. As of now there is very little room front to back for the hood. I need to figure out my gap between the hood and the scuttle. I am am afraid if it is too small that it will cause issues as I build up layers of primer and paint.
 
Back
Top