• Hi Guest!
    You can help ensure that British Car Forum (BCF) continues to provide a great place to engage in the British car hobby! If you find BCF a beneficial community, please consider supporting our efforts with a subscription.

    There are some perks with a member upgrade!
    **Upgrade Now**
    (PS: Subscribers don't see this gawd-aweful banner
Tips
Tips

Replace V-12 90 XJS Air Cond Expansion Valve

Michael J.

Jedi Warrior
Offline
Anyone had some hands on in changing an Air Conditioning Expansion Valve?

The photo below shows the valve, down "in the belly of the beast".
 

Attachments

  • 29394.jpg
    29394.jpg
    40.2 KB · Views: 193
The replacement valve seen in the photo below has a coiled bulb that looks a tot like a hangman's not on a noose. It connects to a disk on the front of the valve. another small copper line connects to a fitting that can be seen with an inspection mirror.
 

Attachments

  • 29395.jpg
    29395.jpg
    42.3 KB · Views: 162
The procedure listed in the XJS Service & Repair Manual is a little "light" on details. The procedure appears in the photo below taken of the page in the manual. It does not say where the coiled bub has to be inserted.
 

Attachments

  • 29396.jpg
    29396.jpg
    51.2 KB · Views: 163
I seem to recall just stuffing the coil down the hole in the firewall so it is in proximity to the evaporator. It was ages ago, so don't chisel that in concrete.
 
Yup, the coil needs to be in the evap case, may find a clip holding the old one in place if it's the original. it needs to "monitor" the evaporator temp so it can regulate the amount of gas passing thru the internal orifice. The "disk" houses a diaphragm controlling a needle valve.
 
Did mine a few years back, took my time and did it in a couple hours. Make sure you put the insulating dope back over the hole in the dash to keep engine heat out.
 
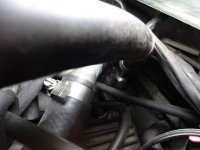
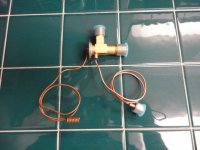
OK, be very very careful doing this job. Removing the low pressure hose is the key to success or failure, and failure can mean a new evaporator. I have a proven technique for this that you may or may not be able to emulate.I have a helper brace the fitting from the passenger side with a big screwdriver or pry bar.I then take an air chisel, with a long bit, and just vibrate the large nut as if I was trying to turn it. Eventually it always frees off, and it can then be easily removed. If you do not have the ability to do that, you might well buy a low pressure hose and use a dremel to cut the nut by splitting it on one side. It is really easy with the limited space there to wring off the end of the evaporator.... The little coil fits into a sheet metal fitting on the lo pressure side of the evap fitting.It is held shut by 2 pozi driv screws. Loosen them, and the coil will pull out. Insert the new one and secure the screws.

Good luck!!
Jesse
 
I remember removing a lot of hoses around the valve to get at the nuts with a crows foot wrench on the valve and an open end on the nut. Just don't torque the valve, even a little bit will crack the evaporator.
 
Back
Top