• The Roadster Factory Recovery Fund - Friends, as you may have heard, The Roadster Factory, a respected British Car Parts business in PA, suffered a total loss in a fire on Christmas Day. Read about it, discuss or ask questions >> HERE. The Triumph Register of America is sponsoring a fund raiser to help TRF get back on their feet. If you can help, vist >> their GoFundMe page.
  • Hey there Guest!
    If you enjoy BCF and find our forum a useful resource, if you appreciate not having ads pop up all over the place and you want to ensure we can stay online - Please consider supporting with an "optional" low-cost annual subscription.
    **Upgrade Now**
    (PS: Subscribers don't see this UGLY banner)
Tips
Tips

TR2/3/3A Removing the fan extension from the Crank hub

GTP1960

Jedi Knight
Offline
Finally started my winter project of upgrading everything behind the apron.
had a good day:
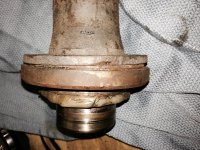
removed bumper, apron ( after removing the wrong set of bolts under the wings), radiator, wide water pump pulley, generator, 4 blade paddle fan , wide crank pulley, fan extension & hub.

my problem is that the fan extension is affixed to the crank hub. It looks like a heavy epoxy, silicone or a weld, it's pretty tough though & wasn't influenced by a pry bar. I ran out of steam before I could work on separating it with greater enthusiasm. but I am wondering is this common?
also, note the angle of the extension in relation to the hub. It is not true. I'm surprised the old girl didn't shake herself to death.

any thoughts/advice appreciated.

best regards,

Guy
 

Attachments

  • image.jpg
    image.jpg
    91.3 KB · Views: 84
OP
GTP1960

GTP1960

Jedi Knight
Offline
Marv,
Yes, there was a long dog bolt with wings on the nut end, to support the hand crank.
 

TR3driver

Great Pumpkin - R.I.P
Offline
Seems very odd to me that someone would want to reinforce that joint. Normally, it is held together by the 6 smaller bolts that hold the pulley to the hub, as well as the one big bolt through the center.

Your avatar photo looks familiar. Was that China Ranch in Death Valley?
 
OP
GTP1960

GTP1960

Jedi Knight
Offline
Seems very odd to me that someone would want to reinforce that joint. Normally, it is held together by the 6 smaller bolts that hold the pulley to the hub, as well as the one big bolt through the center.

Your avatar photo looks familiar. Was that China Ranch in Death Valley?

Hey Randall,
The six bolts were in place & pretty easy to remove. The wide pulley is pressed steel & in two halves.
the big bolt through the center , really was the only connection to the crankshaft.
(Which I hope I'll b able to reuse with the shorter extension i got from BV to use with an 8 blade poly fan.)

BTW: do you think I should cut away that silicone gasket at the end of the hub, or try & Reuse it, or is there another alternative. I don't think I had a leak there, surprisingly enough.

Re: the old truck: Not China ranch, I don't believe, but an old abandoned (now in the tourist business) gold mine town south of Las Vegas. Can't remember the name.
 

CJD

Yoda
Country flag
Offline
Eeeew. It's obvious the front seal leaked, and some PO forced silicone under and over the hub trying to seal it. They glued the extension to the hub with the silicone, and made it out of true to boot. Get rid of all the silicone!

Most silicone gets soft in heavy duty solvents, like carb cleaner or gasoline. I'd try soaking it in carb cleaner for a day and try again. Option 2 would be to reinstall the hub, remove the large center bolt and then you can get a grip on the extension and yank till the silicone breaks.

Needless to say...silicone has no business anywhere near that assembly!
 

dgaldrich

Member
Bronze
Country flag
Offline
If the "strong solvents" don't work, try the hot wrench. Most epoxy compounds will at least soften with heat even from a propane torch. The rubber/RTV stuff will probably burn off.
 
OP
GTP1960

GTP1960

Jedi Knight
Offline
Thx For your thoughts John.
I soaked it in evapo rust all night.
And while the seal at the back of the hub is definitely silicone (got any alternative ideas on replacing this?) the joint in question, extension/hub, seems to be a metal weld. A wire brush doesn't make much of an impression on it.
I'm thinking now I'll either put the 4 paddle fan back on (more for original balance than cooling), with a pusher fan on front of rad.
Or I'll start shopping for another crank hub.(maybe both in due course)
 

TR3driver

Great Pumpkin - R.I.P
Offline
Epoxy is much softer than weld, should be easy to tell the difference just by gouging it with a dental pick or pocket knife. Or just heat it up as dgaldrich suggested.

I would definitely lose the silicone at the back. Replace the seal in the timing cover, and make sure the sealing surface on the hub is in good shape (or install a Speedi-Sleeve to repair it).

But if that is weld holding the extension to the hub, I would start looking for another hub. They are available new (tho a bit pricey), or it shouldn't be too hard to find a used one in decent condition. Ted Schumacher might have one laying around, from doing a narrow belt conversion.

I'll be surprised if you can reuse the same bolt with the shorter extension. If you do, make sure the bolt is not bottoming in the threads in the crank. It has to clamp tightly against the hub or the joint will eventually fail. As I learned the hard way, the joint may appear to be tight, but if part of the force is directly to the crank, the hub will eventually work loose.

I forget offhand whether it is 5/8 or 3/4 diameter, but the thread is a standard NF pitch. You should be able to find a shorter one at any hardware suppy (eg McMaster-Carr or Fastenal). I got mine at the local "Aero Surplus" store.

On the truck, one of the ghost towns would make sense. We've run around and visited most of them at one time or another, but I have no idea which one was which any more. There was even an archeological dig out there somewhere; where they claim to be finding human-made tools from 200,000 years ago. (As I recall, there was considerable dispute over that date, though.)
 

CJD

Yoda
Country flag
Offline
I agree with Randall. If it is a weld, they ruined the hub by not getting it straight. If you think it's epoxy, JB Weld etc, then heat is the ticket. Above 250 degrees all epoxies loose strength. If you don't have a torch, just throw it in an oven at 350 for a while and it should pull apart easily.
 
OP
GTP1960

GTP1960

Jedi Knight
Offline
Thx all!

I ordered the new hub & seals, the old one looked pretty rough and had some dings on the shaft.

I'm going to try the oven heat technique on the Old one, just for sport.
I noticed the thermostat housing was deeply pitted and hose connectors were jagged (though it would probably out last me.) so that's on my list too.
i'm realizing now it's hard to draw the line on these old crates!


"On the truck, one of the ghost towns would make sense. We've run around and visited most of them at one time or another, but I have no idea which one was which any more. There was even an archeological dig out there somewhere; where they claim to be finding human-made tools from 200,000 years ago. (As I recall, there was considerable dispute over that date, though.)"

Randall that truck was in Eldorado canyon, Searchlight, NV., it is a place where a lot of old cars & trucks braked for the last time.

I' m a bit of a rockhound , myself. & I know the real guys (archeologists etc.). Have a conniption fit if any peer questions the 12000 yr old land bridge theory. If there was someone on this side of the pond 200k years ago......they need an eye witness account.
 

Attachments

  • image.jpg
    image.jpg
    92 KB · Views: 54

TR3driver

Great Pumpkin - R.I.P
Offline

I' m a bit of a rockhound , myself. & I know the real guys (archeologists etc.). Have a conniption fit if any peer questions the 12000 yr old land bridge theory. If there was someone on this side of the pond 200k years ago......they need an eye witness account.
I'm no archeologist, I only know what I read in the funny papers. But, I don't see any reason that there couldn't have been multiple waves, perhaps even from multiple sources. Or that those early groups would have necessarily survived to be around when the later groups arrived. So there doesn't seem to be any particular conflict between the 12k and 200k theories.

And "conniption fits" are rarely conducive to good science. :smile:

Here's a link to the site I was talking about, the "Calico Early Man" site
https://www.meetup.com/Friends-of-Calico-Early-Man-Site/

And some more information about other pre-Clovis sites
https://en.wikipedia.org/wiki/Buttermilk_Creek_Complex

(Sorry for hijacking your thread, Guy. Hopefully you got the answers you wanted and don't mind too much.)
 
OP
GTP1960

GTP1960

Jedi Knight
Offline
Randall,
Thanks for the links!
now we are talking about 2 subjects I find very interesting.
(I have volunteered on a dig on the savannah River where 25k-30k year , radiocarbon dated artifacts are found, but not Officially acknowledged.). ...go figure? I just assume we are at one of the crossroads where science meets "political science".
as for me, I have no real opinion on the subject of how long we've been here. My interest is more what they were up to when they were here.

Thanks again for for the links!
 

Attachments

  • image.jpg
    image.jpg
    39.8 KB · Views: 46
Similar threads
Thread starter Title Forum Replies Date
Joe Reed MGB Removing stuck blade on factory electric cooling fan??? MG 7
T Tips on removing fan shroud? Spridgets 6
L Removing Master Cylinder Without Paint Damage Austin Healey 27
D Removing the steering wheel hub Spridgets 12
J General MG Thoughts on removing a stubborn 2-ear spinner MG 5
K TR2/3/3A Removing scratches and scrapes fro the wind wings that screw to the windshield? Triumph 9
Gatheringtree TR2/3/3A Removing the headlamp bezel rim Triumph 2
R TR6 Removing the charcoal cannister considerations Triumph 7
S TR2/3/3A Removing a stuck oil drain plug Triumph 13
K TR2/3/3A Removing TR3 windshield stanchions Triumph 4
KVH General Tech Removing Piston Wrist Pin Triumph 2
C Removing AH Sprite Mk 1 windscreen washer pump Restoration & Tools 2
M Need help removing the pinion assembly from a late 1275 steering rack Spridgets 7
jfarris TR2/3/3A Removing choke cable from dash insert Triumph 3
doakley Spitfire Removing facia Triumph 2
7 Wedge Removing sunroof frame Triumph 5
D Removing the last rust from pitted steel Restoration & Tools 11
D Removing Old Radio Austin Healey 4
S Removing Overdrive Shaft Lever Pin Austin Healey 7
L TR2/3/3A Any trick to removing TR3 doors? Triumph 12
M TR2/3/3A Removing Wires From Stator Tube Triumph 7
BN6_2197 Removing connecting link between shock absorber and rear axle Austin Healey 4
T TR2/3/3A Requesting help on removing TR3A steering column and box Triumph 21
longbridgehealey Removing BN4 Bonnet Austin Healey 9
C Removing the Healey "Flash"? Austin Healey 11
Gliderman8 TR6 Removing Left Rear brake line... help! Triumph 9
maxwedge5281 Removing Complete Rear End From BN6 Austin Healey 5
Jim_Gruber Removing a Spridget Engine Checklist Spridgets 5
S TR2/3/3A removing the temp gauge needle Triumph 5
Sarastro General Tech Any good ideas for removing liners? Triumph 20
R TR2/3/3A Removing WD-40 Triumph 6
F Removing oil and water guage from BT7 dash Austin Healey 17
R TR2/3/3A Removing transmission Triumph 3
Joe Schlosser Removing Control Knobs Spridgets 9
W TR2/3/3A Tell me there is a trick to removing lower control arm pin... Triumph 45
Bona42na Spitfire Removing Transmission/Gearbox from underneath Triumph 3
pkmh Removing Passenger Rear Bearing Nut Austin Healey 26
BN6_2197 Advice on removing the float from the chamber Austin Healey 6
B TR6 Removing the ckoke/heater control knobs Triumph 4
Jim_Gruber Removing the Rear Axle Seal Spridgets 4
Jim_Gruber What is the correct tool for removing brake lines from a BE Master Cylinder Spridgets 10
K TR2/3/3A Removing windshield stanchions? Triumph 8
R TR2/3/3A removing sending unit from tank of TR-3. Triumph 8
Jim_Gruber Removing back Radius Arm Bolt Spridgets 12
KVH TR4/4A Removing Rear Differential Seal--Solid Axle Triumph 1
JimTR4 TR4/4A removing the rheostat Triumph 5
Z MGB 1979 Timing problems after removing distributor - Help Please! MG 28
M TR2/3/3A Can radiator be fixed without removing it? Triumph 20
KVH TR4/4A Removing Glass Windshield Triumph 4
KVH TR4/4A Removing the Differential Triumph 7

Similar threads

Top