• Hey Guest!
    British Car Forum has been supporting enthusiasts for over 25 years by providing a great place to share our love for British cars. You can support our efforts by upgrading your membership for less than the dues of most car clubs. There are some perks with a member upgrade!

    **Upgrade Now**
    (PS: Upgraded members don't see this banner, nor will you see the Google ads that appear on the site.)
Tips
Tips

removing front apron

AnkwizTR3a

Freshman Member
Offline
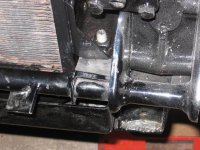
Good Morning Everyone! Hope all is well! Well this past weekend I decided to remove apron on my TR3a to remove the radiator, I have discovered that the water pump, housing, thermostat have been badly corroded. So removing Radiator to have serviced. While removing radiator I have notice that the flange the apron attaches to is torn up, holes are bigger than original diameter, some areas of rust - does anyone have a solution or suggestion on how to re-install apron with these bad flanges - should I re-weld sheet metal or is there any adapters to re-install apron?
 
Without a pic it is hard to say, the captive nuts always spin or break on the TR3's from rust/age. Also the bolts rust and while trying to turn them ,it wipes out already weak metal. My guess is the flanges will have to be rebuilt with new metal and probably weld in new captive nut holders. My best guess is the fenders and the nose will have to come off. Most of these cars are 50 yrs+ old and ready for some over haulin.
 
Good Morning, Well I have removed the front apron, wow the radiator was quite difficult to remove, the 2 lower screws are in a hard spot. I am going to upload some pics hopefully by the end of the week. Hope all is well
 
Many people cut a notch in the top of those bolts so that u can use a screwdriver for most of the way, then tighten the bottom with a wrench.
Emmett
 
Now's a good time to check the motor mounts, as well as silentblocs, among other things...
 
This shows the slot mentioned above. Cut the slot with a hack saw while the bolt is in your vice on the bench. Use a hefty screwdriver from the top - then finish tightening the bolt from the bottom with a wrench.
 

Attachments

  • 20389.jpg
    20389.jpg
    60.7 KB · Views: 263
On mine, my piece has been modified with cutouts for access to the bottom bolt head, plus the oil lines for my oil cooler are routed out under the rad and through the radiator protection piece.

Cheers,
M. Pied Lourd
 
Silly me, I just found a tool that fits.

DSCF0006_crop.jpg


DSCF0007_crop.jpg
 
thanks for the tips everyone - cutting the notch in top of bolt surely made it a bit easier. I now have everything back together, Starter is working well, generator is new (neg earth), new lucas coil, water pump, housing and thermostat. My carbs came back from sucarbs.com - (great help from Chester there). I have fuel going to the carbs, good battery - NO SPARK. I have switched it to neg ground from pos. I watched the Moss Motors video re: polarizing the generator - did that - I think successfully. Does anyone have a detailed information regarding the wiring to the coil to the distributor. I question the condenser and point - so I bought new ones tonight - Have not installed yet. I am so close to getting it started - it no turns over much easier since I have replaced water pump/pulley. Should I go back to the pos earthing system or is too late since I polarized the generator - Obviously I need some help here - anything would be greatly appreciated. CHRIS
 
Don't worry about the polarity; it won't keep the engine from starting. In theory the connections to the coil should be swapped, but the difference between "right" and "backwards" is too small to notice. You'll get spark either way.

Likewise, generator polarization is not the problem here (the engine will run with no generator at all, until the battery runs down).

But to answer your question, for negative ground, the "-" or "SW" terminal of the coil should be connected to the distributor (different coils have different markings). The "+" or "CB" terminal should connect to the white wire from the harness.

See the other thread for more troubleshooting suggestions.
 
Back
Top