• Hey Guest!
    British Car Forum has been supporting enthusiasts for over 25 years by providing a great place to share our love for British cars. You can support our efforts by upgrading your membership for less than the dues of most car clubs. There are some perks with a member upgrade!

    **Upgrade Now**
    (PS: Upgraded members don't see this banner, nor will you see the Google ads that appear on the site.)
Tips
Tips

TR2/3/3A Removal of Fan Extension and Pulley

mgedit

Jedi Knight
Country flag
Online
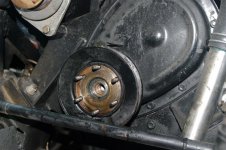
Just removing fan, extension, and pulley. How does the pulley come off? I'm thinking maybe I should have left the extension on the pulley to assist with removal. Is a puller needed to remove the extension with the pulley attached? Don't see anything in service manual suggesting how this is done. Suggestions and advice most welcome and greatly appreciated. Cheers, Mike

attachment.php
 

Attachments

  • Pulley.jpg
    Pulley.jpg
    71.8 KB · Views: 393
I always leave the extension on and use a harmonic balancer puller to pull it off. I'm sure there are other ways, but some sort of puller is required.
 
I've usually found that, with the extension in place, I can just tap on the backside of the fan flange and coax the whole assembly off. (At least until I started gluing it in place with Loctite on the last motor :smile: ) But I agree that without the extension, you'll probably need a puller. You may also need something to stick into the center hole; as the forcing screw on my puller is too big to fit inside the original threads. I use a short bolt, which if I remember correctly has 5/8-18 threads, modified with a small dimple for the point of the puller to rest in.
 
What you up to Mike? Electric fan?

Cheers
Tush
 
From where you are in the photo, I pushed the pulley back and engaged a gear puller on the hub, just filling the crank hole with a 1/2 bolt with a dimple in the head for the screw on the puller.
Bob
 
I'm with Bob on use of the puller - and you likely already have a short bolt to thread into the crankshaft to pull against.
 
Reinstalled the extension with 3 bolts and pulled with a 3-arm puller on back of front flange on extension. Worked fine. I could not get off by tapping or wiggling the extension. Just had to figure out to turn wheels to extreme left to allow assembly to clear steering linkage. Thanks for the help. Cheers, Mike
 
I have a question about the fan belt pulley and this thread seems like a reasonable place to ask it since there is a good photo. Obviously the crankshaft sprocket is keyed to the crankshaft extension. Is the pulley itself also keyed to the crankshaft? It seems like it should be but I can't tell for sure from any of the diagrams that I've found.

Rick...
 
...Is the pulley itself also keyed to the crankshaft?...

I believe it is not. I recently worked on a friend's Italia engine and we had a dickens of a time getting the timing set -- until we figured out that the pulley was installed 60° off.

So, the thing is - use the correct bolt/hole orientation to assure the timing mark is at TDC.
 
The hub of the pulley (which is a separate piece) is keyed to the crankshaft. However the piece with the timing mark is only keyed to the hub by the bolts. So as Geo says, you have to assemble it properly. It can go together 6 different ways (more if you count turning it back to front), but only one is correct.
 
I believe it is not. I recently worked on a friend's Italia engine and we had a dickens of a time getting the timing set -- until we figured out that the pulley was installed 60° off.

So, the thing is - use the correct bolt/hole orientation to assure the timing mark is at TDC.

Good point! I hadn't even thought about the timing mark. Now that you got my attention, I've taken a closer look at the diagrams. I think I've answered my own question in doing so. Here's a couple of clips...

Pulley.jpg Moss.jpg

See if I have this right now. Part 75 in the Moss diagram is listed as the "Hub, pulley". In the diagram from the Maintenance Manual that part appears to be that hub which is the arrow on the left. The arrow to the right shows a key to that hub. If that is correct, then the hub itself is keyed and the pulley needs to be aligned correctly based on the timing mark as you pointed out.

Rick...
 
Yup, that's it.
 
Sorry, missed this update to my thread. Randall is correct ... "The hub of the pulley (which is a separate piece) is keyed to the crankshaft. However the piece with the timing mark is only keyed to the hub by the bolts." The timing mark is 180 degrees from the key in the crank. So with the key at bottom (6 o'clock position), the timing mark is at the top (12 o'clock). Cheers, Mike
 
There are 3 pieces--- 2 pulley ½ pieces, and 1 hub; they bolt together and must be bolted correctly or the timing mark is incorrect in the key way.
 
Mike you don't need to go to all that trouble. I left the original fan on my TR3A and added a Kenlowe 12" diameter electric fan between the grille and the radiator as a pusher fan. It is mounted up high so I can still use the hand-crank. A friend with a TR3 smallmouth also put a small pusher (about 8" diameter) fan behind the TR3 grille.

Still never solved the overheating problem yet ?

Cheers

Don
 
Hi Don. Yes, I know it is extra trouble. I decided to convert to neg ground, add an alternator and electric fan. Bonus is that the weather has been great for working in the garage! Cheers, Mike
 
I'm going to bookmark this thread, excellent posts.

Been meaning to look at my riming chain tensioner.......

for ten years now.....
 
If you are planning to leave out the fan extension, be sure that what you put in its place securely clamps the pulley hub against the timing sprocket. I "got away" with using a big flat washer on my original 59 TR3A engine, but on the 56 engine I put in later, the washer pulled up against the nose of the crank before the hub was firmly clamped. Ran a long time that way, but the hub kept working back and forth against the key until it tore things up pretty good in there. (Hence my reference to gluing it together with Loctite :smile: ). Rick Patton sells a very nice piece to go there; but I just cut one from a big pipe cap.
 
Back
Top