• Hi Guest!
    You can help ensure that British Car Forum (BCF) continues to provide a great place to engage in the British car hobby! If you find BCF a beneficial community, please consider supporting our efforts with a subscription.

    There are some perks with a member upgrade!
    **Upgrade Now**
    (PS: Subscribers don't see this gawd-aweful banner
Tips
Tips

Rear reflectors BJ7

John,

I thought the pictures of your tail lights seemed brighter then standard and the bulbs you referenced seem a very good addition I would like. How is the heat generation of these high output incandescents?

Ray(64BJ8P1)

Hi Ray,

The higher output incandescent bulbs probably do have higher heat output, but my lenses are glass, so it hasn't been an issue. If I get a chance, I can use a IR thermometer to measure the difference.

One of the issues I did discover in my tail light improvement quest was that it is critical that the bulb be centered in the lens. Originally, my right-hand tail light was much dimmer than the left one. Usually, that is because of a poor ground, but that wasn't my case, and with the lens off, both lights were equally bright. The judicious use of a 1/2" dowel to adjust the socket so the filaments are in the middle of the lens made a world of difference.
 
Hi John,

As usual from you, a well designed and researched improvement. What gets me is the 1158 bulb is reasonably priced and I would do this change before considering any LED for the same function.

Thank you,
Ray(64BJ8P1)
 
John - do the LED bulbs flash correctly without needing any additional resistors?
No resistors required. The LEDs are in parallel with the brake/turn signal leads on the regular tail/brake/turn lights. The incandescent bulbs provide sufficient load for the flasher relay.
 
Hi John,

As usual from you, a well designed and researched improvement. What gets me is the 1158 bulb is reasonably priced and I would do this change before considering any LED for the same function.


Thank you,
Ray(64BJ8P1)

Amperage, Amperage,Amperage RAY!
 
Keoke,

The savings of Amperage, heat, or even longevity is less important then luminescence generated. Although I have LEDs installed in the reflectors, the incandescent bulbs described by John seem to produce a more obvious presentation for the main tail lights then the LEDs I have, to date, researched.

Rat(64BJ8P1)
 
Yes, the 50/14 cp lights do require more amperage than the 21/6 cp 1157s, but not that much more. I have some notes from when I tested them, but I can no longer understand what I wrote.
 
After I melted my first set of reflectors with halogen bulbs...

...following John T's lead, converted my reflectors to the LED 1156s:
LEDsocketInSitu.jpg

I like to mechanically clamp the lights to the shroud.

LEDtailSocketPieces.JPG

ReflectorSideRods.jpg
ReflectorRubberhole.jpg

I have the original-shape reflector bezels and wanted to keep their rubbers which have the large holes previously made for the halogen reflectors.

LEDtailSocket1.jpg
Smaller washer fits inside rubber; LED light rim rests against 3/4" hole; 10-24 rods are loctited in place; thumbnuts made from 10-24 rivet nuts. Yoke 1/2" x 1/16" aluminum. Large washer made from 2" fender washer.

LEDsocketSide.jpg

Large washer may be eliminated as the yoke can bear directly against the shroud. I covered it with 3 layers of duct tape to help seal off the opening as the lens rubber doesn't seal all that well.

Addendum: the depth of the yoke is pretty inflexible. It's determined by the distance from the shroud to the flange on the bulb socket with the small washer installed in the rubber and firmly pressed against the outside of the shroud. I had to file away the threads adjacent to the bulb slightly for clearance. The spacing of the threaded rods is determined by the span of the holes on the bulb socket mounting plate.

In retrospect: if one were to use the large washer, keying the yoke to the square openings is unnecessary. One could just file openings for the threaded rods with a rattail file and have the yoke butt directly against the washer surface. Neither the yoke nor washer are going anywhere - this would make it easier to adjust the length of the yoke.

Edit 12/20: per DD below, rods and yoke could be a little longer, regular hex nuts bear against socket flange, thumbnuts still outboard of the yoke. The depth of the yoke wouldn't have to be exact - some tightening adjustment would be possible.
 
Last edited:
I'm impressed, and I'm hard to please!

Very clever and robust; I can imagine how long it took to make/adapt the the pieces. The thumb-nuts: how ingenious!
 
Want to thank Steve G for the idea of how to do these lenses. i just did mine and it works well.

Thought i would post my way since it seems to be easier and may help someone else who would like to do this.

i bought these items at Lowes. i needed 4 washers, 4 bolts, 6 nuts. of course they all come in packs, except the washers.
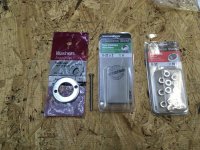
5838773B-45D6-447D-A48C-045D54D6E2AF_1_201_a.jpg

i chose these washers because my bulbs would fit thru them without having to drill them out. i marked the first one for drilling and then lined them all up in my vise. next i drilled a 9/64 hole thru them. This next pic is taken after it was done. so they are not lined up as well as when i drilled them.
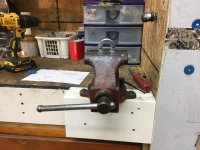
00CF061C-55A7-4161-B388-83A52A54639F.jpg

On two of the washers i used a #8x32 tap and threaded them. the other two i drilled out to 11/64.
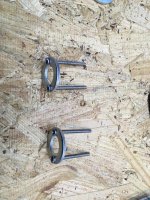
D2FE09EF-43B8-4A9D-ABA3-935FFD24E9C9_1_201_a.jpg

Next i took the reflector apart. Mine are the bullet type lenses, just because i like them. i cut a hole in the rubber large enough for my light bulb to go thru. basically i marked a washer on the back and cut to the size. the washers outer diameter is exactly the same size as the rubber flange that goes inside the body.
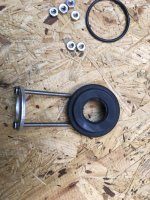
A9A00614-4CD3-44F1-90DF-BBB8DD5868D4_1_201_a.jpg

i put the lense back together with the threaded washer and bolts inside. i later found the lense wanted to push in and out so i put an o-ring around the outside of the washer and pushed the lense in place. this held it. put the unit in the car and worked the rubber flange inside. next i added the second washer and ran nuts up behind it. then i added two more nuts on just enough they allowed the bulb to go in but not hit the lenses. i did not get the same bulbs steve got so this was nice to be able to adjust them.
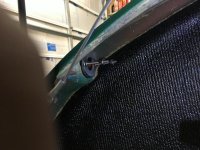
6B732123-5C7D-4A27-B3CF-EB0C938B41C6.jpg

Next i added the light and put nuts on the back to hold in place.
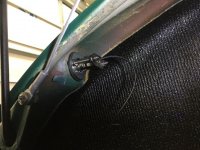
E1FCBDA0-4466-4C64-9607-BB8F3757C31A.jpg

i adjusted my bulb so it was close to the lease but not hitting it.
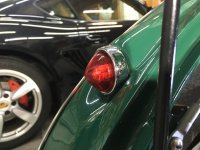
1F2A8E19-0606-4102-9974-873381FA6378.jpg

unfortunately with this type of bulb it shows in the lenses. i may go back and look for ones like Steve used above.

Then it was just wiring. i added a ground wire to the light and ran it to the same place the other lights are grounded. Next, since i had some left over bullets and double connectors, i used them to make the wiring connection. Rather than splice in to the existing wires. Once the left side was done, i did the right. of course that gets done in about a 1/3 of the time...
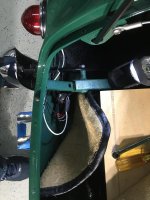
CC8BE9A9-D872-43EC-B982-03769DAFCE07_1_201_a.jpg

easy project. took about a day and nice to have the extra lights in the back. thanks again for the ideas.
 
Back
Top