• The Roadster Factory Recovery Fund - Friends, as you may have heard, The Roadster Factory, a respected British Car Parts business in PA, suffered a total loss in a fire on Christmas Day. Read about it, discuss or ask questions >> HERE. The Triumph Register of America is sponsoring a fund raiser to help TRF get back on their feet. If you can help, vist >> their GoFundMe page.
  • Hey there Guest!
    If you enjoy BCF and find our forum a useful resource, if you appreciate not having ads pop up all over the place and you want to ensure we can stay online - Please consider supporting with an "optional" low-cost annual subscription.
    **Upgrade Now**
    (PS: Subscribers don't see this UGLY banner)
Tips
Tips

TR4/4A Rear main seal

Don Elliott

Obi Wan
Offline
The oil in the bell housing might be coming from a bad seal at the front end of the transmission where the input shaft is. There are splines on this input shaft and you have to wrap masking tape of use a vinyl bag around the splines when it is re-assembled - so as not to prevent the sharp corners of the splines to ruin the new seal you are installing.
 

MadMarx

Jedi Warrior
Country flag
Offline
Hello Guys,

two years back I have updated the installation manual with the most common mistakes during installation.
I post here a link:
https://www.tr4-racing.de/download/splitseal.pdf

Hope it helps.
After now 4 years of experience with these seals I can say that they do well. I get rarely feedback of trouble. I would say 4-5 people in the last 4 years.

Cheers
Chris
 

mallard

Luke Skywalker
Country flag
Offline
Chris the seal worked great for me, would recommend to anybody. Thanks for doing all the homework and producing a great product.
 

shoopal

Jedi Trainee
Country flag
Offline
I Just installed the Alexander seal and it was really easy. A couple of tips:
1. Don't try to open the spring. Remove it from the lip and work it gently over the crank boss. Then open the viton part and slip it over the crank boss so the lip of the seal faces the spring.
Lastly (I have a little hook tool) position the spring back into place. Oil up the lip.
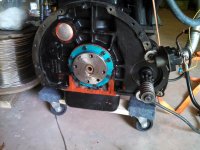
2. Light coating of silicon seal around the seal and in the split. Mark the split position on the crank with a felt tip. Position the crank in place seal split facing cylinder head, By tightening the bearing cap bolts, move the rear bearing cap til its almost down but don't tighten yet
Hand tighten the flywheel bolts (without the flywheel) till the bolt ends move the seal into place. Don't overtighten, it does not take much to move the seal.
Torque down the cap (85-90 lb-ft) and without turning the crank, let it stand overnight.
Naturally all the other instructions hold. Make sure you have the correct flywheel bolts when you install the flywheel. If they are too long, it will wipe out the seal as soon as the crank turns. Mine measured 23 mm long
You can buy the whole kit from Joe Alexander (the-vintage-racer.com) including the centering tool. Loved it.

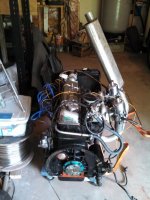
Update 8/20/15 Got the motor running on the bench. I Ran it for 1/2 hour and pulled the flywheel. Rear Seal has absolutely no leaks. Some seeping from pan gasket in front which I am going to attend to. Do be careful of the flywheel/crank bolts. Without the lock plate, they will hit the seal. Moss sells self-locking bolts which are a hair shorter. Note the abundance of Red Silicone. Belts and Suspenders
 

Attachments

  • IMG_20150708_132350_052.jpg
    IMG_20150708_132350_052.jpg
    71 KB · Views: 43
Last edited:

sp53

Yoda
Country flag
Offline
I like the idea of removing the spring because the why I did it I had to open the spring on the seal and found it very unsettling. My memory is shot and I cannot remember which end the seal bottomed out on, and you suggest gently moving the seal with bolts and that also makes good sense, right on.
 

TR3driver

Great Pumpkin - R.I.P
Offline
Over-stretching the spring (to get it over the crankshaft flange) may also weaken it, increasing the chances of leaks farther on. Chris Marx put a lot of time and thought into designing this conversion for his own use (Joe A. just resells them), so I'm inclined to believe that he had a specific reason for having the seal made (it is a custom piece) with the split spring.
 

shoopal

Jedi Trainee
Country flag
Offline
I cleared that suggestion with Joe Alexander before I posted it. He uses them as well as selling them. Obviously the spring has to be joined at some point. I started to unscrew it but it wasn't coming apart easily. When I streched it out to go over the crank, it didn't seem like I "over" stretched it at all, and when I worked around the lip at the end, it was snug.
However, I get your point. I guess I'll know how it worked out after I get the engine running.
 

KVH

Darth Vader
Country flag
Offline
When I get around to removing my crank, how will I be able to determine what the prior owners may have already done to the crank, or with which seal kits? What do I look for, for example, if I want to see if the crank was already machined?
 

TR3driver

Great Pumpkin - R.I.P
Offline
The only seal mod you're likely to find will be very obvious : no scroll at all. If so, you may have found the cause of the leak : some of the instructions for the older seal conversion had the wrong dimension for the crank surface!

For the journals, you can get a rough idea by looking at the bearing inserts. If they have been previously ground undersize, the undersize will be marked on the back on the insert. Eg 010 for .010" undersize. But, you'll probably need an accurate measurement to decide if they have to be ground undersize (again), so you'll need either a micrometer, or take the crank to a shop and let them mike it for you.

I see Enco has a 0-3" set of mikes on sale for $33 at the moment, which seems too good to be true, but I've been happy with the ones I got from them several decades ago. Be sure to check the calibration, though, mine all had to be tweaked (but the set comes with the standards to check them, and the wrench to adjust the calibration).
https://www.use-enco.com/CGI/INPDFF?PMPAGE=8&PMKANO=393&PARTPG=&PMCTLG=01
 

KVH

Darth Vader
Country flag
Offline
I see Enco has a 0-3" set of mikes on sale for $33 at the moment, which seems too good to be true, but I've been happy with the ones I got from them several decades ago. Be sure to check the calibration, though, mine all had to be tweaked (but the set comes with the standards to check them, and the wrench to adjust the calibration).
https://www.use-enco.com/CGI/INPDFF?PMPAGE=8&PMKANO=393&PARTPG=&PMCTLG=01

Hold on just a second here. This appears to be an instance where you're not mentioning HF (whose mics I own).
 

TR3driver

Great Pumpkin - R.I.P
Offline
Hold on just a second here. This appears to be an instance where you're not mentioning HF (whose mics I own).

True enough. I've bought a lot of tools from HF, but for precision stuff like micrometers, I prefer to buy from Enco. Probably no real difference, but my perception at least is that Enco's poorest (cheapest) quality tools are just slightly better than what HF sells, at about the same price. For example, the digital calipers I got from Enco remember where zero is, and "wake up" if you just move the slide. So I can just pick them up and measure something, without having to clean and close the jaws plus press the On button. The HF calipers were a dollar or two cheaper, but they forget where zero is every time they turn off. Seems like they also eat batteries faster (though I don't have any actual measurements to back that up).

I also like that Enco sells better and best quality tools right next to the cheap ones; so you can make your own decision as to how much quality you want to pay for. HF doesn't give you that choice, they only sell cheap junk.
 
Last edited:

KVH

Darth Vader
Country flag
Offline
So I can cope with surprises: What if after removing the rear main seal I see I have no scroll or the crank has been ground too much? What's the fix other than a new crank (from a fenced yard somewhere)?
 

TR3driver

Great Pumpkin - R.I.P
Offline
Probably the only other choice is to run the earlier conversion (which is still available from many sources including Moss). It can be made to work well, here are some tips on what to check
https://drive.google.com/file/d/0B2...ZTA1LTg4NDQtOWNhZDVkOTI1MzE5/view?usp=sharing
(article originally written by Ken Gillanders and published in the TRSC newsletter; reprinted in "Tech Talk". However, TRSC and Ken take no responsibility for technical accuracy.)

If the area has been ground too small, it can be built up with weld and reground to the correct dimension. I wouldn't do that for a race motor, as it may very slightly weaken the crankshaft, but I don't think you plan any serious racing and it should be just fine for a street motor. It's been more than a few years since I asked, but ISTR I was quoted $20 for welding plus grinding one journal at a local crankshaft service. The (former) scroll area might be a bit higher though, since it is larger.
Here's a web page with a little more information on welding (although you'll probably want to deal with someone like Arizona Crankshaft Co.)
https://www.crankshaftco.com/crankshaft-welding.html
 

TRMark

Jedi Knight
Bronze
Country flag
Offline
Randall, thank you for the info from Ken Gillanders, I plan on pulling the engine next winter to do some work on the seal and a few other things. I did the Racetorations seal conversion years ago, it has always leaked. I machined the scroll area to 63.5 mm per instructions. A friend of mine did the conversion to his TR3 a few years ago and has had no problems, he said he drilled additional oil return holes rear main bearing cap per instructions from Macy's Garage. Here is the link. https://www.macysgarage.com/myweb6/Rear_seals.htm Just not to enthusiastic about the drilling, I have the drill press and clamps, but I am going to be very nervous.
 

TR3driver

Great Pumpkin - R.I.P
Offline
Randall, thank you for the info from Ken Gillanders, I plan on pulling the engine next winter to do some work on the seal and a few other things. I did the Racetorations seal conversion years ago, it has always leaked. I machined the scroll area to 63.5 mm per instructions.
FWIW, the instructions I got from Ken had been hand-modified to read 2.520" (64mm), and "uncle jack" Drews recommended 1.525" (64.135mm). Jack also recommended cutting down the spring to exactly 8" free length.
 

DanB

Jedi Warrior
Country flag
Offline
The oil in the bell housing might be coming from a bad seal at the front end of the transmission where the input shaft is. There are splines on this input shaft and you have to wrap masking tape of use a vinyl bag around the splines when it is re-assembled - so as not to prevent the sharp corners of the splines to ruin the new seal you are installing.
There could have been oil from the transmission, since the input bearing was wasted. I am running a borrowed gearbox now, slowly making progress on rebuilding my OD trans. When I get it ready to put back in, I will revisit the rear seal...overall the engine leaks a good bit, so I have several places to work on. It likes to mark its territory!
 

shoopal

Jedi Trainee
Country flag
Offline
Hi all
Just to update my experience (see earlier posts) I used the Alexander rear seal. When I started the engine on the floor (see pictures) while running no leaks. The next day a small drip from the pan bolt next to the rear block. When I pulled the flywheel, I saw that the leak was a small seep from the joint between the block and the rear bearing housing which has those ****-a-mamie felt seals. A generous application of red RTV in the gaps seems to have solved that problem. If not, I'll have to live with it. Anyway that Alexander seal did it's job. BTW the installation tool worked great to press the front crank seal.
 

Attachments

  • IMG_20150708_132350_052.jpg
    IMG_20150708_132350_052.jpg
    71 KB · Views: 57
  • IMG_20150708_132401_459.jpg
    IMG_20150708_132401_459.jpg
    46.2 KB · Views: 55
Similar threads
Thread starter Title Forum Replies Date
J Rear Main Seal Kit Austin Healey 1
S TR2/3/3A rear main seal is leaking Triumph 13
D rear main seal Austin Healey 13
T BJ7 Slipping Clutch? rear main seal? Austin Healey 11
Gerard 1098 10CC rear main seal conversion Spridgets 4
W A-40 Somerset - Leakage at Rear Main Bearing / Oil Seal Other British Cars 0
KVH General TR Rear Main Seal--Minor Problem Triumph 4
Editor_Reid Rear Main Seal for BN2 Austin Healey 12
J BJ8 rear main seal kit - is it necessary and worth the risk to install? Austin Healey 33
T TR4/4A Oil drain hole from rear crank seal/rear main cap Triumph 3
S TR2/3/3A rear main seal Triumph 20
E 100 4 Does anyone recognize this rear main seal mod? Austin Healey 12
KVH TR4/4A Viton Rear Main Seal Triumph 12
C Rear Main Seal Leak with Moss Retrofit Austin Healey 21
TR3driver TR4/4A "Mad Marx" rear main seal for TR2-4A once again available Triumph 10
KVH TR4/4A Rear Main Seal Leak TR4A Triumph 1
B Rear main seal kit Spridgets 3
O TR2/3/3A TR3 Rear Main Seal Triumph 5
A TR2/3/3A More TR3 Rear main seal problems. Please Help!! Triumph 8
tinman58 TR2/3/3A Rear main seal TR3 Triumph 11
P how to replace rear main seal in 1500 midget Spridgets 2
R Rear main seal question. Spridgets 29
MGTF1250Dave Improved TR Rear Main Seal Kit Triumph 19
KVH TR4/4A Rear Main Seal TR4A Triumph 17
B 1970 XKE 4.2 rear main seal Jaguar 2
M TR2/3/3A TR3 crankshaft rear main seal opinions wanted. Triumph 8
58Custom 1275 Rear Main Seal Kit- - seek info Spridgets 2
glemon Rear engine main seal review Triumph 7
J Moss rear main seal. Austin Healey 5
TimK Rear Main Seal Kit Installation Austin Healey 24
M Rear main Scroll Seal Triumph 11
A Rear Main Oil Seal Conversion - Bearing Cap debris Austin Healey 5
V TR6 TR6 Rear Main Seal Triumph 17
aaronclark TR2/3/3A TR3 Rear Main Seal Questions Triumph 7
T TR2/3/3A Tr3A rear main seal conversion - adviced needed Triumph 11
spartan0199 rear main seal kit 833-145 Austin Healey 12
A TR6 TR6 rear main seal housing special bolt ?? Triumph 1
fad64b TR2/3/3A Rear main seal TR3 Triumph 12
S TR2/3/3A tr3 rear main seal Triumph 6
A TR6 TR6, Best front and rear main seal ??? Triumph 0
C rear main oil seal Austin Healey 4
K Usual 1275 rear main oil leak question Spridgets 0
G TR4/4A And the fun continues...rear main leak Triumph 5
B General MG Solutions for topical MG rear main leak? MG 7
Martinld123 Drain Pipe Rear Main Bearing Cap BN2, remove? Austin Healey 2
Gerard 1098 "10CC" rear main Spridgets 0
S TR2/3/3A tr3 rear main Triumph 24
TraceZ rear main leaks Spridgets 3
B rear main Spridgets 5
B rear main puller Austin Healey 6

Similar threads

Top