• Hi Guest!
    You can help ensure that British Car Forum (BCF) continues to provide a great place to engage in the British car hobby! If you find BCF a beneficial community, please consider supporting our efforts with a subscription.

    There are some perks with a member upgrade!
    **Upgrade Now**
    (PS: Subscribers don't see this gawd-aweful banner
Tips
Tips

Rear Brake Cylinder Retainer Clip Installation

mredtamu

Freshman Member
Offline
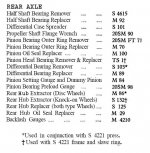
I'm replacing the rear suspension on my 1975 TR6, and as part of that had to remove the backing plate from the trailing arm. And as part of that, had to remove the brake cylinder from the backing plate. In doing so, I warped the retaining clips (the ones included in #55 in the picture below).
brake_parts.jpg


I bought new ones, and now I can't get them back in. The hand brake lever gets in the way of sliding the clip around the cylinder, when trying to install the clip from the front of the car.

Does anyone have suggestions on getting these back in without damaging them?

Thanks!
Charles
 
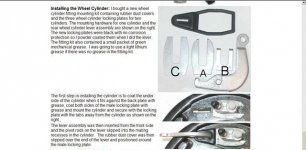
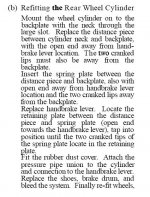
Here's some more info from the forum wiki that has the Buckeye Triumph stuff archived.

Scroll down to the section on reassembling the rear wheel cylinder.
 
yea just did my rear brakes and those clips are a bear, I am going to order new clips and redo the brakes soon, I didnt like how the last clip went on, they dont say to take the rear backing plate off but it looks easier to do that way

Hondo
 
IMO, both of the above links show the wrong assembly order. Following the instructions in the TR3 Bentley makes the job much easier, and not hard at all with the backing plate still installed on the axle.

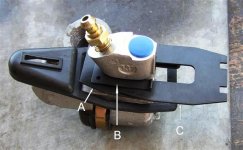
After poking the cylinder through the back plate, the smallest retaining plate (item B in Frank's diagram) goes on first; otherwise the turned up ends make it impossible to install without bending it. This is what the TR3 Bentley calls the "distance piece". You don't want it bent, as that will make the other plates harder to install, and increase the friction against the backplate. The open end goes away from where the handbrake lever will be (but isn't yet).

Then install item A "spring plate", again with the open end away from the lever and the tabs on the end away from the backing plate.

Now install the lever, by pulling the cylinder away from the backing plate far enough to slide the lever into its socket.

Then tap the last "retaining" plate into place between the first two, with the open end towards the handbrake lever. Keep tapping until the tabs on the spring plate snap into the notches in the retaining plate.

The book says to now install the rubber boot, but I've been running without one for upwards of 30 years and no apparent ill effects.
 

Attachments

  • 29772.jpg
    29772.jpg
    72.7 KB · Views: 385
its kind of funny how we all seem to start the same project at the same time and have the same issues


Hey Randall thanks for the information. seems to me the order of installation is the issue. to me I dont care in what order they go on but to get them installed and not bend, break or destroy them in the process. I can tell you there was a lot of beer and cursing involved when I did mine last week. but when the new parts come in I will be installing them in the order of which you describe. I cant help wonder who wrote the Bently book and did they even have a Triumph and go thru every process and write it down. Now I did notice some punched holes in one or two of the plates and wondered if there was a Triumph special tool 007-069 that made the job easier??

Hondo
 
I too fought with those clips until I took the time to read the instructions. Now it takes almost no time at all to attach the wheel cylinder. Just put the middle clip in last and it really is easy.
 
hondo402000 said:
Now I did notice some punched holes in one or two of the plates and wondered if there was a Triumph special tool 007-069 that made the job easier??
Not that I've ever heard of. Usually if there is, it's called out in the factory workshop manual, but there isn't anything about it in there.
 

Attachments

  • 29774.jpg
    29774.jpg
    73.2 KB · Views: 312
Using TR3driver's info as guidance, I just reinstalled the right-left brake cylinder on my '57 TR3, and it went on almost effortlessly. Just be patient and tap in the middle clip v-e-r-y slowly so that it stays properly aligned with the bottom clip to which it will mate. (BTW, I did this with the whole assembly on the car; no need to remove the backing plate for this operation.)

Also, make sure that you apply a little grease to the cylinder base before installing it, as well as to the plate-facing side of the bottom clip. This is because. as I understand it, the cylinder rides slightly back-and-forth within its slot in the normal course of brake operation.

(Thanks, TR3drive.)
 
I use the same approach as Randall's out of the Bentley manual except for one thing. I find the boot easier to install if I do it early in the process rather than try and work in in later. YMMV on that bit about the boot.
 
I too fought with those clips until I took the time to read the instructions. Now it takes almost no time at all to attach the wheel cylinder. Just put the middle clip in last and it really is easy.
I also filed the leading edges of the middle clip so it doesn't dig in to the bottom clip when sliding it in last. Made it pretty painless.
 
This forum is great. I just replaced a rear wheel cylinder. As a reminder, I reviewed this thread and all went well. Thanks everyone!!
 
Back
Top