• Hi Guest!
    You can help ensure that British Car Forum (BCF) continues to provide a great place to engage in the British car hobby! If you find BCF a beneficial community, please consider supporting our efforts with a subscription.

    There are some perks with a member upgrade!
    **Upgrade Now**
    (PS: Subscribers don't see this gawd-aweful banner
Tips
Tips

Ray's engine is done

Country flag
Offline
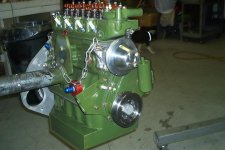
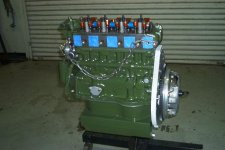
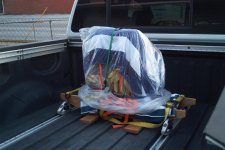
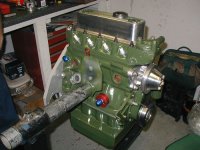
Ray's engine is offically done, Ray came up today and we put the final trouches on it and it wnet home with him today.

Here's a little run down of what comprises this engine

MG 1275
Bored .040 AE21253 hi comp. pistons
9.7 to 1 compression ratio
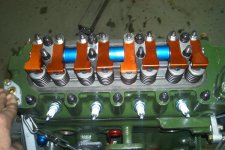
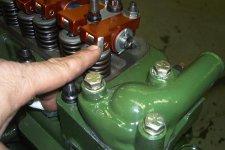
Ported and polished cylinder head w. new valves, AE valve springs, hardened exhaust seats. three angle valve job
Harland sharp roller rocker 1.3 arms w/ solid spacers
APT VP276 nitirited slot drive camshaft
APT CF-04 chiiled iron lifters
Rollmaster vernier timing gear set
ARP rod bolts, head stud kit,and flywheel bolts
Connecting rods resized, and balanced
STD/STD EN16T crank balanced
King tri metal bearings
AE full circle cam bearings
Payen gaskets used thru out
Romac Harmonic balancer
APT oversized aluminum water pump pulley
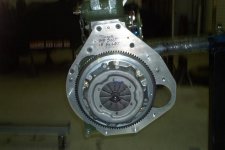
Rivergate Sspd back plate w/ rear engine seal
Fidanza aluminum flywheel
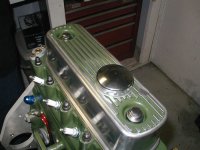
Alloy valve cover
Winner Circle racing oil pan
1-2-3 electronic distributor
Acme Speed Shop HS2 carbs
Winner Circle LCB race headers
Winner Circle AN oil line adapter and fittings
Gear reduction starter
 

Attachments

  • 14467.jpg
    14467.jpg
    59.7 KB · Views: 406
Closer look at the Harland Sharp roller rocker arms. I ended up having to elongated the pushrods holes in the head to get pushrod clearence, we used stock type pushrods, I was pleased with the valve geomentry. Basicly what you're doingwith 1.3 HS roller rocker using stock rocker arm pedestal is putting a 1.3 to 1 rocker arm on a 1.25 to 1 pedestal, and this throws the geomentry off a bit, and that is why I had to elongate the pushrod holes in the head. This is the first time I done this exact set up, and it was a PITA, knowing what I know now I could have done it lot eaiser and quicker than it took me the first time around. Anyone ding this on thier own that doesn't do this kind of work often, this is not for the faint of heart, and for dang sure not to be done to engine without pulling the head, so when you guys see those HS rocker arms being sold on Ebay for just under $300, realize, you still need to buy new Cooper S adjustment hardware, solid spacers, and alot of labor to make it happen, included fit the rocker arms to a new shaft, I had to re tap all the threads for the adjustments, and you must use a larger alloy valve cover for clearence, so it's not a walk in the park, doa-able yes, easy, no.
 

Attachments

  • 14470.jpg
    14470.jpg
    68.3 KB · Views: 399
Closer look at mod made to to #1 and # 8 rocker arms to clear the alloy valve cover.
 

Attachments

  • 14471.jpg
    14471.jpg
    55.9 KB · Views: 391
All loaded up in Rays truck headed home to Georgia.
 

Attachments

  • 14472.jpg
    14472.jpg
    58.8 KB · Views: 388
DROOL!!!!!!
 
Fantastic!

I expect Ray to have that engine fired up soon (probably sooner than my Hap motor, sadly...)

Someday, Ray, we'll have to get our 2 cousin engines together.
 
Wow, that is one heck of a list. That engine sure has nice specs. and it sure is beautifully painted. And from what I have read, it's very nicely done on the inside too.

It'll surely put out a bit more power than my motor even though it's the same size. I am turning nearly the same colour as the engine.

Compared with my new engine;
Though I do have a 12G1805 head, I bet it isn't as good as that modified head.
I'm only going with 9.0:1 compression. Our gasoline here isn't as good as even most of the rest of Europe.
And I'm using a 266 cam. I also figured I didn't need the adjustable cam drive, as long as I could set the cam timing perfectly. That meant making my own woodruff key.
I figure 1.3 arms are 1.3 arms. They should give nearly the same results, as far as power, except rollers make it nice so the valve guides last a long time. So I just put in the APT offset bushings.
My bolts, bearings and gaskets are pretty much the same specs as Ray's.

But then comes the rest
I expect to leak a bit of oil from the rear main. I would rather keep the scroll seal.
I think I'll make a pan like that one. - Yeah, I know it's cheaper and better to just buy one, but it's a challenge.
I'll go for programmable, crank fired ignition when I finally get rid of the distributor.
Programmable single point FI instead of carbs.
I'll make my own headers.
No oil cooler for this climate.
And no gear reduction starter. I don't want it to sound like a Chrysler.

So my wish list still contains:

Romac Harmonic balancer (I'm using a standard one)
aluminum flywheel

Congratulations Ray!! :thumbsup:
 
I just got up to speed this morning...having not slept much the last two nights (Thursday...anticipation, Friday...euphoria).

The engine, as you can see, exemplifies Hap's work well...it is exactly what I expected. That's just the outside though. The earlier photos and descriptions as well as an on-site visit previously attest to the build quality. I am most pleased.

Hap's an artist, on the internals as well as the presentation. And, best of all, no surprises...challenges along the way...yes, but unanticipated costs, attitudes, or other hindrances...no!

I consider Hap a friend, that's a good outcome of any financial transaction. We celebrated with lunch and a SPIRITED drive over Paris Mtn. Whew...when Hap gets behind the wheel of his BGT you better hold on. I commented that he seemed comfortable hitting 6000 out of first, second, and occasionally third...on the next series of curves he showed me 7000. I've also never seen the outskirts of Greenville, on the way back to his shop, at 90 MPH...but I did yesterday...when I had my eyes open :smile:

All in all, a great experience. Thanks, Hap.

Ray

PS...I'll have some more photos soon and will be adding an engine build page to my web site ASAP.

Ray
 

Attachments

  • 14480.jpg
    14480.jpg
    85.7 KB · Views: 297
drooartz said:
Fantastic!

I expect Ray to have that engine fired up soon (probably sooner than my Hap motor, sadly...)

Someday, Ray, we'll have to get our 2 cousin engines together.

Well, Drew, I certainly have the motivation I need to get the project back up to speed when the weather warms enough for me to paint parts. But then, SO DO YOU! Now excuses now...

I'll look forward to getting these two together one day. I plan on driving the wheels off the Spridget, so you might just see me in your driveway one day. :smile:

Ray
 
Good Ray you got a picture with the valve cover on, mot a big deal but I oved the engine color infused into the voavle cover, looks cool I think.

Donn, the seal on Rivergate back engine plate is in addition to the scroll, it does not elminate the scroll, the seal is just it's back up, a little different set up than the MM rear seal kits.

I don't get the "Chrysler" starter sound, I know what you are talking about, but not quite the same sound. I personally like the sound of a engine starting, rather the sound of a Lucas starter kickng out :smile: :smile: I've used the gear reduction starter for almost 20 years now and would never look back.
 
Why shucks, that looks just like Miss Agathas engine till he put that alum on the top. Hay, it is the same color.

Man am I green with envy.

Wonder if it runs Ray or is it 180 out, hehe.
 
mccalebr said:
Well, Drew, I certainly have the motivation I need to get the project back up to speed when the weather warms enough for me to paint parts. But then, SO DO YOU! Now excuses now...

I'll look forward to getting these two together one day. I plan on driving the wheels off the Spridget, so you might just see me in your driveway one day. :smile:
I'm working on it, Ray, I'm working on it. Garage/workspace should be finished up today, and then I truly have no excuses.

And you're welcome in my driveway any day. I'll show you some fantastic roads around here!
 
Back
Top