• Hi Guest!
    You can help ensure that British Car Forum (BCF) continues to provide a great place to engage in the British car hobby! If you find BCF a beneficial community, please consider supporting our efforts with a subscription.

    There are some perks with a member upgrade!
    **Upgrade Now**
    (PS: Subscribers don't see this gawd-aweful banner
Tips
Tips

TR2/3/3A radiator question

2billydavies

Senior Member
Offline
Hello everyone....
I just joined this forum yesterday on advice from my father. He recently gave me his 1958 TR3a that has been in our family for about 30 years. I grew up with this car and am excited to receive it. It is being shipped from PA to Florida as I type. I cannot wait to continue "working" on the car and enjoying it as I did with my father, and as he did with his father (my grandfather).

I have a quick question about a radiator. The car is pretty much all original.... runs great, but it is coming down here to the hot florida weather. The radiator is original which means its about 60 years old. It's going to be the first thing I replace and I was wondering what my best options are. Should I go with something straight out of Moss Motors Magazine?? Anyone else have a TR3 that is living in the hot florida sun?? I'm guessing an electric cooling fan wouldn't hurt.... i'm just looking for some ideas.

Thanks! hope to become a pretty steady user of this forum.
Bill
 
Hey, Bill, and welcome! What a great legacy for you to continue!!

If it were mine and the radiator overall is in good shape, I'd consider seriously checking it out and perhaps recoring it. An electric fan can be added, and may be a good idea if your driving will include a lot of stop and go trips. If you do replace the radiator, keep the old one for authenticity's sake. Also, if you do replace it, get one without the hole for the starter crank, as that will make a slight difference in cooling performance.

Good luck, and post pictures when it arrives!

Mickey
 
What Mickey said or, it might be fine. I had my 4A's checked and radiator guy said just put it back in. Won't help a bad radiator but available are both 160 degree summer or 180 degree winter thermostats.
 
i appreciate the feedback. thats pretty much what i was thinking, recoring it and placing it back in. thanks a ton.... looking forward to the car and using this website. thanks!
 
I had mine recored about 2 years ago -- it still worked fine (never an overheating problem) but looked pretty beat up and I had the apron off for a timing chain tensioner anyway.

Re-coring was not cheap (about the same as a repro radiator) but I liked keeping the original. I also kept the crank hole -- yeah I expect it cools better w/o one but it handles the Tucson summer just fine and I like to use the crank once in awhile.
 
What I have found around here is that all the radiator shops have closed up, now you have to buy a replacement one because nobody repairs them. I'm sure the new plastic radiators have had a lot to do with this happening.
 
That is indeed happening. On a recent long trip with a friend he blew out a solder joint on the radiator in his AC Ace -- not much chance of ordering a replacement (apart from the fact we were in middle-of-nowhere New Mexico. Leak stop got us to Albuquerque where we found an old school radiator shop who rebuilt the thing while we waited.

JampBs_zpsff80c69c.jpg


There are still a few around. This one (J&B's) was a very busy place -- hopefully they will be around awhile.
 
Twenty years ago there were at least a half dozen of these shops within 30 mile of my house in New Hampshire. The tanks got things cleaned out like none of the DIY flushes even come close to. I don't know of a single radiator shop today although I suspect one could still be found within a reasonable distance but the future does not look bright for them. Except for the classic car business, replacement is the cheapest modern option. Tom
 
Hopefully some of the remaining shops will get into having radiators shipped in & out like we see for carbs and distributors. The local (Tucson) shop that I used had just the one guy who was superannuated (i.e. very old) and he finally just closed. Fortunately the gal in the above photo looks like she will be working for many years (daughter of the owner, did her first radiator when she was 14) so at least that shop seems to have a transition plan.
 
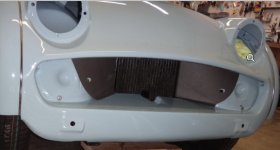
One extra step to consider is, depending on your s/n, your car may or may not have a cardboard rad deflector, which helps the cooling significantly. The TR2's and early 3's (click pix to enlarge) had a different design of grill which funneled the air much better. The "fix" on the TR3A was to add the cardboard deflector to achieve the same effect. I'm not sure what s/n this was enacted at, but I believe back in the day Triumph would add it to earlier cars at no extra charge.
 
Sounds like we should be thankful that we still have a radiator shop in our small town (24,000) and 3 more in the next 2 closest towns (2 in Waynesboro and 1 in Harrisonburg).

Scott
 
I guess I really do live in old car paradise ... gotta be at least 4 or 5 "old time" radiator shops within a few miles of my house. They've had to branch out some, so they now do AC & fuel tanks as well, but the radiator business is still going.

Excellent point about the cardboard air deflector, Bruce. Piggott gives the change point as TS40104, which sounds right as TS39781LO didn't have one (or the holes for it) when it came to me. Of course the car before that, TS42xxx didn't have one either, but I never knew to look for the holes (so it might have had the holes and just lost the cardboard when it got wet and/or disintegrated from old age).

Another tip is that the factory widened the air holes in the 3A grille (by stamping it deeper) but some of the aftermarket grilles are made to the original factory spec instead of the revised spec. TeriAnn has a good writeup, with photos here https://www.tr3a.info/FAQ_grill.html

Neither of these are "magic bullets", but they do make a difference.

FWIW, I've always opted to have the original radiator recored, and been quite happy with the results. There are some choices you can make for the recore, depending on your goals.
One is to delete the crank hole, which adds about 10% cooling capacity (the hole blocks off the tubes entirely, so there's a whole 2" wide section that does almost nothing for cooling).
Another is to have the fill neck replaced with a modern 3/4" reach neck instead of the original 1" reach. That gives you a lot more choice of caps (I happen to like the Stant Lev-R-Vent series with the vent lever), but of course don't forget and force an original cap on!
I also had them reinforce the joint where the extension tank joins the upper tank (which frequently cracks in my experience), and later the upper hose fitting as well (more of a precautionary measure, as I switched to a heavy duty Gates hose and was worried about how much engine vibration it transmits to the radiator). (Sorry I forgot to take a photo of the fitting, but here's a shot of the extension tank)
 
When I bought my "pre-owned" 59 3A in 1962 it did not have the fibreboard radiator duct installed. I did occasionally have some high temp problems. I'm reminded of a summer cross country trip to California. Climbing the mountains out of the desert required a couple of stops to cool off... me and the car. Even though I generally didn't have much of a problem I elected to install the duct while I'm in the process of restoring it now.

Several folks on this forum gave excellent advice on how to fold and install the duct. It took a lot of manipulation to get the folds right so that it would slide in and fit the apron correctly. The key however is the vertical fold on each side of the radiator. It needs to be folded back toward the engine so that the tabs on the duct fit alongside the radiator. Once I did that, and had the bottom two folds adjusted so they fit the contour of the apron, the duct stayed aligned in place very nicely. You might be able to see it here...
 

Attachments

  • Radiator duct.jpg
    Radiator duct.jpg
    35.7 KB · Views: 108
...Several folks on this forum gave excellent advice on how to fold and install the duct. It took a lot of manipulation to get the folds right so that it would slide in and fit the apron correctly. ...

Can you direct me to any of these threads? Thanks,
 
Can you direct me to any of these threads? Thanks,

Bruce...

I was able to find a couple of the links that I had saved, but I don't see the suggestion about folding the vertical flaps. One of the links was to a different forum and it is no longer active. That may be the one with the specific instructions. I'll keep looking for it. In the meantime, here are a few...

https://www.britishcarforum.com/bcf/showthread.php?74380-TR3A-Radiator-Duct&highlight=radiator+duct

https://www.tr-register.co.uk/forums/index.php?/topic/41271-radiator-duct/

https://www.britishcarforum.com/bcf/showthread.php?91521-Air-Deflector-Installation-Help-Needed (you contributed to this one)

I'll see if I can find the other one.

Rick...
 
Though, for the record, I think the duct was generally painted body color.
I agree. The SPC even lists different part numbers for the different colors, though I don't think they've been available that way since the 60s.

But even if you don't go with body color (mine was black), a coat of paint will definitely help it last longer.
 

Ugh... thanks Rick.

Reminds me of how slow I am going. I tried to put the deflector in as per the pix from the other thread (in July), and eventually gave up, figuring it would be far easier to do after mounting the nose... and as correctly confirmed by George Hahn and Gordon Dedrick in the other thread. Now here it is October - at least now I do have the nose and fenders on the car, ready to be bolted up, so the deflector will be coming up very soon, so I'll take some install pictures as I go for those who come later.

As a side note, it just goes to show you how a restoration goes at times - I was totally ready to mount the nose in July - hence my idea to pre-mount the deflector.

The night before I was going to do it, I decided to tighten down the steering box cover one last quarter turn on the wrench to try to stop the ever so small weeping - and promptly exploded the bearing housing.... so out came the steering column and all the associated stuff that went with it - steering wheel, wires down the center etc etc. I ended up sending it to Mark Macy for rebuilding and preload set up. It was probably an 8 week setback all told. Oh well, take a deep breath and...perseverance...
 
Back
Top