Hey Guest!

 Hey - did you know if you click on the title of a thread it will take you to the first unread post since you last visited that thread?
 but were afraid to ask:
  STOP!! Never post your email address in open forums. Bots can "harvest" your email! If you must share your email use a Private Message or use the
  smilie in place of the real @
 Pretty Please - add it to our Events forum(s) and add to the calendar! >>
Gblake2613
Jedi Hopeful
Offline
Project up-date
First the "Rookie" lesson for the week. I was trying to remove the frozen drums off of my donor TR4 axle and learned a good lesson.
Beating the heck outa the drums once the set screws are removed will not work, EVER. Speaking of set screws, once you have determined that the screws are not going to screw out, very carefully drill them out. I will not be using my original hubs or axles, but it would have been nice not to have destroyed the right hub by drilling to far through the screw. You only need to drill about a 1/8" to cut the head off of the screw, in my hast at 2 am, I went a little further and wasted a lot of time and a hub.
A good way to remove a frozen drum is to unbolt the handbrake and hydraulic lines from the cylinder. Remove the 6 bolts that hold the bake plate and hub/axle assemble to the axle housing. Once this is done, the bake plate will be separated from the hub/axle/frozen brake drum assembly. Now you have access to the inside of the rusted out mess that use to be a functioning brake assembly. Mine was a total waste.
I wasted a lot of time trying to free that brake drum from the bake plate before I realized that removing the axle/hub/drum as one unit provides access to the inside of the drum. If you do this, make note of the different shims that are between the back plate and the axle housing, they will be different on the driver’s and passenger’s sides
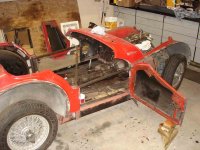
Now, as to the project update, I have attached a photo of my now partially attached PS inner sill. I gave up on trying to remove the carrier (see my other post if you know how) My TR time was cut short on Sunday prior to welding the A post. It still feels like progress though.
Greg
First the "Rookie" lesson for the week. I was trying to remove the frozen drums off of my donor TR4 axle and learned a good lesson.
Beating the heck outa the drums once the set screws are removed will not work, EVER. Speaking of set screws, once you have determined that the screws are not going to screw out, very carefully drill them out. I will not be using my original hubs or axles, but it would have been nice not to have destroyed the right hub by drilling to far through the screw. You only need to drill about a 1/8" to cut the head off of the screw, in my hast at 2 am, I went a little further and wasted a lot of time and a hub.
A good way to remove a frozen drum is to unbolt the handbrake and hydraulic lines from the cylinder. Remove the 6 bolts that hold the bake plate and hub/axle assemble to the axle housing. Once this is done, the bake plate will be separated from the hub/axle/frozen brake drum assembly. Now you have access to the inside of the rusted out mess that use to be a functioning brake assembly. Mine was a total waste.
I wasted a lot of time trying to free that brake drum from the bake plate before I realized that removing the axle/hub/drum as one unit provides access to the inside of the drum. If you do this, make note of the different shims that are between the back plate and the axle housing, they will be different on the driver’s and passenger’s sides
Now, as to the project update, I have attached a photo of my now partially attached PS inner sill. I gave up on trying to remove the carrier (see my other post if you know how) My TR time was cut short on Sunday prior to welding the A post. It still feels like progress though.
Greg