• Hi Guest!
    You can help ensure that British Car Forum (BCF) continues to provide a great place to engage in the British car hobby! If you find BCF a beneficial community, please consider supporting our efforts with a subscription.

    There are some perks with a member upgrade!
    **Upgrade Now**
    (PS: Subscribers don't see this gawd-aweful banner
Tips
Tips

Progress on the '65 Resto

BizJetGuy

Jedi Hopeful
Offline
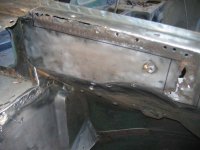
I spent most of the day working on a "rustectomy" around the R/H Wheel Arch area.

I knew I was in trouble (rust-wise) when I bought the project but when I removed the fender a few months ago and found a rusted out trumpet and no metal to weld a new one to, I almost threw in the towel. Since then, I've bought a welder, learned a few basics and started on the long journey to roadworthiness.

That being said, I used the speaker holes that a PO had kindly cut in the footwells as practice pieces before diving in on official rust repairs. Now that I've moved on from those, the next project is the wheel arch, or trumpet.

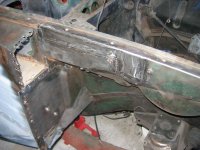
I spent most of the day removing the old trumpet, cutting out old, rusty metal and replacing with new metal so I now have something to weld the new arch to.

I'm trying my hand at attaching a "before" photo and then I'll attach an "after" photo.
 

Attachments

  • 271434-IMG_0233Resized.jpg
    271434-IMG_0233Resized.jpg
    62.6 KB · Views: 132
Mike!!! You are "Soooo ahead of the curve..."!!!!

Some sheet tin, a welder, an old LBC as a 'pattern'... some practice and sooner than ya can think about it you've got a fully restored LBC!!!

<envy icon>

Well done!
 
Man, wish I could do that, good deal.
 
me too, Jack... my "welds" look like hen poop.
 
BTDT, both sides on my B. Looks great. This job is a major PITA to do.

The forward curve is a real bear to get aligned on the inner fender. As supplied, the pressing is nowhere near the correct curvature. Tack it along the top of the fender channel and again where the "tab" sticks into the A-pillar compartment. Then bash the curve onto the inner fender with a body hammer at the top. Tack. Bash. Tack. Bash. All the way around. Drill a hole into the top of the trumpet and spray the inside with Waxoyl. Glue a plug in with seam sealer. You never want to do this again.

Make absolutely sure that the captive nuts for the fender line up on the chennel that you replaced. Don't ask why I know this is so important /ubbthreads/images/graemlins/blush.gif.

271456-DSC02852.JPG
 

Attachments

  • 271456-DSC02852.JPG
    271456-DSC02852.JPG
    73.8 KB · Views: 93
Scotty!! I especially like your liberal use of the term "BASH".... *Totally* appropriate under the circumstances.

Ordinarily it'd be termed: "Adjust to fit."

YEAH, sure!... /ubbthreads/images/graemlins/devilgrin.gif
 
I "adjusted" the front and rear panels of this B to comply with the rest of the body geometry.... "Port-A-Power" and "Persuasion" were key to the final result. /ubbthreads/images/graemlins/devilgrin.gif
 
[ QUOTE ]


Ordinarily it'd be termed: "Adjust to fit."

YEAH, sure!... /ubbthreads/images/graemlins/devilgrin.gif

[/ QUOTE ]

I think the actual factory instructions say: "offer up the replacement panel and gently persuade into proper alignment". Yeah. Right. /ubbthreads/images/graemlins/devilgrin.gif /ubbthreads/images/graemlins/devilgrin.gif

BFH works much better /ubbthreads/images/graemlins/jester.gif
 
You said it: "BASH"!

..Iff'n th' shoe don't fit.....

BASH it!!! /ubbthreads/images/graemlins/devilgrin.gif
 
Thanks for the encouragement, guys!

Scott - THANK YOU for the guidance on panel fitment. I have been looking at the car and then the panel about 15 times trying to figure out where to tack it and where to whack it!

My welds aren't the prettiest around but I got some encouragement last weekend when my brother-in-law came by to check out the progress. He gave me some great pointers on welding technique and assured me that the welder I bought was of excellent quality - only the guy behind the trigger to blame, now.

There are quite a few more photos on my blog as to the day's events, if you are interested.
 
[ QUOTE ]
only the guy behind the trigger to blame, now.

[/ QUOTE ]

My point entirely!!!
 
[ QUOTE ]
Make absolutely sure that the captive nuts for the fender line up on the chennel that you replaced. Don't ask why I know this is so important

[/ QUOTE ]

When I received my extension piece from Moss (the one that mounts on top of the trumpet) there is only one captive nut while the original has two. Did I just get a bum part or are the replacements just missing one?

BTW - I was surprised by this since the extension appears to be a Heritage part.
 
To quote W.C.Fields: "Trust everyone... but cut th' cards!"

Line all up with YOUR car, and fit accordingly. NOTHING you get today will be as it was in BMC's day. Hedge all bets.
 
[quote
When I received my extension piece from Moss (the one that mounts on top of the trumpet) there is only one captive nut while the original has two. Did I just get a bum part or are the replacements just missing one?

BTW - I was surprised by this since the extension appears to be a Heritage part.

[/ QUOTE ]

Dunno, the part I bought was the whole enchilada ~4ft long with 6 or 7 captive nuts. I welded it in about 1/8" off lengthwise and had to drill/retap the captive nuts. Doh!

Wish I'd known, I probably have the other 3 feet laying around inna garage. Could of had it gratis :smile:
 
GAH!! Mild steel sheet and some "NutZerts"!!!
 
[ QUOTE ]
GAH!! Mild steel sheet and some "NutZerts"!!!

[/ QUOTE ]

Tis easier to write a check /ubbthreads/images/graemlins/jester.gif
 
No challenge in THAT, mon!!! It's a ~SKILL TEST~!!!
 
Back
Top