• Hi Guest!
    You can help ensure that British Car Forum (BCF) continues to provide a great place to engage in the British car hobby! If you find BCF a beneficial community, please consider supporting our efforts with a subscription.

    There are some perks with a member upgrade!
    **Upgrade Now**
    (PS: Subscribers don't see this gawd-aweful banner
Tips
Tips

TR2/3/3A pressure relief understanding

sp53

Yoda
Country flag
Offline
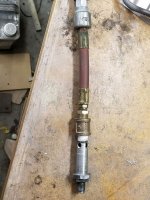
I took apart an old pressure relief valve to better understand them and take the mystery out because I really do not know how they work. It had an interesting lead washer to seal the adjusting spring assembly and a rubber washer to seal whole unit. There is also another plug with a spring and ball with a copper sealing washer on the large nut.

I am guessing but it looks like there is a check and balance of the oil pressure with the 2 ball and spring assemblies. The lead washer looks like something installed and set at the factory to relieve the oil pressure at a curtain time or pressure. The ball and spring without the adjusting screw does something, but I do not know.

I was trying to figure out the path for the oil and how the oil moves through the filter and into the oil gallery but could not understand the holes inside the unit. Perhaps the other smaller ball and spring open and the oil moves up the gallery with pressure after the filter. Curiosity killed the cat, but can give a small explanation----anyone understand these things?


Steve
 
Here ya go: > Engine Externals <

The pressure relief is just a ball and spring that closes off a hole. When the pressure on it gets high enough, it moves the ball, allowing oil through.

The lead washer is just a seal. I don't remember the details, but it you look at it a minute, you'll see that just a copper washer will not seal the adjuster. You need something that seals against the threads of the adjuster, too.
 
To add some more...You can replace the lead seal by wrapping solder around the adjuster when you put it back together. The ball and spring under the adjuster is the one that sets the maximum oil pressure. When you start the car, there is not enough volume to build full pressure, so that ball is solid against it's hole and allows all the flow to pass to the engine. Once the volume increases to the point of the adjusted setting (normally about 70psi, the ball moves back and allows oil to bypass the filter back to the sump. More volume and the ball moves back farther and allows more volume to bypass.

The second ball is only on the later heads. The early heads sent all the oil to the engine, and rather than going to the sump, the bypassed oil went through the filter. So the oil going to the bearings was unfiltered! On the later engines the head was changed so that all flow goes through the filter, except the bypassed oil.

That's what the second ball is for...if the filter got totally clogged, the engine would get no oil, so the second ball is there to open if the pressure across the filter is too great, and bypass the oil to the bearings.
 
Thanks for your responses guys. I did know about the early engines, and I could not understand why there where 2 balls. One thought I had was some kind of balancing deal with the balls. Now I understand better and feel more comfortable about the 2 ball and spring with the copper washer and no adjustment.

I am going leave the leaded washer and first ball assembly alone because of the sealing issues. Moreover, the inside of the pressure regulator had no obvious metal shavings inside, but the filter had some small chucks of the lifter inside. Plus the regulator seems to work fine. I will say the last time I ran the engine the oil pressure seemed lower, 48 or 50. I want to change the gauge because maybe some metal got inside the gauge. The oil gauges and the hard plumbed in metal line make for a real challenge changing gauges. I might have a flex hose for the oil gauge made out of some flexible braided metal line at a shop we have in town that builds hydraulic lines because my experience is the hard plumed line from the factory needs to be just right or the gauge seems to stick. But, I am a fuzzy about the original look—the drama.

This is the first time I have fixed an engine that I knew had metal in the oil pan. I am staying with it, but the cleanup and the uncertainty have me unsettled.

Thanks Steve
 
My oil pressure on a newly rebuilt engine as a bit low after it started to warm up. I took the PRV apart and found by using my compressor i could adjust the pressure. I had to add a small spacer to the spring and ground the ball seat to get a consistent 70lb pressure. At 70 the ball starts to lift allowing air to escape.
I now have 70 lb oil pressure at at start up and it stays up around 60 to 70 running and drops to 25 at idle.

David
 

Attachments

  • Pressure release valve 2 e setting.jpg
    Pressure release valve 2 e setting.jpg
    782.1 KB · Views: 164
Wow that is interesting David, did you leave the lead seal and setting alone on the Jam nut? If you did loosen the lead seal, did you use solider around the area to fix it?

Thanks Steve
 
Or hunt up a suitably sized copper washer as a replacement.

As an aside, we've found relief valve balls pitted and oblonged from rattling for hours, replaced them and used valve grinding compound to resurface the seat. Would do that only on rebuilding the engine, as grinding compound wouldn't be good circulating through an engine. Hard to keep it from happening with the engine in the car.
 
For that I don't think a washer would work, as it wouldn't seal the threads between the adjuster and lock nut.
 
I do not recall if I reused the lead washer or the solder trick. Need to check for leaks in that area.

After grinding the seat I put the assembly in the parts washer and blew it out to be sure it was clear of grinding dust.

David
 
Back
Top